Introduction to Ansible AWX
Ansible AWX is an Open Source version of Ansible Tower and licensed under Apache v2. It provides a good web user interface for Ansible tasks, If you are looking to give a try with ansible tower this one is the right choice.
To begin with, the Ansible AWX installation on Kubernetes, Make sure to have an up and running Kubernetes cluster. If you don’t have one, follow this guide to set up one in just 5 minutes.
ansible@awx1:~$ kubectl get nodes
NAME                        STATUS   ROLES    AGE     VERSION
awx1.linuxsysadmins.local   Ready    master   2d12h   v1.19.0
awx2.linuxsysadmins.local   Ready    <none>   2d12h   v1.19.0
awx3.linuxsysadmins.local   Ready    <none>   2d12h   v1.19.0
ansible@awx1:~$
We are using current latest version in our lab environment.
System Requirements
To run the AWX service, we need below minimum system requirements per Pod. However, we will remove this limitation in the upcoming step.
Minimum of 6GB of memory
At least 3 CPU cores
Minimum 20GB of disk space
Running Kubernetes Cluster setup
In our setup, we have enough resource to spin up the required Pod.
Resolve Dependencies
We need a few core dependencies to perform the Ansible installation, so let’s make sure we are using the python version greater than 3.6 and git version 1.8.4 and make.
$ sudo apt install make python3 git unzip wget curl net-tools

ansible@awx1:~$ /usr/bin/python3 --version
Python 3.8.2
ansible@awx1:~$

ansible@awx1:~$ git --version
git version 2.25.1
ansible@awx1:~$
Or run Ansible from your gateway / Ansible Management server.
$ ansible -b -m apt -a "name=make,python3,git,unzip,wget,curl,net-tools,software-properties-common,nfs-common state=present" awxMake sure to install this package on all the worker nodes.
$ sudo apt install nfs-commonUse Ansible to make our life easier.
$ ansible -b -m apt -a "name=nfs-common state=latest" awx
$ ansible -b -m service -a "name=nfs-client.target state=started" awx
Installing Ansible
The next step is to Install the Ansible on Kubernetes Master node. Make sure to use a version above 2.8.
$ sudo apt update
$ sudo apt install software-properties-common
$ sudo apt-add-repository --yes --update ppa:ansible/ansible
$ sudo apt install ansible
We are using with 2.9.6 version.
ansible@awx1:~$ ansible --version
ansible 2.9.6
  config file = /etc/ansible/ansible.cfg
  configured module search path = ['/home/ansible/.ansible/plugins/modules', '/usr/share/ansible/plugins/modules']
  ansible python module location = /usr/lib/python3/dist-packages/ansible
  executable location = /usr/bin/ansible
  python version = 3.8.2 (default, Jul 16 2020, 14:00:26) [GCC 9.3.0]
ansible@awx1:~$
Installing Helm
To easy the PostgreSQL installation, we will use Helm. Let’s start to install the helm so that it will manage to create the database pod.
$ curl -fsSL -o get_helm.sh https://raw.githubusercontent.com/helm/helm/master/scripts/get-helm-3
$ chmod 700 get_helm.sh
$ ./get_helm.sh
Create Separate Cluster Context for AWX
By default, we will have a Kubernetes context. For the standard procedure, and security reason let’s create a separate context, user and namespace for Ansible awx installation.
To switch between different clusters let’s define the custom context location under home directory of your user.
$ mkdir -p /home/ansible/.kube/custom-contexts/awx-config/
$ cd /home/ansible/.kube/custom-contexts/awx-config/
Creating Certificates
Using openssl manually generate a certificates for our user ansible.
Generate a key with 4096 bit.
$ openssl genrsa -out ansible.key 4096Generate the certificate signing request (CSR).
$ openssl req -new -newkey rsa:4096 -nodes -keyout ansible.key -out ansible.csr -subj "/CN=ansible/O=system:authenticated"Generate the server certificate / Sign the certificate with CA.
$ sudo openssl x509 -req -in ansible.csr -CA /etc/kubernetes/pki/ca.crt -CAkey /etc/kubernetes/pki/ca.key -CAcreateserial -out ansible.crt -days 365Verify the certificate.
$ openssl x509 -noout -text -in /home/ansible/.kube/custom-contexts/awx-config/ansible.crt Output for reference
ansible@awx1:~$ openssl x509  -noout -text -in /home/ansible/.kube/custom-contexts/awx-config/ansible.crt
Certificate:
    Data:
        Version: 1 (0x0)
        Serial Number:
            41:5f:e9:6e:b6:5f:3f:e2:1a:e5:8e:83:96:db:2c:99:5d:63:6b:01
        Signature Algorithm: sha256WithRSAEncryption
        Issuer: CN = kubernetes
        Validity
            Not Before: Sep 11 10:54:03 2020 GMT
            Not After : Sep 11 10:54:03 2021 GMT
        Subject: CN = ansible, O = system:authenticated
        Subject Public Key Info:
            Public Key Algorithm: rsaEncryption
                RSA Public-Key: (4096 bit)
                Modulus:
                    00:dc:8a:8e:f6:a5:64:ad:0e:e0:93:22:72:c0:1f:
                    fc:5f:46:66:d9:41:9f:0f:32:3b:df:39:1f:07:da:
                    75:26:67:2e:f8:6e:c7:7a:a4:4e:a0:8f:93:19:69:
                    a4:a6:53:90:78:f5:05:8e:40:84:85:73:bb:3d:55:
                    4f:db:1c:64:44:f0:ce:5f:df:c8:d5:47:e9:82:45:
                    94:ae:96:bd:9a:db:8e:6e:bc:39:6a:b8:47:86:65:
                    0d:e7:a1:82:c1:97:e5:be:90:2f:ab:65:2f:2f:7c:
                    7e:c1:a3:8c:ac:e1:b5:e5:aa:25:02:bc:31:74:03:
                    d9:c7:cd
                Exponent: 65537 (0x10001)
    Signature Algorithm: sha256WithRSAEncryption
         48:60:14:42:3b:d5:5f:f2:26:e9:b4:46:45:9f:00:a1:7b:7e:
         41:09:1e:3f:74:ac:96:69:ea:f5:3a:fe:16:99:c2:e3:53:57:
         a6:d7:47:1b:42:db:98:1f:5c:cd:2e:ef:0c:a1:b2:0d:17:66:
         14:56:ad:6b:22:24:07:c7:71:10:d4:92:82:38:d0:6c:7a:40:
         f3:67:97:12:92:55:3f:74:e1:2e:c7:85:5f:39:ec:b8:7a:09:
         7c:3b:34:4a:cf:66:3b:be:0a:d4:0f:54:00:00:97:1f:c9:b7:
         e5:d0:7d:2b:3b:20:95:c8:36:6e:f1:6a:1e:1a:2d:16:aa:e7:
         f5:28:03:fa
ansible@awx1:~$
Create Namespace for AWX
This will be taken care by the installer, however, to create the roles and role-binding we need to create the namespace before starting with the installer.
# kubectl create namespace awxTo verify run the command # kubectl get namespace
Create Custom Context Configuration
Create a config file by appending below cluster, context and user info.
$ cat > awx_cluster_config.yml

apiVersion: v1
kind: Config
preferences: {}

clusters:
- cluster:
  name: awxcls

contexts:
- context:
  name: awx-contx

users:
- name: ansible
Add context details to the configuration file.
KUBECONFIG=awx_cluster_config.yml kubectl config set-cluster awxcls --server=https://192.168.0.42:6443 --client-certificate=/home/ansible/.kube/custom-contexts/awx-config/ansible.crt --client-key=/home/ansible/.kube/custom-contexts/awx-config/ansible.key

KUBECONFIG=awx_cluster_config.yml kubectl config set-credentials ansible --client-certificate=/home/ansible/.kube/custom-contexts/awx-config/ansible.crt --client-key=/home/ansible/.kube/custom-contexts/awx-config/ansible.key

KUBECONFIG=awx_cluster_config.yml kubectl config set-context awx-contx --cluster awxcls --namespace=awx --user ansible
Now the custom config file will looks like below.
ansible@awx1: cat ~/.kube/custom-contexts/awx-config/awx_cluster_config.yml
apiVersion: v1
clusters:
- cluster:
    server: https://192.168.0.42:6443
  name: awxcls
contexts:
- context:
    cluster: awxcls
    namespace: awx
    user: ansible
  name: awx-contx
current-context: ""
kind: Config
preferences: {}
users:
- name: ansible
  user:
    client-certificate: ansible.crt
    client-key: ansible.key
We need to add and replace some of values in this files. It included, certificate-authority-data:, client-certificate: and client-key:
certificate-authority-data: –> This value can be get from exiting config $ sudo cat /etc/kubernetes/admin.conf file.
certificate-authority-data: LS0tLS1CRUdJTiBDRVJUSUZJQ0FURS0tLS0tCk1JSUM1ekNDQWMrZ0F3SUJBZ0lCQURBTkJna3Foa2lHOXcwQkFRc
---- Output Truncated ----
ansible@awx1:~$ cat ansible.crt | base64 | tr -d '\n'
LS0tLS1CRUdJTiBDRVJUSUZJQ0FURS0tLS0tCk1JSUR6VENDQXJVQ0ZCNWJOTmFmU1c4Um9RblpxQlVreGNDZ25sTy9NQTBHQ1NxR=
---- Output Truncated ----ansible@awx1:~/.certs_ansible$ cat ansible.key | base64 | tr -d '\n'
LS0tLS1CRUdJTiBQUklWQVRFIEtFWS0tLS0tCk1JSUpRd0lCQURBTkJna3Foa2lHOXcwQkFRRUZBQVNDQ1Mwd2dna3BBZ0VBQW9o=
---- Output Truncated ----Finally, the newly created config file should look likes below.
apiVersion: v1
clusters:
- cluster:
    certificate-authority-data: LS0tLS1CRUdJTiBDRVJUSUZJQ0FURS0tLS0tCk1JSUM1ekNDQWMrZ0F3SUJBZ0lCQURBTkJna3Foa2lHOXcwQkFRc
    server: https://192.168.0.42:6443
  name: awxcls
contexts:
- context:
    cluster: awxcls
    namespace: awx
    user: ansible
  name: awx-contx
current-context: ""
kind: Config
preferences: {}
users:
- name: ansible
  user:
    client-certificate-data: LS0tLS1CRUdJTiBDRVJUSUZJQ0FURS0tLS0tCk1JSUR6VENDQXJVQ0ZCNWJOTmFmU1c4Um9RblpxQlVreGNDZ25sTy9NQTBHQ1NxR=
    client-key-data: LS0tLS1CRUdJTiBQUklWQVRFIEtFWS0tLS0tCk1JSUpRd0lCQURBTkJna3Foa2lHOXcwQkFRRUZBQVNDQ1Mwd2dna3BBZ0VBQW9o=
Custom Context Env
Load all configuration in the KUBECONFIG environment variable, edit the bashrc and append the below shell script into it.
# vim ~/.bashrcThanks Nikolay Grozev for the below shell script.
# Set the default Kube context if present
DEFAULT_KUBE_CONTEXTS="$HOME/.kube/config"
if test -f "${DEFAULT_KUBE_CONTEXTS}"
then
  export KUBECONFIG="$DEFAULT_KUBE_CONTEXTS"
fi

# Additional contexts should be in ~/.kube/custom-contexts/
CUSTOM_KUBE_CONTEXTS="$HOME/.kube/custom-contexts"
mkdir -p "${CUSTOM_KUBE_CONTEXTS}"

OIFS="$IFS"
IFS=$'\n'
for contextFile in `find "${CUSTOM_KUBE_CONTEXTS}" -type f -name "*.yml"`
do
    export KUBECONFIG="$contextFile:$KUBECONFIG"
done
IFS="$OIFS"
Source it activate the multi context switching.
$ source ~/.bashrcCheck the available contexts.
$ kubectl config get-contextsansible@awx1:~$ kubectl config get-contexts
CURRENT NAME CLUSTER AUTHINFO NAMESPACE
awx-contx awxcls ansible awx
* kubernetes-admin@kubernetes kubernetes kubernetes-admin
ansible@awx1:~$ Creating Role
Let’s define a role under the awx namespace.
$ kubectl create role ansible-role --namespace=awx --verb=create --verb=get --verb=list --verb=update --verb=delete --resource=pods -o yaml --dry-run=client > role.yamlIf you need to update any resource, make sure to modify as shown below. However, avoid providing cluster scopes.
---
apiVersion: rbac.authorization.k8s.io/v1
kind: Role
metadata:
  name: ansible-role
  namespace: awx
rules:
- apiGroups:
  - ""
  - extensions
  - apps
  resources:
  - "*"
  verbs:
  - create
  - get
  - list
  - update
  - delete
  - patch
...
$ kubectl create -f role.yaml
$ kubectl describe role -n awx ansible-role
We have completed with creating the role on awx namespace.
ansible@awx1:~$ kubectl describe role -n awx ansible-role
Name:         ansible-role
Labels:       <none>
Annotations:  <none>
PolicyRule:
  Resources     Non-Resource URLs  Resource Names  Verbs
  ---------     -----------------  --------------  -----
  *             []                 []              [create get list update delete patch]
  *.apps        []                 []              [create get list update delete patch]
  *.extensions  []                 []              [create get list update delete patch]
ansible@awx1:~$
Create RoleBinding
After creating the role, bind the role with a role binding to specific user in your namespace.
$ kubectl create rolebinding ansible-rolebinding --role=ansible-role --user=ansible -n awx
$ kubectl describe rolebindings.rbac.authorization.k8s.io -n awx ansible-rolebinding
Output for your reference.
ansible@awx1:~$ kubectl create rolebinding ansible-rolebinding --role=ansible-role --user=ansible -n awx
rolebinding.rbac.authorization.k8s.io/ansible-rolebinding created
ansible@awx1:~$
ansible@awx1:~$
ansible@awx1:~$ kubectl describe rolebindings.rbac.authorization.k8s.io -n awx ansible-rolebinding
Name:         ansible-rolebinding
Labels:       <none>
Annotations:  <none>
Role:
  Kind:  Role
  Name:  ansible-role
Subjects:
  Kind  Name     Namespace
  ----  ----     ---------
  User  ansible
ansible@awx1:~$
Creating PersistentVolume
We are going to use the NFS as our storage solution, install the NFS client package and list the exported share from the NFS server. If you have installed as part of resolve dependencies, ignore. In case, If you are looking to set up an NFS server look at this How to Setup NFS Server on CentOS 8.
The share we are about to create in NFS server should have below NFS options, replace with your UID and GID and it should match on all the k8s nodes.
/k8sdata *(rw,all_squash,anonuid=1001,anongid=1001)List the exported NFS shares.
ansible@awx1:~$ showmount -e 192.168.0.55
Export list for 192.168.0.55:
/nfspub   *
/k8sdata  (everyone)
/nfslimit 192.168.0.[42-44]/24
/nfsshare (everyone)
ansible@awx1:~$
As part of AWX installer, the PersistentVolumeClaim will be created, However, it will be in a pending state if we don’t have a persistent Volume, So let’s create one.
$ cat > persistentVolume_k8sdata.yamlCreate a file and append the YAML content.
---
apiVersion: v1
kind: PersistentVolume
metadata:
  name: k8sdata
spec:
  capacity:
    storage: 10Gi
  volumeMode: Filesystem
  accessModes:
    - ReadWriteOnce
  persistentVolumeReclaimPolicy: Retain
  storageClassName: dbstorageclass
  mountOptions:
    - hard
    - nfsvers=4.2
  nfs:
    path: /k8sdata
    server: 192.168.0.55
...
Let’s create the PV
$ kubectl create -f persistentVolume_k8sdata.yamlRight after creating it, let’s verify.
ansible@awx1:~$ kubectl get persistentvolumes
NAME      CAPACITY   ACCESS MODES   RECLAIM POLICY   STATUS      CLAIM   STORAGECLASS     REASON   AGE
k8sdata   10Gi       RWO            Retain           Available           dbstorageclass            12s
ansible@awx1:~$
Creating PersistentVolumeClaim
Create a persistent volume claim for PostgreSQL database.
$ cat > postgrespvc.yaml
---
apiVersion: v1
kind: PersistentVolumeClaim
metadata:
  name: postgrespvc
  namespace: awx
spec:
  storageClassName: dbstorageclass
  accessModes:
    - ReadWriteOnce
  resources:
    requests:
      storage: 5Gi
...
We are good to move forward.
ansible@awx1:~$ kubectl get pvc
NAME          STATUS   VOLUME    CAPACITY   ACCESS MODES   STORAGECLASS     AGE
postgrespvc   Bound    k8sdata   10Gi       RWO            dbstorageclass   5s
ansible@awx1:~$
Switching to AWX Context
Now switch to the awx context.
$ kubectl config get-contexts
$ kubectl config use-context awx-contx
$ kubectl config current-context
ansible@awx1:~$ kubectl config use-context awx-contx
Switched to context "awx-contx".
ansible@awx1:~$
ansible@awx1:~$ kubectl config current-context
awx-contx
ansible@awx1:~$
ansible@awx1:~$ kubectl get pods
No resources found in awx namespace.
ansible@awx1:~$We are good with listing pods, but none of pods or deployments are created yet. Try to create a deployment by following this guide.
Let’s try to list the nodes. Here, we are getting forbidden error, because we have not created cluster level roles or bindings.
ansible@awx1:~$ kubectl get nodes
Error from server (Forbidden): nodes is forbidden: User "ansible" cannot list resource "nodes" in API group "" at the cluster scope
ansible@awx1:~$
Let’s start with Installing AWX.
Downloading AWX
Right after installing ansible and helm, start with downloading AWX from the release page.
https://github.com/ansible/awx/releasesI’m going with the current latest version 14.1.0.
$ wget https://github.com/ansible/awx/archive/14.1.0.zip
$ unzip 14.1.0.zip
$ cd awx-14.1.0/
Edit the inventory file and make the below changes.
$ vim installer/inventoryWe are installing on a Kubernetes cluster, so comment out the remaining section which part of OpenShift and Docker.
localhost ansible_connection=local ansible_python_interpreter="/usr/bin/env python3"

[all:vars]

dockerhub_base=ansible

# Kubernetes Install
kubernetes_context=awx-contx
kubernetes_namespace=awx
kubernetes_web_svc_type=NodePort
#Optional Kubernetes Variables
pg_image_registry=docker.io
pg_serviceaccount=awx
pg_volume_capacity=5
pg_persistence_storageClass=dbstorageclass
pg_persistence_existingclaim=postgrespvc
pg_cpu_limit=1000
pg_mem_limit=2

postgres_data_dir="~/.awx/pgdocker"

pg_username=awx
pg_password=awxpass
pg_database=awx
pg_port=5432

admin_user=admin
admin_password=password

create_preload_data=True
secret_key=awxsecret
If you need to use your own defined credentials replace the admin and password.
More Tweaks
We still need additional changes. In case, if you have very minimum resource in your test lab, make the below changes.
Edit the role yaml to add/remove parameters.
$ vim installer/roles/kubernetes/defaults/main.ymlAWX is resource hungry and they are with the below default value.
web_mem_request: 1
web_cpu_request: 500
task_mem_request: 2
task_cpu_request: 1500
redis_mem_request: 2
redis_cpu_request: 500
Change them to 0 for all the containers or assign with less value than the default.
web_mem_request: 0
web_cpu_request: 0
task_mem_request: 0
task_cpu_request: 0
redis_mem_request: 0
redis_cpu_request: 0
Moreover, the reason behind making a higher wait value is because my pods are not yet ready whenever it about to start with migrating the database, this causes the Ansible to fail remaining tasks.
Change from 60 seconds to 90 seconds.
postgress_activate_wait: 90We have additionally added this parameter.
postgress_migrate_wait: 90Added an additional task to wait for 90 seconds before starting with migrating the database.
$ vim installer/roles/kubernetes/tasks/main.yml- name: Wait for management pod to start
shell: |
{{ kubectl_or_oc }} -n {{ kubernetes_namespace }} \
get pod ansible-tower-management -o jsonpath="{.status.phase}"
register: result
until: result.stdout == "Running"
retries: 60
delay: 10
- name: Wait for two minutes before starting with migrate database
pause:
seconds: "{{ postgress_migrate_wait }}"
when: openshift_pg_activate.changed or kubernetes_pg_activate.changed
That’s all the required changes as of now.
Running the installer playbook
start to run the ansible playbook as shown below.
$ ansible-playbook -i installer/inventory installer/install.ymlIf everything goes well, we should get the below result.
PLAY RECAP ********************************************************************************************************
localhost                  : ok=37   changed=20   unreachable=0    failed=0    skipped=72   rescued=0    ignored=3

ansible@awx1:~/awx-14.1.0$
Finally, these are the pods, deployments and services will be up and running.
ansible@awx1:~$ kubectl get pods
NAME                          READY   STATUS    RESTARTS   AGE
awx-8479679749-v5ssh          3/3     Running   0          7m24s
awx-postgresql-postgresql-0   1/1     Running   0          6m42s
ansible@awx1:~$

ansible@awx1:~$
ansible@awx1:~$ kubectl get deployments.apps
NAME   READY   UP-TO-DATE   AVAILABLE   AGE
awx    1/1     1            1           7m28s
ansible@awx1:~$

ansible@awx1:~$ kubectl get svc
NAME                      TYPE        CLUSTER-IP       EXTERNAL-IP   PORT(S)        AGE
awx-postgresql            ClusterIP   10.104.114.252   <none>        5432/TCP       12m
awx-postgresql-headless   ClusterIP   None             <none>        5432/TCP       12m
awx-web-svc               NodePort    10.97.1.249      <none>        80:30352/TCP   10m
ansible@awx1:~$
Now, it’s time to access the web interface.
Accessing the AWX User Interface
Launch anyone of web browser and navigate to any one of Kubernetes nodes IP with the NodePort from the above output. Instead of accessing with node IP: Port we can set up an Ingress, Will update the post with Ingress later.
http://192.168.0.43:30352/#/login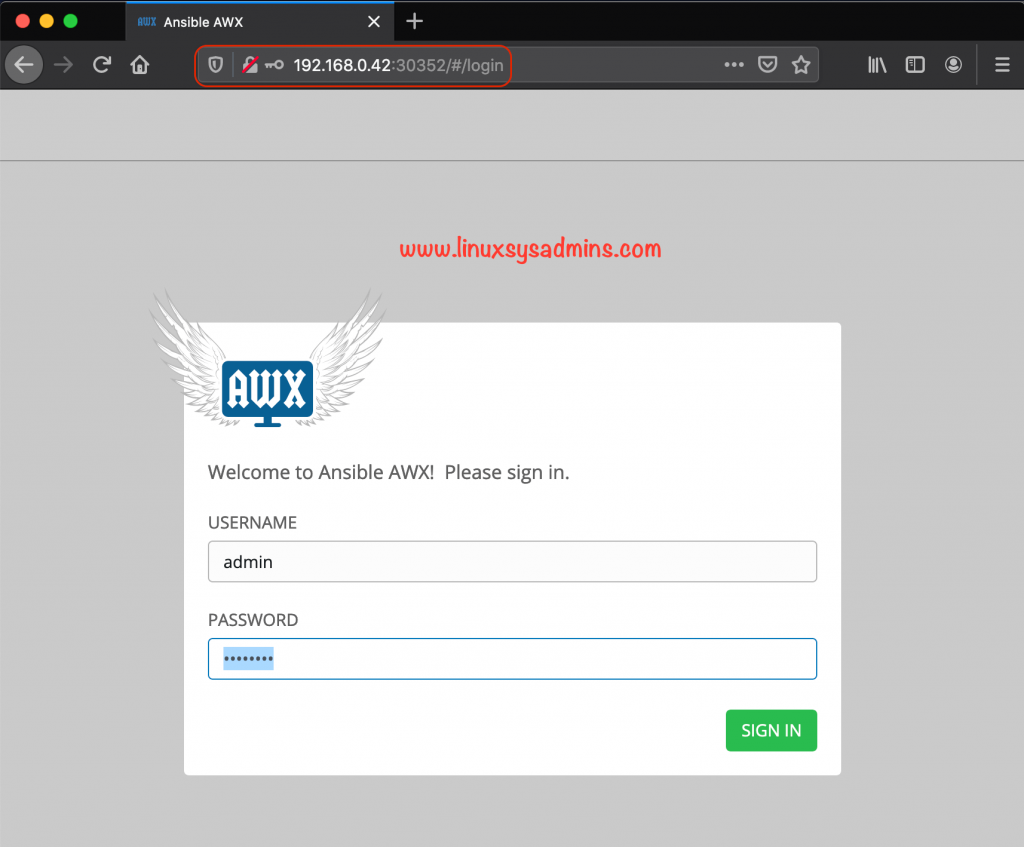
We have used the default credentials defined in the inventory file, Use the same to login the AWX.
admin_user=admin
admin_password=password
Right after login screen we will get the dashboard.
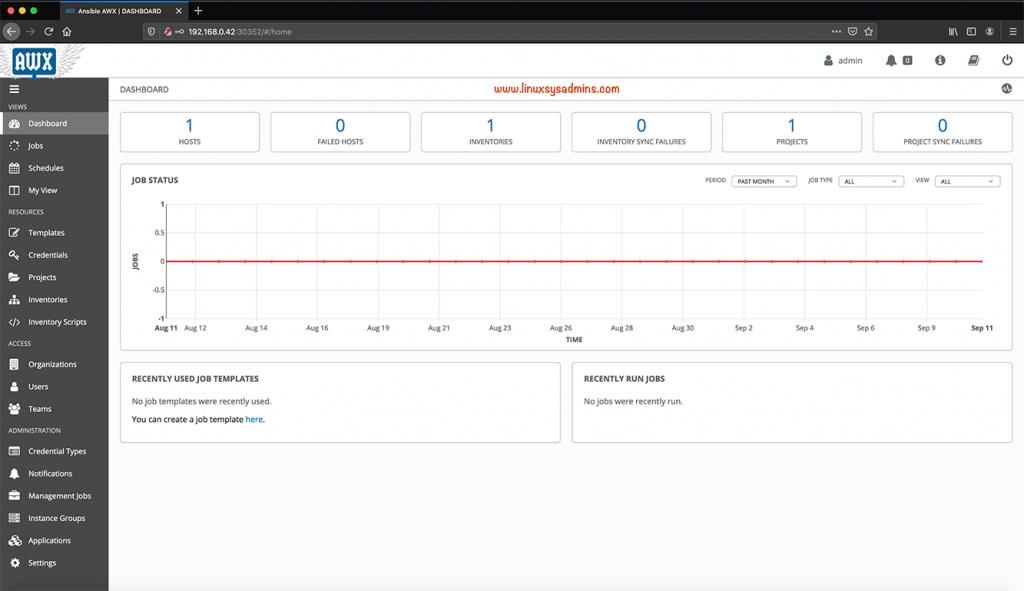
Few more topics will be covered in upcoming how-to guide.
Troubleshooting and fixes
Hence I’m using a custom context, we need to define all the required roles and role binding for Ansible user. At the final stage of task in the play, hit with the below error.
TASK [kubernetes : Scale up deployment] **************************************************************************************************
fatal: [localhost]: FAILED! => {"changed": true, "cmd": "kubectl -n awx  scale deployment awx --replicas=1\n", "delta": "0:00:00.069851", "end": "2020-09-11 18:55:40.835967", "msg": "non-zero return code", "rc": 1, "start": "2020-09-11 18:55:40.766116", "stderr": "Error from server (Forbidden): deployments.apps \"awx\" is forbidden: User \"ansible\" cannot patch resource \"deployments/scale\" in API group \"apps\" in the namespace \"awx\"", "stderr_lines": ["Error from server (Forbidden): deployments.apps \"awx\" is forbidden: User \"ansible\" cannot patch resource \"deployments/scale\" in API group \"apps\" in the namespace \"awx\""], "stdout": "", "stdout_lines": []}
We will get the same error when we try to scale the deployment manually.
ansible@awx1:~$ kubectl scale deployment --replicas=2 awx
Error from server (Forbidden): deployments.apps "awx" is forbidden: User "ansible" cannot patch resource "deployments/scale" in API group "apps" in the namespace "awx"
The cause of this, I have failed to add “patch” in the verbs of the role. Once modified the .yaml and applied using $ kubectl apply -f role.yaml it works.
That’s it, we have completed with the AWX setup. Will carry out remaining AWX guides in upcoming posts.
Conclusion
The complex Ansible AWX installation on Kubernetes can be configured using an Ansible playbook, This saves our time by completing the whole setup process in less than 5 minutes. Let’s see more how-to guide on AWX in future articles. To receive the updates subscribe to our newsletter and stay with us.
tried many times – followed all steps but was unable to setup custom context
I always get -> The connection to the server localhost:8080 was refused – did you specify the right host or port?
What I’m doing wrong!
I appreciate the article, its far more advanced that others I’ve been… but be honest, it takes 15-20 minutes to read it, installation will be 10x that 😛
how to install awx 19.2.2 on kubernetes?
Have you given a try with the same steps to get install 19.2.2? Will give a try.
In the section “Creating PersistentVolumeClaim” you don’t actually apply the claim in the awx namespace.
@Will,
Have you verified the PVC after completing the installation?
Thanks & Regards,
Babin Lonston
Hello @Babin, thanks a lot for the wonderful tutorial. Could you please help me with my query ? We are running ansible on Linux 18.04 machine and AWX on kubernetes which is on the same machine. I can run ansible directly from the machine, and also run AWX within kubernetes and access it on web gui. My question is, how do I get AWX connected to Ansible here? Where in AWX should I make the configurations about ansible so that it works with ansible? I thanks you in advance.
Regards,
Yogesh Saini
Thanks for this tutorial, do some tries with K8s and skipped ns and pvc stuff ( because only testing purpose) but facing this “postgres_data_dir is defined and postgres_data_dir != ””
Dont understand because:
cat inventory |grep postgres_data_dir
postgres_data_dir=”~/.awx/pgdocker”
Forgot to mention the version is 17.0.1
But after a restart it gaves again error.
It seems redis related
redis.exceptions.ResponseError: MISCONF Redis is configured to save RDB snapshots, but it is currently not able to persist on disk. Commands that may modify the data set are disabled, because this instance is configured to report errors during writes if RDB snapshotting fails (stop-writes-on-bgsave-error option). Please check the Redis logs for details about the RDB error.
Your redis error is probably related to permissions. the awx project has a psp, or pod security policy that will allow the redis container to start as root which will get rid of the error you’re seeing. go into the installer/roles/kubernetes/defaults/main.yaml and copy three variables out. there’s a psp create one that you’ll set to true, a psp name and another one, privileged related. copy those to your inventory file and set them. then rerun the setup. once redis starts correctly those rdb errors will be gone and the task container should be error free as well
First of all thanks for the tutorial.
I’ve encountered an error while writing on the nfs share with permission denied.
I fixed it adding rsync and root_squash to /etc/export for k8sdata
Hope it helps
Hi,
I am trying to configure awx in kubernetes, but while executing the playbook i am getting this error.
TASK [kubernetes : Record deployment size] **********************************************************************************************
fatal: [localhost]: FAILED! => {“changed”: true, “cmd”: “kubectl get deployment awx -n awx -o=jsonpath='{.status.replicas}’\n”, “delta”: “0:00:00.083016”,
“end”: “2020-11-22 14:19:01.374716”, “msg”: “non-zero return code”, “rc”: 1, “start”: “2020-11-22 14:19:01.291700”,
“stderr”: “Error from server (NotFound): deployments.apps \”awx\” not found”, “stderr_lines”: [“Error from server (NotFound): deployments.apps \”awx\” not found”], “stdout”: “”, “stdout_lines”: []}
…ignoring
TASK [kubernetes : Get Postgres Service Detail] *****************************************************************************************
fatal: [localhost]: FAILED! => {“changed”: true, “cmd”: “kubectl describe svc awx-postgresql -n awx”, “delta”: “0:00:00.094680”, “end”: “2020-11-22 14:19:02.187916”,
“msg”: “non-zero return code”, “rc”: 1, “start”: “2020-11-22 14:19:02.093236”, “stderr”: “Error from server (NotFound): services \”awx-postgresql\” not found”, “stderr_lines”: [“Error from server (NotFound): services \”awx-postgresql\” not found”], “stdout”: “”, “stdout_lines”: []}
…ignoring
If you can help will be appreciate.
Have you followed the “More Tweaks”? Do you have enough resource?
To understand more please provide the start to end output.
Hi!
I have a question. Somewhere on the road you installed helm for PostgreSQL, but i quite don’t get why. I am new to k8s and all that stuff, but as far as I can see, you didn’t use anything in particular with helm. Am I wrong? If yes, could you please explain?
Thanks!
@Steven,
PostgreSQL configuration will be handled by helm.
If you want the AWX installer to manage creating the database pod (rather than installing and configuring postgres on your own). Then you will need to have a working helm installation.
Great guide, but I wish I could use the delfault context, what precautions should I take?
@Simone, Skip below headings, you will be good with the remaining steps to use the default context.
Create Separate Cluster Context for AWX
Create Custom Context Configuration
Custom Context Env
Switching to AWX Context
Thanks & Regards,
Babin Lonston