Introduction
collectd collects the system and application performance metrics. It has hundreds of Plugins. The latest stable release of Collectd 5.9.2 released on 1st of October 2019 and licenced under MIT License & GNU General Public.
We are going to install collected monitoring on Ubuntu 20.04 LTS. The below steps work well with Ubuntu 16.04 LTS and Ubuntu 18.04 LTS as well. If you looking to install collectd on CentOS 7 or 8 the required steps are included as well.
By default, Ubuntu repository provides collectd packages. However, to install the same on CentOS required to enable with EPEL repository. Let’s enable the repo.
Install the EPEL repo by running yum command.
# yum install https://dl.fedoraproject.org/pub/epel/epel-release-latest-8.noarch.rpmInstalling Packages
To begin with, the installation installs the required dependencies with collectd package. This included few of dependencies support for Perl as well.
# apt install collectd python build-essential librrds-perl libjson-perl libhtml-parser-perl apache2 emboss bioperl ncbi-blast+ gzip libjson-perl libtext-csv-perl libfile-slurp-perl liblwp-protocol-https-perl libwww-perl git libconfig-general-perl libregexp-common-perlInstalling on CentOS 7/8
# yum install collectd
# yum install rrdtool rrdtool-perl perl-HTML-Parser perl-JSON
If you are looking for quick up and running solution use docker to pull the images from
https://hub.docker.com/r/puckel/docker-collectdThis won’t take more than 5 minutes.
Enable the Web module
Enable the Apache modules.
# a2enmod cgi cgidroot@collectd:~# a2enmod cgi cgid
Your MPM seems to be threaded. Selecting cgid instead of cgi.
Enabling module cgid.
Module cgid already enabled
To activate the new configuration, you need to run:
systemctl restart apache2
root@collectd:~#Installing Perl Modules
This two Perl module installation will take a bit of time. Don’t interrupt the process once it started.
# cpan jSON
# cpan CGI
Enable CGI support for collectd
Edit the default web configuration and append with CGI support.
# vim /etc/apache2/sites-available/000-default.conf<Directory /var/www/html/collectd-web/cgi-bin>
Options Indexes ExecCGI
AllowOverride All
AddHandler cgi-script .cgi
Require all granted
</Directory>Apache configuration
Edit the default apache configuration and enable the port.
# vim /etc/apache2/apache2.confBy default it will be enabled, look at the line number 150.
Include ports.confLet’s enable collectd to listen on all interface, edit the configuration
# vim /etc/apache2/ports.confKeep the existing config and append with below.
Listen 0.0.0.0:80To make the changes restart the Apache service.
# systemctl restart apache2Configuring Collectd
To make few changes on collectd.conf edit the configuration and made the changes.
# vim /etc/collectd/collectd.confUncomment plugin for network
LoadPlugin networkBy following under network plugin section, uncomment the server section and replace 127.0.0.1 to 0.0.0.0.
<Plugin network>
        # server setup:
        Listen "0.0.0.0" "25826"
</Plugin>
Look for plugin and uncomment the plugins needed.
Enable Web Interface
During the package installation, we have completed with installing git as well. Clone the git repo to start with configuring the web.
# git clone https://github.com/httpdss/collectd-web.gitNavigate to the cloned repo under
# cd collectd-web/cgi-bin/Enable the execution permission on graphdefs.cgi.
# chmod +x graphdefs.cgiOnce done, navigate one step backwards to the main directory under the downloaded repo, and edit the python script.
# cd ..
# vim runserver.py
Replace 127.0.0.1 to 0.0.0.0 in below line.
httpd = BaseHTTPServer.HTTPServer(("127.0.0.1", PORT), Handler)After changing, it should be look like below
httpd = BaseHTTPServer.HTTPServer(("0.0.0.0", PORT), Handler)It’s time to run the python script to start in background.
./runserver.py &Incase, if you required to stop the service kill the service using
# killall pythonAccessing Web UI of Collectd
Once we start the collectd web python script we are ready to access the web interface.
http://192.168.0.31:8888/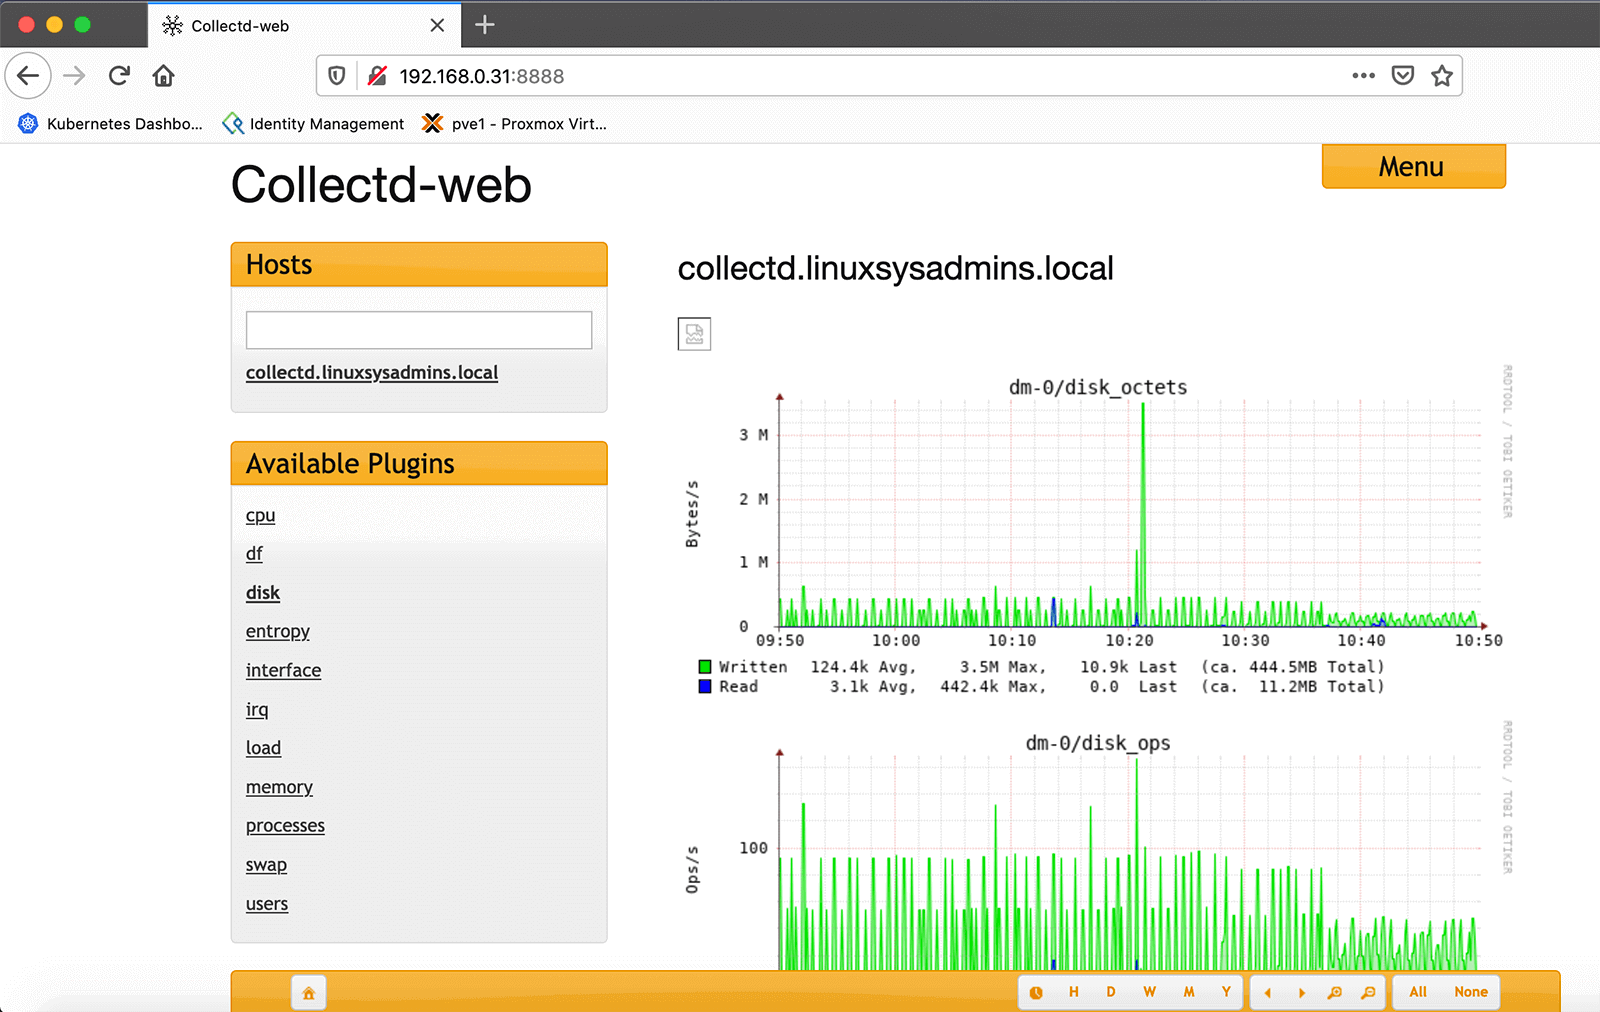
Let’s start to add one more client machine.
Client Setup
Let’s add a Ubuntu Client to collectd server. Install the dependencies and required packages for the client.
# apt install collectd python build-essential librrds-perl libjson-perl libhtml-parser-perl apache2Installing client packages on CentOS 7/8
# yum install collectd rrdtool rrdtool-perl perl-HTML-Parser perl-JSON -y[root@prod-srv-02 ~]# yum install collectd rrdtool rrdtool-perl perl-HTML-Parser perl-JSON -y
Last metadata expiration check: 0:41:12 ago on Sat 23 May 2020 06:16:03 PM +04.
Package collectd-5.9.0-5.el8.x86_64 is already installed.
Package rrdtool-1.7.0-16.el8.x86_64 is already installed.
Package rrdtool-perl-1.7.0-16.el8.x86_64 is already installed.
Package perl-HTML-Parser-3.72-14.el8.x86_64 is already installed.
Package perl-JSON-2.97.001-2.el8.noarch is already installed.
Dependencies resolved.
Nothing to do.
Complete!
[root@prod-srv-02 ~]#Modifying Configuration
Edit the configuration of collectd on client system.
# vim /etc/collectd.confBelow are the changes required in client side.
Hostname    "prod-srv-02.linuxsysadmins.local"
FQDNLookup   true
LoadPlugin syslog

<Plugin syslog>
        LogLevel info
</Plugin>
Enable the required plugins by removing “#”.
LoadPlugin cpu
LoadPlugin interface
LoadPlugin load
LoadPlugin memory
LoadPlugin network
Enter the collectd server IP under network plugin and enable all other required plugins.
<Plugin network>
        # client setup:
        Server "192.168.0.31" "25826"
        <Server "192.168.0.31" "25826">
        </Server>
</Plugin>

<Plugin load>
        ReportRelative true
</Plugin>

<Plugin memory>
        ValuesAbsolute true
        ValuesPercentage false
</Plugin>
Starting the Client Service
Finally, enable and start the service.
# systemctl start collectd
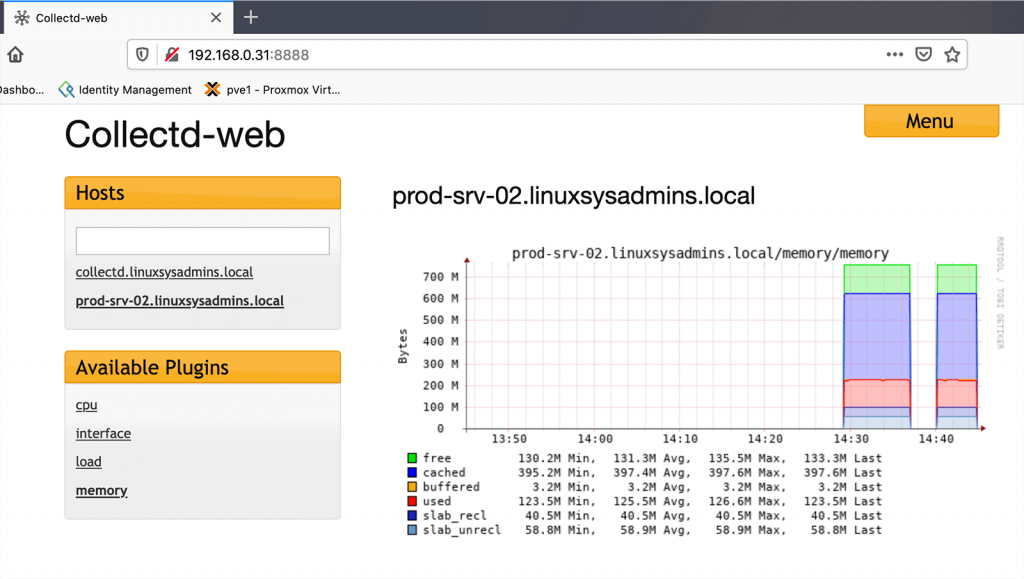
# systemctl enable collectdOnce service started on client system, switch back to collectd server and reload the interface. Now we should get the newly added client in the list.
That’s it, we have successfully installed and configure collectd monitoring server on Ubuntu and CentOS servers.
Conclusion
To up and run with an OpenSource monitoring tool we can use collectd which collects the system and application performance metrics from remote serves and start to monitor from a centralized monitoring server. Subscribe to the newsletter for more monitoring guides.