Introduction
In our Logical volume management series, In our first logical volume setup, we have gone through setting up a linear logical volume. Now we are about to start with how to set up Striped Logical Volumes.
The linear logical volume will write the data to a single physical volume, Once the first disk’s physical extents are used it will start to write under the next disks this follows for all the disks one after another. Writing to a single physical volume constantly will not give good I/O performance.
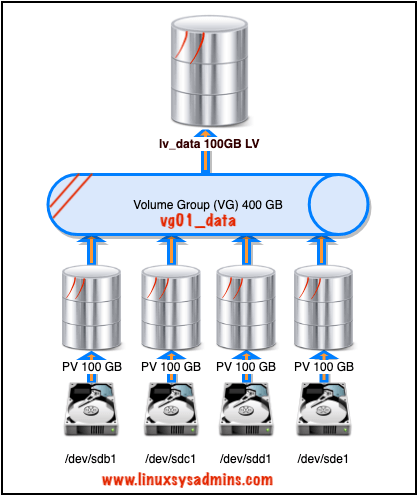
The Striped logical volume will write the data equally across all the available physical volumes. We have four numbers of physical volumes. While writing data to a striped logical volume it will stripe the data across all the four disks which give more read and write (I/O) performance.
How it Works
Assume we are trying to write a 32 MB file. The first 4 MB (1 Extend) will write under the first disk /dev/sdb1 then the second 4 MB will be under 2nd disk /dev/sdc1, 3rd 4 MB on third disk /dev/sdd1 and fourth will be under 4th disk /dev/sde1, again the 5th one will start from 1st disk /dev/sdb1 this process will continue in a round-robin fashion again and again. So our striped LV holding disks are constantly getting read and write and provide more performance in I/O perspective. Moreover, the default minimum size of a single write can be started from 64k. In our setup, we are going to use 128k.
What is the use of Striped Logical volume?
- The Striped LV can be created to get more I/O performance by writing data equally across multiple disks.
- For a critical server receives a huge number of reading and write.
Important Info
- The minimum number of disks allowed in stripe is 2.
- If you need to extend the striped logical volume we can’t extend only by adding 1 PV, It’s only possible to extend a striped logical volume by adding all numbers of the striped count. In our case, our stripe count is 4 (disks). So extending is only possible by adding 4 numbers of 100G disks this is one of the drawbacks in the striped logical volume.
Logical Volume Management Series
- Create Logical volume management LVM file-system in Linux
- Extend and Reduce LVM Logical Volume Management in Linux
- Shrink a Volume Group in Logical Volume Management (LVM)
- Creating Striped Logical Volumes in LVM
- Migrate from single-partition boot device to LVM in CentOS7
- Creating a Logical volume-based file system using Ansible
List and verify the Current Setup
Before starting with our setup let’s list out all the present block devices, physical volume, volume group and logical volumes.
[root@client1 ~]# pvs
   PV         VG     Fmt  Attr PSize   PFree
   /dev/sda2  centos lvm2 a--  <19.00g    0
 [root@client1 ~]#
 [root@client1 ~]# vgs
   VG     #PV #LV #SN Attr   VSize   VFree
   centos   1   2   0 wz--n- <19.00g    0
 [root@client1 ~]#
 [root@client1 ~]# lvs
   LV   VG     Attr       LSize   Pool Origin Data%  Meta%  Move Log Cpy%Sync Convert
   root centos -wi-ao---- <17.00g
   swap centos -wi-ao----   2.00g
[root@client1 ~]#
Knowing much information about the current setup is important before preparing a new setup.
[root@client1 ~]# lsblk
  NAME            MAJ:MIN   RM  SIZE RO TYPE MOUNTPOINT
  sda                8:0     0   20G  0 disk
   |-sda1            8:1     0    1G  0 part  /boot
   |-sda2            8:2     0   19G  0 part
   |-centos-root     253:0   0   17G  0 lvm   /
   |-centos-swap     253:1   0    2G  0 lvm   [SWAP]
  sdb                8:16    0  100G  0 disk
   |-sdb1            8:17    0  100G  0 part
   sdc               8:32    0  100G  0 disk
   |-sdc1            8:33    0  100G  0 part
   sdd               8:48    0  100G  0 disk
   |-sdd1            8:49    0  100G  0 part
   sde               8:64    0  100G  0 disk
   |-sde1            8:65    0  100G  0 part
    sr0              11:0    1  906M  0 rom
[root@client1 ~]#
We have 4 numbers of disks in the above output.
Creating a Physical Volume
Start by creating the required physical volumes. As we said before, we have four numbers of 100 GB disks. Prepare the disk’s partition before starting with creating PV.
Using four disks create the Physical volume. Creating PV can be done in several ways by pointing to each disk are using a range of disks and their partition.
# pvcreate -v /dev/sd[b-e]1
# pvcreate -v /dev/sdb1 /dev/sdc1 /dev/sdd1 /dev/sde1
Use “-v” to print more information while creating the PV.
[root@client1 ~]# pvcreate -v /dev/sd[b-e]1
     Wiping signatures on new PV /dev/sdb1.
     Wiping signatures on new PV /dev/sdc1.
     Wiping signatures on new PV /dev/sdd1.
     Wiping signatures on new PV /dev/sde1.
     Set up physical volume for "/dev/sdb1" with 209713152 available sectors.
     Zeroing start of device /dev/sdb1.
     Writing physical volume data to disk "/dev/sdb1".
   Physical volume "/dev/sdb1" successfully created.
     Set up physical volume for "/dev/sdc1" with 209713152 available sectors.
     Zeroing start of device /dev/sdc1.
     Writing physical volume data to disk "/dev/sdc1".
   Physical volume "/dev/sdc1" successfully created.
     Set up physical volume for "/dev/sdd1" with 209713152 available sectors.
     Zeroing start of device /dev/sdd1.
     Writing physical volume data to disk "/dev/sdd1".
   Physical volume "/dev/sdd1" successfully created.
     Set up physical volume for "/dev/sde1" with 209713152 available sectors.
     Zeroing start of device /dev/sde1.
     Writing physical volume data to disk "/dev/sde1".
   Physical volume "/dev/sde1" successfully created.
[root@client1 ~]#
List the created Physical volumes.
[root@client1 ~]# pvs
   PV         VG     Fmt  Attr PSize    PFree
   /dev/sda2  centos lvm2 a--   <19.00g       0
   /dev/sdb1         lvm2 ---  <100.00g <100.00g
   /dev/sdc1         lvm2 ---  <100.00g <100.00g
   /dev/sdd1         lvm2 ---  <100.00g <100.00g
   /dev/sde1         lvm2 ---  <100.00g <100.00g
[root@client1 ~]#
Creating a Volume Group
Using created PV’s let’s create the volume group. As we have seen above step the same way we can follow for VG as well.
[root@client1 ~]# vgcreate -v vg01_data /dev/sd[b-e]1
     Wiping signatures on new PV /dev/sdb1.
     Wiping signatures on new PV /dev/sdc1.
     Wiping signatures on new PV /dev/sdd1.
     Wiping signatures on new PV /dev/sde1.
     Adding physical volume '/dev/sdb1' to volume group 'vg01_data'
     Adding physical volume '/dev/sdc1' to volume group 'vg01_data'
     Adding physical volume '/dev/sdd1' to volume group 'vg01_data'
     Adding physical volume '/dev/sde1' to volume group 'vg01_data'
     Archiving volume group "vg01_data" metadata (seqno 0).
     Creating volume group backup "/etc/lvm/backup/vg01_data" (seqno 1).
   Volume group "vg01_data" successfully created
[root@client1 ~]#
Run the command with the “-v” option to get verbose information.
[root@client1 ~]# vgs
   VG        #PV #LV #SN Attr   VSize   VFree
   centos      1   2   0 wz--n- <19.00g      0
   vg01_data   4   0   0 wz--n- 399.98g 399.98g
[root@client1 ~]#
After creating the Volume group display the VG to know more detailed information about the VG.
# vgdisplay -v vg01_data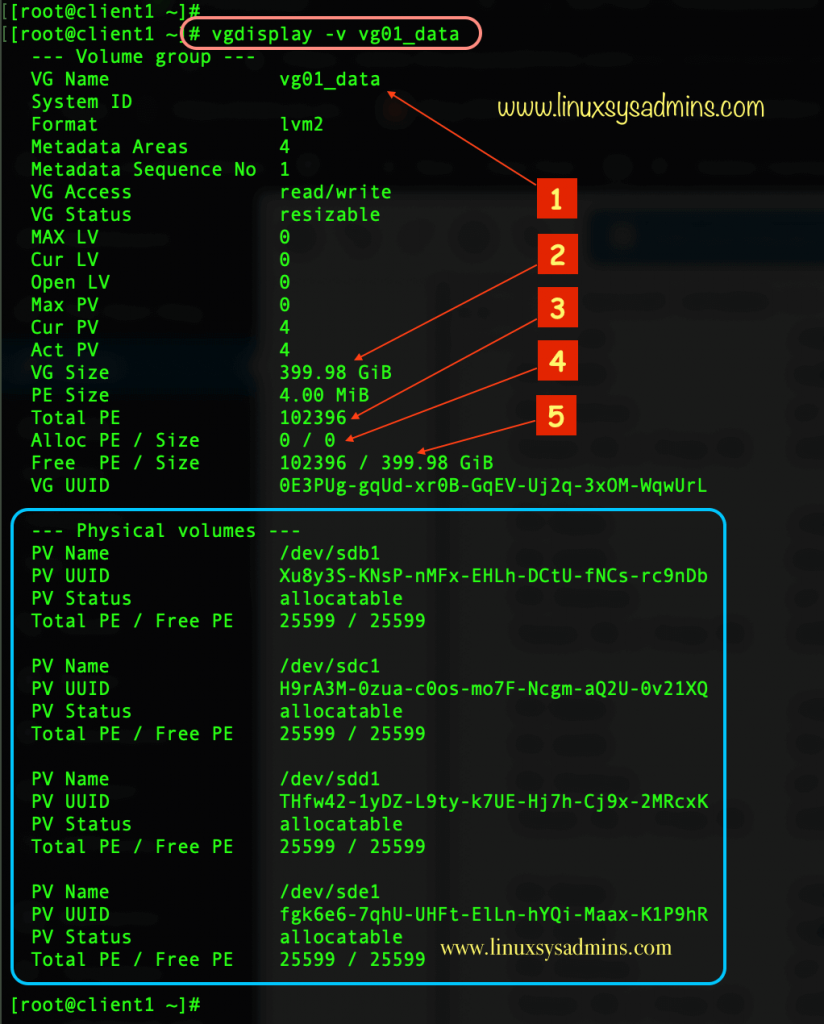
- Volume Group name
- The total size of Volume group
- Available physical extents (PE) in this VG.
- Allocated physical extents (PE).
- Available Free PE or size in Unit.
While using -v option the residing physical volume information will be print on the screen with details like Total PE, Free PE, PV device name, UUID and status.
Create a Striped Logical Volume
Creating a striped logical volume is similar to just creating a linear logical volume but additionally with only two options.
# lvcreate -L 100G -i 4 -I 128k -n lv_data vg01_data -v
# lvcreate -L 100G -i 4 -I 128k -n lv_data vg01_data /dev/sd[b-e]1- lvcreate – command to create a logical volume.
- -L 100 G – Creating with Unit size.
- -i 4 – Number of Stripes (Disk need to be used for stripes)
- -I 128k – Size of a single stripe.
- -n – Naming the striped logical volume.
- lv_data – Name of the logical volume to be created.
- vg01_data – VG name which used for the logical volume.
Or refer below
- -L – –size (Unit size K,M,G,T,P)
- -i – –stripes Number
- -I – –stripesize (Size can be in Unit size)
- -n – –name | Logical Volume name
[root@client1 ~]# lvcreate -L 100G -i 4 -I 128k -n lv_data vg01_data -v
     Archiving volume group "vg01_data" metadata (seqno 21).
     Creating logical volume lv_data
     Creating volume group backup "/etc/lvm/backup/vg01_data" (seqno 22).
     Activating logical volume vg01_data/lv_data.
     activation/volume_list configuration setting not defined: Checking only host tags for vg01_data/lv_data.
     Creating vg01_data-lv_data
     Loading table for vg01_data-lv_data (253:2).
     Resuming vg01_data-lv_data (253:2).
     Wiping known signatures on logical volume "vg01_data/lv_data"
     Initializing 4.00 KiB of logical volume "vg01_data/lv_data" with value 0.
   Logical volume "lv_data" created.
[root@client1 ~]#
Print the created logical volume with the “-m or –maps” option to list all mapped Physical volumes.
# lvdisplay -m /dev/vg01_data/lv_data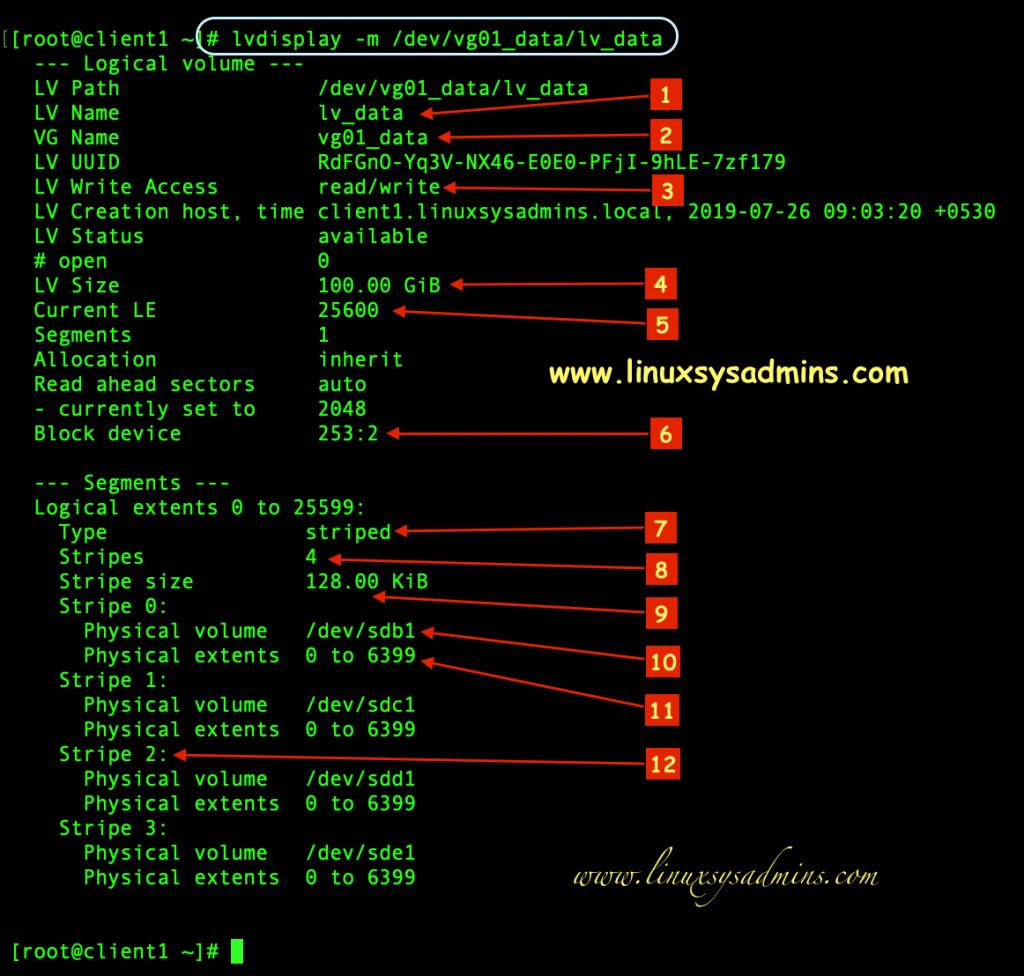
- Name of the logical volume we created.
- Volume group used by the Logical volume.
- LM mode, whether it’s in reading/writing mode.
- Size of the striped logical volume.
- The total number of available extents (PE).
- The major and minor number of a block device.
- The type of logical volume.
- The number of stripes used for the logical volume.
- Stripe size used for creating the logical volume.
- Device name used for the striped logical volume.
- physical extents available under each disk.
- Each number of disks used for stripe.
Verify the Disks used under Stripe Volume
To know the Major and Minor number of underlying block devices we can use low-level logical volume management tool “dmsetup” else use the simple command “lsblk“.
However, to find the dependence of a logical volume the dmsetup command will help to print in a clear output.
# dmsetup deps /dev/vg01_data/lv_data[root@client1 ~]# dmsetup deps /dev/vg01_data/lv_data
4 dependencies : (8, 65) (8, 49) (8, 33) (8, 17)
[root@client1 ~]#Match the “dmsetup” and “lsblk” output it should match the disks we are referring.
[root@client1 ~]# lsblk
  NAME                  MAJ:MIN     RM  SIZE RO TYPE MOUNTPOINT
  sda                     8:0    0   20G  0 disk
  |-sda1                  8:1    0    1G  0 part /boot
  -sda2                   8:2    0   19G  0 part
   |-centos-root          253:0  0   17G  0 lvm  /
    -centos-swap          253:1  0    2G  0 lvm  [SWAP]
  sdb                     8:16   0  100G  0 disk
  |-sdb1                  8:17   0  100G  0 part
    -vg01_data-lv_data    253:2  0  100G  0 lvm
  sdc                     8:32   0  100G  0 disk
  |-sdc1                  8:33   0  100G  0 part
    -vg01_data-lv_data    253:2  0  100G  0 lvm
  sdd                     8:48   0  100G  0 disk
  |-sdd1                  8:49   0  100G  0 part
    -vg01_data-lv_data    253:2  0  100G  0 lvm
  sde                     8:64   0  100G  0 disk
  |-sde1                  8:65   0  100G  0 part
    -vg01_data-lv_data    253:2  0  100G  0 lvm
  sr0                     11:0   1  906M  0 rom
 [root@client1 ~]#
Creating & mounting the filesystem
Create a filesystem under the created stripe volume.
# mkfs.xfs /dev/mapper/vg01_data-lv_data [root@client1 ~]# mkfs.xfs /dev/mapper/vg01_data-lv_data
meta-data=/dev/mapper/vg01_data-lv_data isize=512 agcount=17, agsize=1638144 blks
= sectsz=512 attr=2, projid32bit=1
= crc=1 finobt=0, sparse=0
data = bsize=4096 blocks=26214400, imaxpct=25
= sunit=256 swidth=1024 blks
naming =version 2 bsize=4096 ascii-ci=0 ftype=1
log =internal log bsize=4096 blocks=12800, version=2
= sectsz=512 sunit=8 blks, lazy-count=1
realtime =none extsz=4096 blocks=0, rtextents=0
[root@client1 ~]#Mount the created file system
Create a mount point and mount the file system.
[root@client1 ~]# df -hP /data/
 Filesystem                     Size  Used Avail Use% Mounted on
 /dev/mapper/vg01_data-lv_data  100G  2.8G   98G   3% /data
[root@client1 ~]#
That’s it, we have successfully created with a striped logical volume.
Conclusion
We have gone through how to create striped LV in logical volume management using multiple physical volumes. Let’s come-up with more LVM articles in future. Subscribe to the newsletter and stay closer. Your feedbacks are most welcome through below comment section.
Hey so once you created the logical volume group striped raid setup, how would you go about encrypting it and decrypting it?
@Captain,
Encrypting and decrypting can be done using LUKS, Please find the guide below.
https://www.linuxsysadmins.com/creating-luks-encrypted-filesystem-in-linux/
If you plan to remove the LUKS in later days
https://www.linuxsysadmins.com/how-to-safely-remove-a-luks-encrypted-disk-from-redhat-6-7-linux-and-variants/
Thanks & Regards,
Babin Lonston
Hello Babin,
I will create 4 disk’ stripped volume, but I am not sure if adding some other disk will work in the way of using all them since the first write.
For example, when I created a 2 volume stripe before, I after wrote and after added 2 disk more. But the activity measuring bars were only displaying 2 disks of 4, and sometimes the other 2. Depending what I was reading… and not sure about this. Also the performance was the same.
Could be possible to create a 4 disk volume and then add one more, and make all the logical volume use them?
can you please help me to find out what is the use of stripe size in lvm and what is extent size in lvm
@Asamth,
Stripe can’t be more than available disks. For example, you have 4 numbers of disks and maximum allowed stripe is 4, each stripe will be saved to each disk.
The use of stripe is to get a good performance.
The physical extent (PE) size is the basic unit out of which logical volumes are created. It defines the minimum size of a volume and the possible increments (having a 4MB PE size would mean the minimum volume size is 4MB and you can grow it in 4MB increments).
Thanks & Regards,
Babin Lonston
Great post initially worked out well – after power out though got this error.
what would be the process to try and repair a striped logical volume when I keep getting …..
root@galaxy2:/# vgdisplay -v vg01_data
Metadata location on /dev/sdc1 at 30720 begins with invalid VG name.
Failed to read metadata summary from /dev/sdc1
Failed to scan VG from /dev/sdc1
Metadata location on /dev/sdd1 at 30720 begins with invalid VG name.
Failed to read metadata summary from /dev/sdd1
Failed to scan VG from /dev/sdd1
Metadata location on /dev/sde1 at 30720 begins with invalid VG name.
Failed to read metadata summary from /dev/sde1
Failed to scan VG from /dev/sde1
Metadata location on /dev/sdf1 at 30720 begins with invalid VG name.
Failed to read metadata summary from /dev/sdf1
Failed to scan VG from /dev/sdf1
Metadata location on /dev/sdg1 at 30720 begins with invalid VG name.
Failed to read metadata summary from /dev/sdg1
Failed to scan VG from /dev/sdg1
Metadata location on /dev/sdh1 at 30720 begins with invalid VG name.
Failed to read metadata summary from /dev/sdh1
Failed to scan VG from /dev/sdh1
VG name on command line not found in list of VGs: vg01_data
Volume group “vg01_data” not found
Cannot process volume group vg01_data
thanks
Brent
@Brent Glover,
This could be some UUID mismatch, we may need to remove the partition from underlying physical volume. Before that, could you provide the output of
# pvs -v
and
# vgs -P -o +devices
Thanks & Regards,
Babin Lonston
[…] https://www.linuxsysadmins.com/create-striped-logical-volume-on-linux/ […]
Nice, it really works for me, this improve the I/O on my disks
Thanks for this great post. i really appreciate your blog.
The best place for learning.