
Introduction
Identity Management server: Are you looking to implement any one of the centralized authentication solutions in your environment and it should include with a DNS and more features? Why can’t we think about IDM using IPA? IDM is an opensource solution which provided by Red Hat and builds with more features to support one-time passwords (OTPs), Single sign-on (SSO), policy, PAM, NTP, Kerberos, audit, Active directory trust, Host-Based Access Control (HBAC) and much more.
If you are looking to build a dedicated DNS server, LDAP server and NTP server, its time to replace those all with IDM. A single place to manage everything. Do we have a valid subscription with RedHat? then you will get the end to end support while we raise with any case regarding IDM. Moreover, CentOS and Oracle Linux too included IPA in their repositories, using this guide we are safe to go-head to set-up IDM in CentOS or in Oracle Linux.
What should be considered while IDM implementation?
IDM replaced NSCD cache daemon with SSSD, Its recommended disabling Name Service cache daemon (NSCD). Having both installed in a server may cause unanticipated problems. Never disable IPv6 to get an uninterrupted name resolution for LDAP server in it. Strictly need to be configured with both forward and reverse DNS lookups.
In our upcoming all how-to guides we are going to resolve any hostnames and user authentication from the IDM server which we are about to implement now in a test environment.
System Requirement
- Static IP and Hostname.
- Minimum 3 GB of RAM and 1 GB of Swap to manage 10,000 users and 100 groups.
- Need minimum 30 GB of disk space
- A single Interface minimum required.
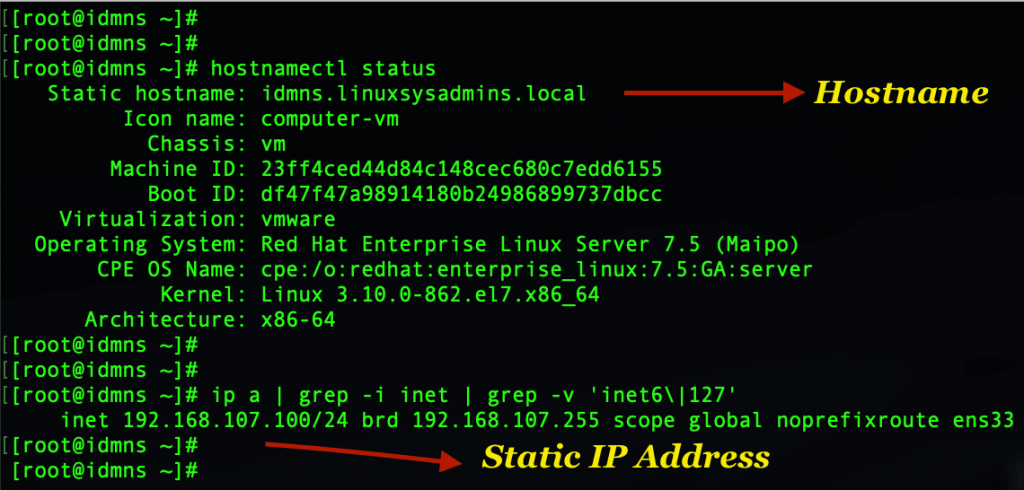
Step 1: Set Hostname and configure a Static IP Address.
To set up an Identity Management server including DNS server it must be configured with a static IP and hostname before starting with any other steps.
# hostnamectl set-hostname idmns.linuxsysadmins.local
# hostnamectl status
# ip a | grep -i inet | grep -v 'inet6\|127'
Add the hostname in /etc/hosts.
# vi /etc/hosts
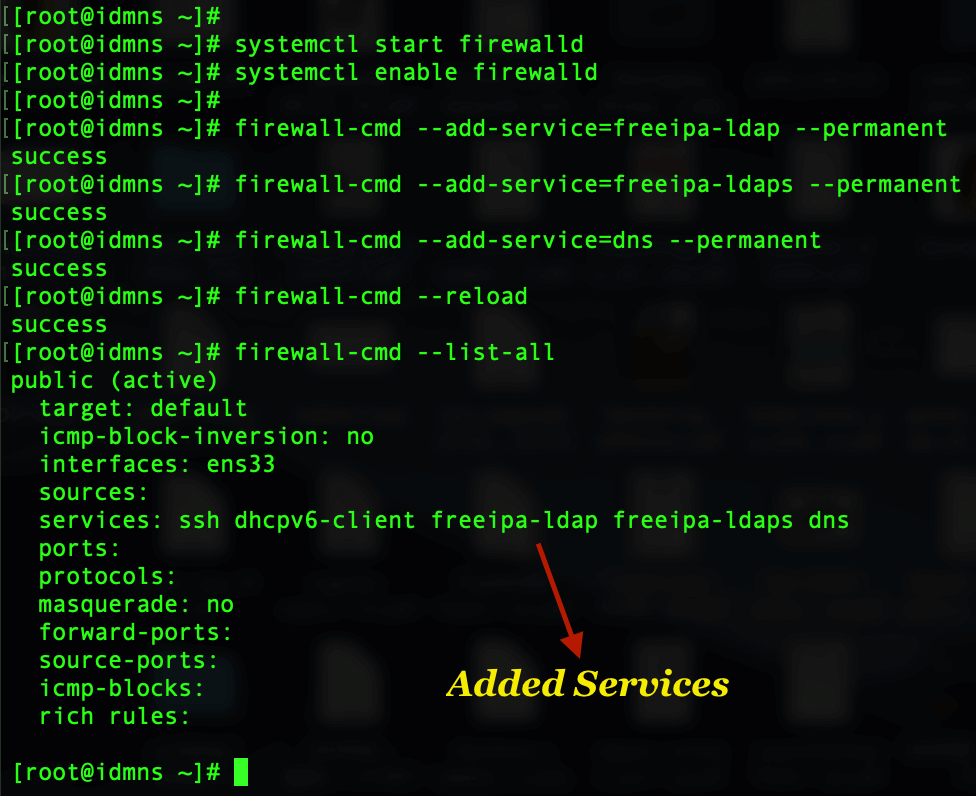
Step 2: Adding Firewall rules:
Start the firewalld service and add the required services.
| S:NO: | TCP PORT | UDP PORT | USE OF PORT |
|---|---|---|---|
| 1. | 80 | – | IDM Web HTTP |
| 2. | 443 | – | IDM Web HTTPS |
| 3. | 88 | 88 | Kerberos or SSO |
| 4. | 389 | 389 | LDAP |
| 5. | 636 | 636 | LDAPS |
| 6. | – | 123 | NTP |
| 7. | 464/749 | – | Kadmind |
| 8. | 53 | 53 | DNS |
Above ports are defined in following XML file to enable the required ports.
# cat /usr/lib/firewalld/services/freeipa-ldap.xml
# cat /usr/lib/firewalld/services/freeipa-ldaps.xml
# cat /usr/lib/firewalld/services/dns.xml
By adding freeipa-ldap, freeipa-ldaps and dns we are done with enabling 80,443,389,636,88,464,53 ports.
# systemctl start firewalld
# systemctl enable firewalld
# firewall-cmd --add-service=freeipa-ldap --permanent
# firewall-cmd --add-service=freeipa-ldaps --permanent
# firewall-cmd --add-service=dns --permanent
# firewall-cmd --reload
# firewall-cmd --list-all or # iptables -L -n -v --line-numbers
Step 3: Installing Red Hat Identity Management using IPA
Next step we need to install the required packages. In our setup, we are using with bind for DNS. If you are not set up with DNS exclude the bind and bind-dyndb packages. In future, any plan to integrate existing Active Directory with IDM make sure to install with “ipa-server-trust-ad”.
# yum install ipa-server ipa-server-dns bind bind-dyndb-ldap ipa-server-trust-ad -y
Step 4: Configure the IPA server
Running only “ipa-server-install” command will ask for several questions which we need to provide one by one, Instead, we can use all those options in a single command to perform an unattended installation.
# ipa-server-install --setup-dns --no-forwarders --auto-reverse -p "redhat123" -a "redhat123" \
-n linuxsysadmins.local -r LINUXSYSADMINS.LOCAL --netbios-name=LINUXSYSADMINS \
--hostname=idmns.linuxsysadmins.local --setup-adtrust --setup-kra --idstart=5000 \
--idmax=2000000 --auto-reverse --enable-compat --mkhomedir --no-host-dns
In case if we need to add a forwarder and forwarders policy in future it possible from the command line and from the web interface.
Let’s look into each option we used.
- –setup-dns – Configure DNS using Bind for our IPA
- –no-forwarders – Do not add any DNS forwarders.
- –auto-reverse – Create necessary reverse zones
- -p – Directory Manager password
- -a – admin user Kerberos password (Web UI)
- -n – primary DNS domain name of the IPA setup.
- -r – Kerberos realm name of the IPA Server setup.
- –netbios-name – NetBIOS name of the IPA domain
- –hostname – hostname of IPA server
- –setup-adtrust – To configure with an AD trust
- –setup-kra – To setup and configure dog tag KRA
- –idstart – UID needs to be started (we use 5000)
- –idmax – The max value of UID allowed (we using 2000000)
- –enable-compat – Enable support for trusted domains for old clients
- –mkhomedir – create home directories for users on their first login
- –no-host-dns – To skip DNS for hostname lookup during installation
The password used through this guide will be “redhat123“. Make sure to use your own defined complex password when you are implementing IDM in production environments.
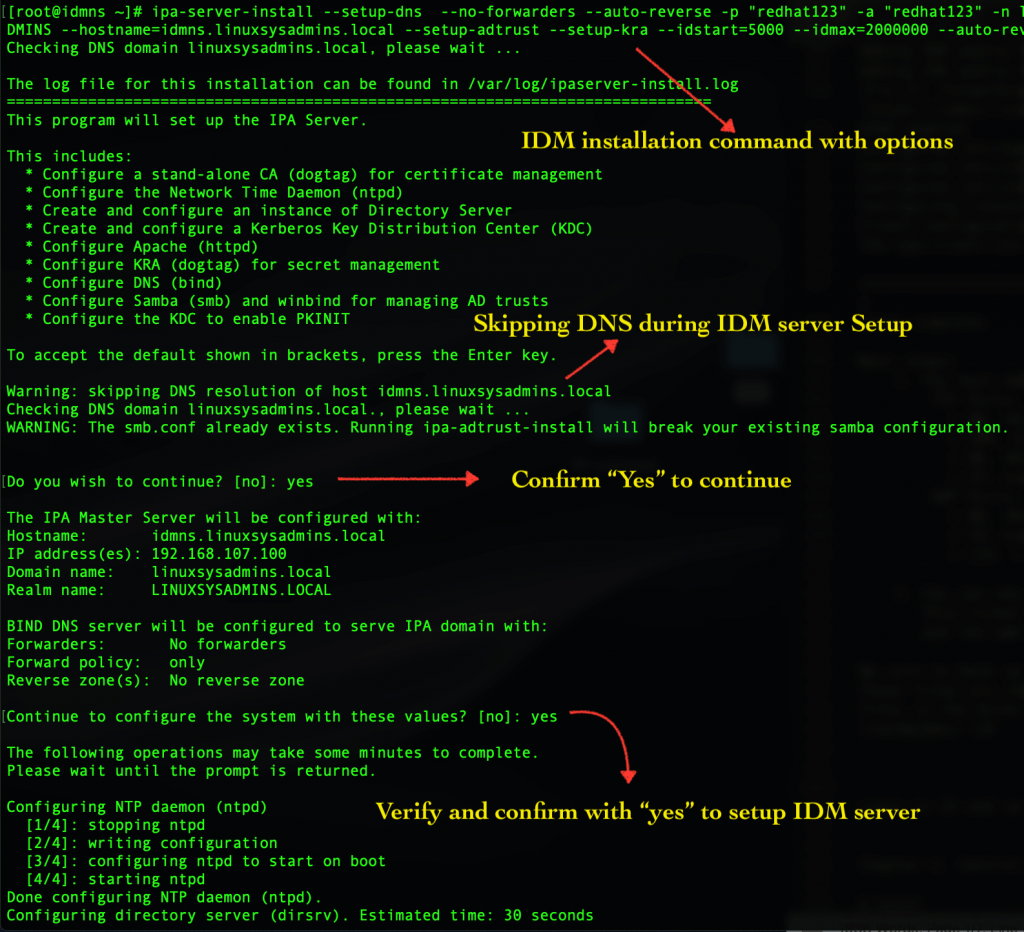
Installation Output has been truncated:
[root@idmns ~]# ipa-server-install --setup-dns --no-forwarders --auto-reverse -p "redhat123" -a "redhat123"
-n linuxsysadmins.local -r LINUXSYSADMINS.LOCAL --netbios-name=LINUXSYSADMINS --hostname=idmns.linuxsysadmins.local
--setup-adtrust --setup-kra --idstart=5000 --idmax=2000000 --auto-reverse --enable-compat --mkhomedir --no-host-dns
Checking DNS domain linuxsysadmins.local, please wait ...

The log file for this installation can be found in /var/log/ipaserver-install.log
==============================================================================
This program will set up the IPA Server.

This includes:
* Configure a stand-alone CA (dogtag) for certificate management
* Configure the Network Time Daemon (ntpd)
* Create and configure an instance of Directory Server
* Create and configure a Kerberos Key Distribution Center (KDC)
* Configure Apache (httpd)
* Configure KRA (dogtag) for secret management
* Configure DNS (bind)
* Configure Samba (smb) and winbind for managing AD trusts
* Configure the KDC to enable PKINIT

To accept the default shown in brackets, press the Enter key.

Warning: skipping DNS resolution of host idmns.linuxsysadmins.local
Checking DNS domain linuxsysadmins.local., please wait ...
WARNING: The smb.conf already exists. Running ipa-adtrust-install will break your existing samba configuration.


Do you wish to continue? [no]: yes

The IPA Master Server will be configured with:
Hostname: idmns.linuxsysadmins.local
IP address(es): 192.168.107.100
Domain name: linuxsysadmins.local
Realm name: LINUXSYSADMINS.LOCAL

BIND DNS server will be configured to serve IPA domain with:
Forwarders: No forwarders
Forward policy: only
Reverse zone(s): No reverse zone

Continue to configure the system with these values? [no]: yes

The following operations may take some minutes to complete.
Please wait until the prompt is returned.

Configuring NTP daemon (ntpd)
[1/4]: stopping ntpd
[2/4]: writing configuration
[3/4]: configuring ntpd to start on boot
[24/24]: restarting smbd
Done configuring CIFS.
Configuring client side components
Using existing certificate '/etc/ipa/ca.crt'.
Client hostname: idmns.linuxsysadmins.local
Realm: LINUXSYSADMINS.LOCAL
DNS Domain: linuxsysadmins.local
IPA Server: idmns.linuxsysadmins.local
BaseDN: dc=linuxsysadmins,dc=local

Skipping synchronizing time with NTP server.
New SSSD config will be created
Configured sudoers in /etc/nsswitch.conf
Configured /etc/sssd/sssd.conf
trying https://idmns.linuxsysadmins.local/ipa/json
[try 1]: Forwarding 'schema' to json server 'https://idmns.linuxsysadmins.local/ipa/json'
trying https://idmns.linuxsysadmins.local/ipa/session/json
[try 1]: Forwarding 'ping' to json server 'https://idmns.linuxsysadmins.local/ipa/session/json'
[try 1]: Forwarding 'ca_is_enabled' to json server 'https://idmns.linuxsysadmins.local/ipa/session/json'
Systemwide CA database updated.
Adding SSH public key from /etc/ssh/ssh_host_rsa_key.pub
Adding SSH public key from /etc/ssh/ssh_host_ecdsa_key.pub
Adding SSH public key from /etc/ssh/ssh_host_ed25519_key.pub
[try 1]: Forwarding 'host_mod' to json server 'https://idmns.linuxsysadmins.local/ipa/session/json'
SSSD enabled
Configured /etc/openldap/ldap.conf
Configured /etc/ssh/ssh_config
Configured /etc/ssh/sshd_config
Configuring linuxsysadmins.local as NIS domain.
Client configuration complete.
The ipa-client-install command was successful

==============================================================================
Setup complete

Next steps:
1. You must make sure these network ports are open:
TCP Ports:
* 80, 443: HTTP/HTTPS
* 389, 636: LDAP/LDAPS
* 88, 464: kerberos
* 53: bind
UDP Ports:
* 88, 464: kerberos
* 53: bind
* 123: ntp

2. You can now obtain a kerberos ticket using the command: 'kinit admin'
This ticket will allow you to use the IPA tools (e.g., ipa user-add)
and the web user interface.

Be sure to back up the CA certificates stored in /root/cacert.p12
These files are required to create replicas. The password for these
files is the Directory Manager password
[root@idmns ~]#
In case Installation fails, check your logs and fix what we missed before running again.
# tail -n 25 /var/log/ipaserver-install.log[stextbox id=”info” caption=”Info”]At the end of the output, we will be notified by installation to back-up the “/root/cacert.p12”, this required to set up a replica in future.[/stextbox]
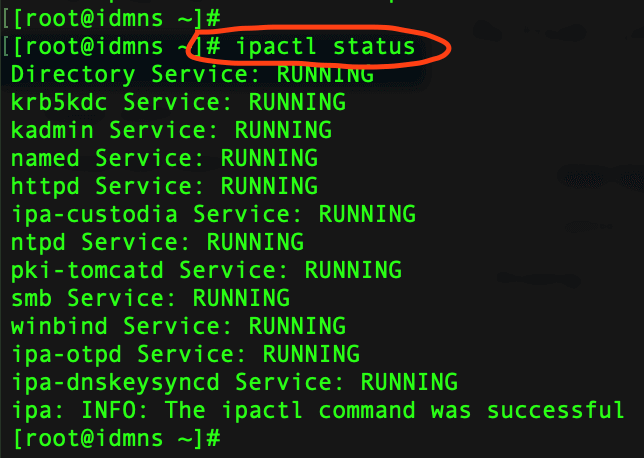
To check the service status using “ipactl” command. ipactl service can be managed using available options start, stop, restart and status
# ipactl status
Step 4: Access IDM Management Web interface.
Before login to the Web UI, we need a Kerberos ticket to authenticate by running “kinit” command from IDM server command line, type the password when prompt for it.
# kinit
Fire up anyone of web browser and navigate using IP or hostname.
https://192.168.107.100
          or
https://idmns.linuxsysadmins.local
It will prompt to accept the certificate, click on “Advanced” and again click “Exception” at the bottom.
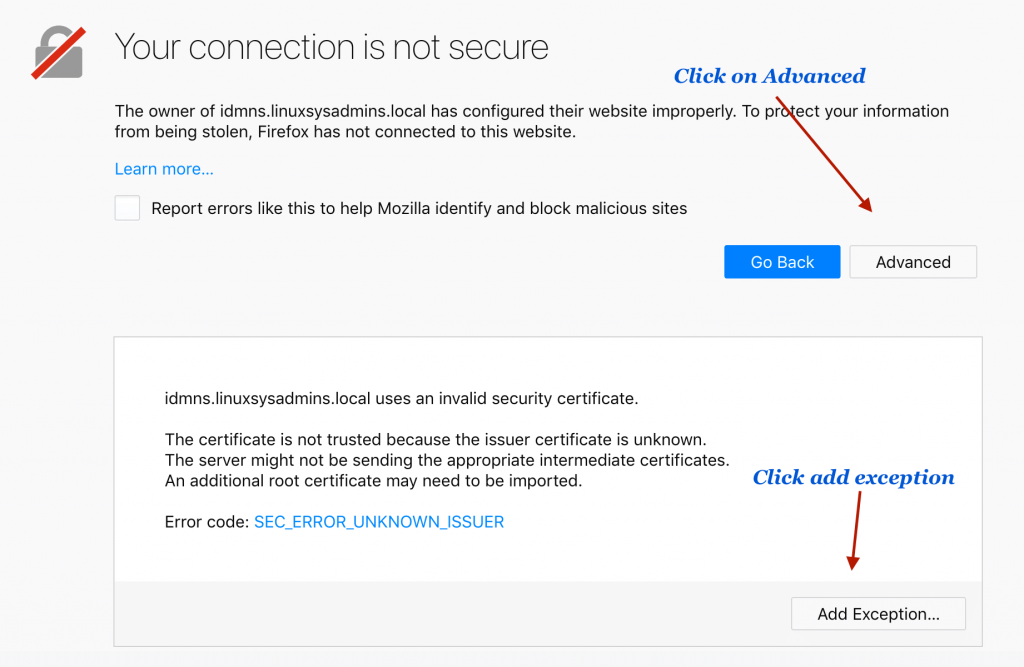
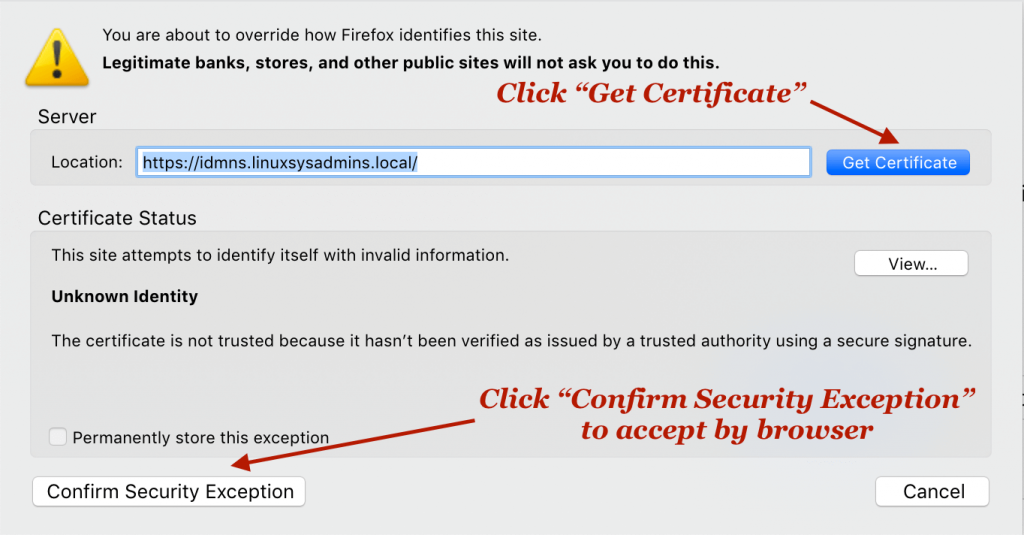
This will bring a pop-up window click “Get Certificate” and click “Confirm Security Exception” to import the certificate.
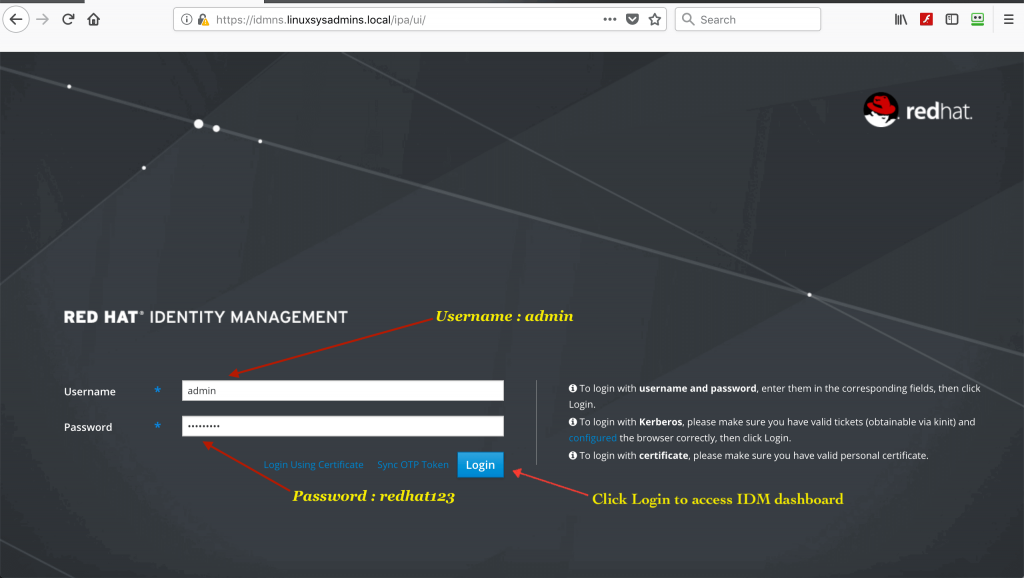
Now we will get the Identity Management Server login screen as shown in below figure. By default, the username will be “admin” and password provided during installation with “-a” option “redhat123“.
Username: admin
Password: redhat123
Once we click “Login” it will take us to “Identity –> Users –> Active users –> list of users“. By default during the installation admin user will be created which can be seen in this list.
There is three types of users can be added or present in IDM server we will discuss this later in a separate article.
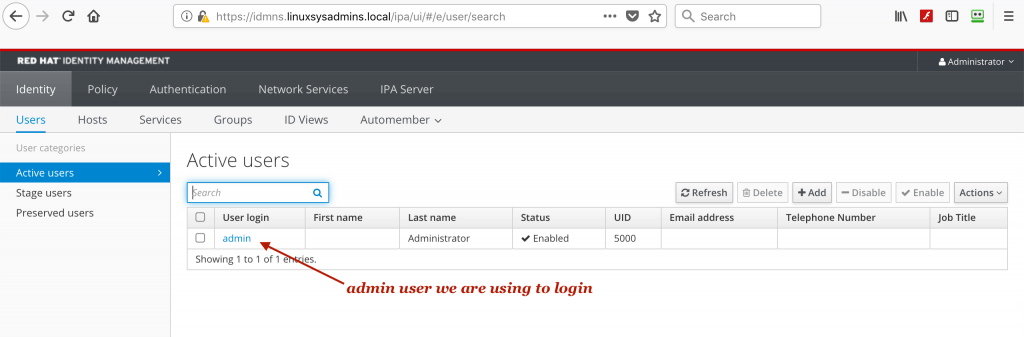
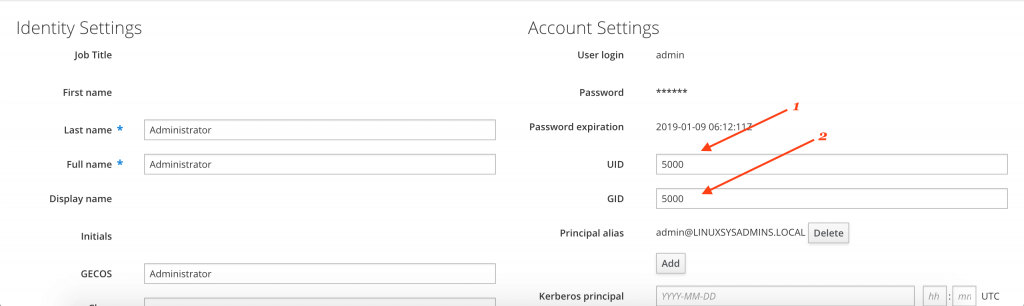
Click on user “admin” we will get more information.
- We can notice the starting UID 5000.
- And GID as 5000 which will match to UID.
This because during installation we used the option “–idstart” which made the starting UID from 5000.
To know more information about this navigates to IPAServer –> ID Ranges –> ID Range: LINUXSYSADMINS.LOCAL_id_range it will give full information.
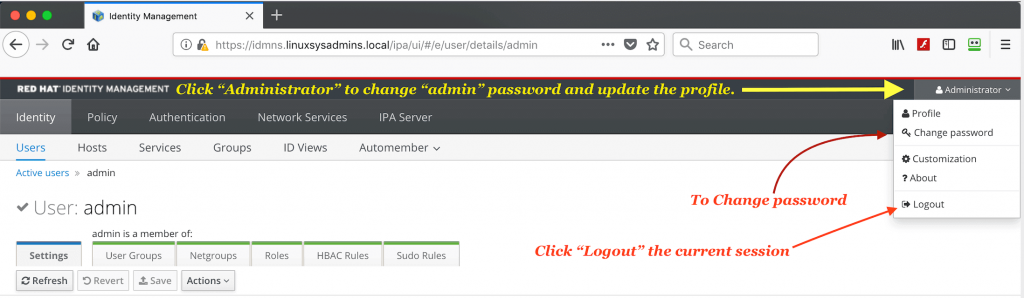
Step 5: Updating the profile and changing the admin password:
In case if we need to update our profile with more information click on “Administrator” in right side top corner and click “profile” to update the information.
To change the password click “Change password“.
To log out the session click on administrator and choose “Logout“.
That’s it we have completed with installing and configuring identity management server (IDM) using IPA.
Step 6: Uninstalling IDM/IPA Server
In case due to failed installation and we required to uninstall completely before performing a fresh install it’s possible by using “–uninstall” option.
Additionally, we can perform an uninstallation without manual interaction using the
# ipa-server-install --uninstall
This will remove all the IPA and clear the configurations.

Conclusion
We can set up an opensource identity management server using IPA to fulfil our centralized user authentication and DNS resolution. IDM not limited to only identity management it have more features let’s cover in upcoming articles. Subscribe to our newsletter and stay tuned to receive more IDM related topics.
12 thoughts on “Setup an Identity Management server in Linux using IPA”
Comments are closed.
@Sri,
Could you please provide more info like logs, You can find the logs under /var/log/pki/pki-tomcatd/ca/debug log . Kindly have a look at this URL.
https://osric.com/chris/accidental-developer/2017/10/freeipa-failed-to-start-pki-tomcatd-service/
In case, if it’s not resolved let me know, we are here to sort this out.
Thanks & Regards,
Bobin Lonston
Hello Babin Lonston,
After following the above steps I am able to connect IDM server/UI as well, but after sometime or again if I re-connect to the server frequently it is showing the below error-
Failed to start pki-tomcatd Service
Shutting down
Hint: You can use –ignore-service-failure option for forced start in case that a non-critical service failed
Aborting ipactl
Please help me.
Thanks,
Sri.
@Sri,
Add localhost entry in /etc/hosts and try from a web browser.
Thanks, & Regards,
Babin Lonston
Hi Babin Lonston,
I have successfully completed up to step3 and trying to perform the Step 4: kinit
[root@idmns ~]# kinit admin@LINUXSYSADMINS.LOCAL
Password for admin@LINUXSYSADMINS.LOCAL:
Password: redhat123
I am trying to open the browser with IP or hostname, but getting the error message “This site can’t be reached”
https://IP address
or
https://idmns.linuxsysadmins.local
Please help me.
Thanks,
Sri.
Hello Babin Lonston, How do i add users from windows AD (exported to a .csv format) to ipa server?
How do i add the OUs, to be more specific? Example of my exported users:
OU Name Distinguished Name
Application OU=Application,OU=Technology,DC=local,DC=ztest,DC=com
APPS-Mon OU=APPS-Mon,DC=local,DC=ztest,DC=com
Audit OU=Audit,OU=ztest,DC=local,DC=ztest,DC=com
BackOffice OU=BackOffice,OU=ztest,DC=local,DC=ztest,DC=com
Thanks
How do we uninstall this stuff!?
@Alice,
The article has been updated at the end with Uninstallation heading. We can use ipa-server-install –uninstall to perform an uninstallation.
Thanks & Regards,
Bobin Lonston
@Rock,
We have successfully integrated AD/DNS with our new IDM server. Free IPA is an Opensource tool and all the steps followed for IDM are applied for Free IPA as well.
1. I will post my document in two days. Already its prepared only waiting to post.
2. No, You can’t use the existing one, You need to have new name.
3. If you going to Join a Linux machine to Ad using “realm join” it will provide only with user management. By using a IDM server inbetween client and AD will provide more feature like Audit, full user management, Account ageing, Sudo, HBA, 2FA etc.
Will update soon in few days, Subscribe to newsletter and stay tuned.
Thanks & Regards,
Babin Lonston
When is
“3. If you going to Join a Linux machine to Ad using “realm join” it will provide only with user management. By using a IDM server inbetween client and AD will provide more feature like Audit, full user management, Account ageing, Sudo, HBA, 2FA etc”
coming out.
@Emmanuel,
AD server and IDM integration you can expect this by today or tomorrow max. Will work on remaining in future.
Thanks & Regards,
Bobin Lonston
Hello Babin Lonston,
I was planning to integrate FreeIPA server on our my corporate environment. I have a query regarding this. I already have a DNS server and Windows Active Directory DS installed on my local network.
01: Is it possible to configure FreeIPA with my existent DNS server? If so, what is the process I should follow?
02: Is it possible to use the AD DS ‘s existent FQDN and NetBIOS name on my new FreeIPA server?
03: What extra feature I can get by integrating my existing AD DS with the FreeIPA?
*** My goal is to have them both in my network, AD DS for windows environment and FreeIPA for Unix/Linux environment.
It will be a huge favor if you kindly provide me solid guidelines regarding this. Waiting to hear from you.
@Rock,
Kindly find the article.
https://www.linuxsysadmins.com/integrating-idm-with-active-directory-using-indirect-cross-forest-trust/