Table of Contents
Introduction
Apache Tomcat is an open-source technology, which licensed under Apache License version 2. Basically to understand what the use of Tomcat it’s a simple HTTP server used for Java Servlet, JavaServer Pages, Java Expression Language.
Apache released it’s latest version 9.0.13 by last month which includes several improvements. Moreover, Its released number of bug fixes to earlier version 7.0.91. In this guide, we are about to perform the installation for Tomcat 8.5.35 and will cover 9.0.13 in a separate article.
What we are going to perform in this guide are as follow.
- Install Tomcat Server
- Then build your WAR (Web Archive) file, and just drop it in the deploy directory of Tomcat.
Step 1: Verify whether Java already exists in Server
First, you need to verify if Java is installed or not, you can check it by below command:
$ java -versionIf not then you install it according to the below steps. Sart installing Java Runtime Environment (JRE) and Open JDK.
$ sudo yum install java-1.8.0-openjdk
$ sudo yum install java-1.8.0-openjdk-devel
List the Java Installation directory.
$ ls /usr/lib/jvmStep 2: Setting up Environment variable paths
Set the Java installation directory as the home directory for Java.
$ export JAVA_HOME=/usr/lib/jvm/java-1.8.0-openjdk-1.8.0.191.b12-0.el7_5.x86_64For setting it by default for every user on the system:
$ sudo sh -c "echo export JAVA_HOME==/usr/lib/jvm/java-1.8.0-openjdk-1.8.0.191.b12-0.el7_5.x86_64 >> /etc/environment"
Assign the JRE directory as JRE_HOME.
$ export JRE_HOME=/usr/lib/jvm/java-1.8.0-openjdk-1.8.0.191.b12-0.el7_5.x86_64/jreFor the PATH variable:
$ export PATH=$PATH:/usr/lib/jvm/java-1.8.0-openjdk-1.8.0.191.b12-0.el7_5.x86_64/bin:/usr/lib/jvm/java-1.8.0-openjdk-1.8.0.191.b12-0.el7_5.x86_64/jre/bin
Step 3: Download and extract Apache Tomcat 8.5/9
After installing JAVA, the next step is to download tomcat8 from official website
Download URL for Tomcat v8.5.35.
Navigate to /opt and start downloading the tar file.
$ cd /opt
$ sudo wget https://www.apache.org/dist/tomcat/tomcat-8/v8.5.35/bin/apache-tomcat-8.5.35.tar.gz
Extracting the compressed downloaded file and listing it
$ sudo tar xzf apache-tomcat-8.5.35.tar.gzMoving the extracted apache-tomcat8 directory from /opt to /usr/share/tomcat8:
$ sudo mv apache-tomcat-8.5.35 /usr/share/tomcat8Step 4: Performing Admin Operations
Switching to root user for performing admin operations.
$ sudo -iListing contents of tomcat8 directory in /usr/share/tomcat8:
# ls /usr/share/tomcat8Changing directory to /usr/share/tomcat8/bin:
In /usr/share/tomcat8/bin directory, you can view scripts like a startup, shutdown, Catalina etc to manage tomcat server.
# ls /usr/share/tomcat8/binStep 5: Starting Tomcat server
You can start the tomcat server by executing the “startup.sh” script.
# cd /usr/share/tomcat8/bin/
# ./startup.sh
or
# /usr/share/tomcat8/bin/startup.sh
Step 6: Accessing Web GUI
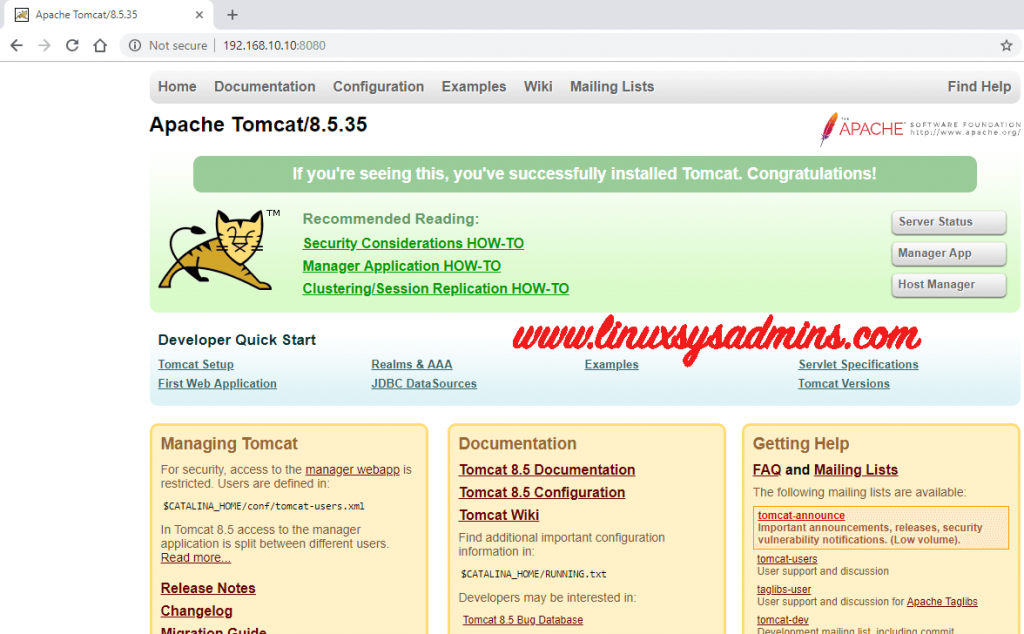
After successfully starting the tomcat web server, you can access the web GUI by.
http://<your-ip-address>:8080For example in my case.
http://192.168.10.10:8080Also, make sure to check the firewall restrictions at your end.

Congratulations you have successfully set up and started the tomcat server.
Step 7: Deploying the sample webpage in tomcat
You can test deploy a webpage, by building your own project .war file or by downloading a sample war file.
In the following, I have copied the sample.war file into /usr/share/tomcat8/webapps directory.

Accessing the sample webpage, To view the required webpage, Navigate to
http://<your-ip-address>:8080/sample
For example in my case:
http://192.168.10.10:8080/sample
Viewing Sample Application JSP Webpage, To view the required webpage, go to.
http://<your-ip-address>:8080/sample/jsp
For example in my case:
http://192.168.10.10:8080/sample/jsp
Viewing Sample Application Servlet Webpage, To view the required webpage navigate to
http://<your-ip-address>:8080/sample/hello
For example in my case:
http://192.168.10.10:8080/sample/hello
Step 8: Shutting down the Tomcat Server.
Simply use the below command, to shut down the tomcat server, Navigate to script location and run with
# ./shutdown.sh
       Or
# /usr/share/tomcat8/bin/shutdown.sh
We have successfully set up the Apache tomcat server and deployed our very first sample application.
Conclusion
To deploy with our first application we can use Apache Tomcat 8.5 which is presently stable version, In our upcoming guide we are about to cover with “Tomcat 9” guide, Till then subscribe to our newsletter to stay up-to-date.
Just a heads up, I don’t think you ever actually installed tomcat, as far as the guide is concerned
anh ơi , anh cho em hỏi là sao em build tomcat nhưng đang truy cập http://192.169.1.200:8080 mà báo
This site can’t be reached192.168.1.200 refused to connect.
anh có thể fix giúp em xem là tại sao không ạ. Em cám ơn anh!
@Quang Lam,
Are you using any local OS firewall?, In case if you use allow 8080.
Regards,
Babin Lonston