Introduction
Are you responsible to create multiple virtual machines per day? If you often deploy Ubuntu, Debian and Fedora-based operating systems then you need to look into this. Apt Cache Server available for both Ubuntu and Debian based operating systems.
In case, if you need to set up 20 Ubuntu Desktop machines for newly joined developers in your organization. And those all need to be applied with security patches and developers tools, sure it will consume a lot of your bandwidth. By having an Apt-Cache server we can save a lot of bandwidths.
Moreover, if you are running your Internet cafe systems with anyone of above-mentioned distribution then Apt Cache Server should run on anyone of your Desktop/Server. For example, When you try to install “git” on any one of your client (client1) it will be cached on your apt-cacher server. When some another client (client2) install the same package it will not download again from the internet. Instead, it will download from the Apt Cache Server. Thus, it will save both time and bandwidths.
My Server Setup
For demonstration purpose, we will use below hostname and IP address. Once install with apt-cacher we the port 3142 will be available.
Hostname        :   apt.linuxsysadmins.local
IP Address      :   192.168.107.99
Apt-cache Port  :   3142
Let’s start with the installation.
Install Apt Cache Server
Start to install Apt Cacher NG using anyone of the installer/package manager.
# apt install apt-cacher-ngSetting up apt-cacher-ng (3.1-1build1) …
Created symlink /etc/systemd/system/multi-user.target.wants/apt-cacher-ng.service → /lib/systemd/system/apt-cacher-ng.service.
Processing triggers for ureadahead (0.100.0-21) …
Processing triggers for systemd (237-3ubuntu10.24) …Configuring Apt Cache
Once completed with installation start to configure the apt-cache server by locating its configuration file.
# vi /etc/apt-cacher-ng/acng.confThe list of changes needs to be done in our apt-cache server to make it fully functional. Few of configurations are already un-commented in case if you need more option remove “#” to enable the options.
CacheDir: /var/cache/apt-cacher-ng
LogDir: /var/log/apt-cacher-ng
Port:3142
BindAddress: 192.168.107.99
It’s good to define a separate logical volume for “CacheDir” to store the packages.
- The Package where to store.
- Where the logs need to be saved.
- The default port of Apt-cacher-ng
- Bind address or under which interface apt-cache need to listen.
If you need to listen on all interfaces then 192.168.107.99 should be replaced with 0.0.0.0.
These are the type of mirrors added to store the cache. We decided to cache Ubuntu/Debian, EPEL repos and Fedora packages.
Remap-debrep: file:deb_mirror*.gz /debian ; file:backends_debian # Debian Archives
Remap-uburep: file:ubuntu_mirrors /ubuntu ; file:backends_ubuntu # Ubuntu Archives
Remap-cygwin: file:cygwin_mirrors /cygwin # ; file:backends_cygwin # incomplete, please create this file or specify preferred mirrors here
Remap-sfnet:  file:sfnet_mirrors # ; file:backends_sfnet # incomplete, please create this file or specify preferred mirrors here
Remap-alxrep: file:archlx_mirrors /archlinux # ; file:backend_archlx # Arch Linux
Remap-fedora: file:fedora_mirrors # Fedora Linux
Remap-epel:   file:epel_mirrors # Fedora EPEL
Remap-slrep:  file:sl_mirrors # Scientific Linux
Remap-gentoo: file:gentoo_mirrors.gz /gentoo ; file:backends_gentoo # Gentoo Archives
To get a report about downloaded, cached, missed packages enable the report line.
ReportPage: acng-report.htmlLater you can access the report by accessing below URL.
http://192.168.107.99:3142/acng-report.htmlEnable the PID of the daemon process.
PidFile: /var/run/apt-cacher-ng/pidThe number of days before considering to delete the expired files.
ExThreshold: 4Allowing HTTPS Downloads
I need to cache docker packages, docker repository uses https. To allow the https, we need to configure PassThrough as shown below.
PassThroughPattern: .*
PassThroughPattern: (archive\.ubuntu\.com|security\.ubuntu\.com|packages\.get\.docker\.com):443$
PassThroughPattern: ^(.*):443$
That’s all the common configurations we need to consider for a basic apt-cacher-ng setup. Save and exit the configuration file by writing wq! the changes.
Security Configuration
We can secure the total count and report page by configuring credentials. We are using simple credentials for demonstration purpose.
# vim /etc/apt-cacher-ng/security.conf
AdminAuth: sysadmins:redhat
Save the changes.
Starting the Apt Cache Server
Once completed with configuring the server it’s time to start/enable the service and check the status.
# systemctl start apt-cacher-ng
# systemctl enable apt-cacher-ng
# systemctl status apt-cacher-ng
Make sure to start the service persistently during reboot.
root@apt:~# systemctl enable apt-cacher-ng
 Synchronizing state of apt-cacher-ng.service with SysV service script with /lib/systemd/systemd-sysv-install.
 Executing: /lib/systemd/systemd-sysv-install enable apt-cacher-ng
root@apt:~#

root@apt:~# systemctl status apt-cacher-ng
 ● apt-cacher-ng.service - Apt-Cacher NG software download proxy
    Loaded: loaded (/lib/systemd/system/apt-cacher-ng.service; enabled; vendor preset: enabled)
    Active: active (running) since Tue 2019-09-03 17:47:34 +04; 5s ago
  Main PID: 2718 (apt-cacher-ng)
     Tasks: 1 (limit: 1081)
    CGroup: /system.slice/apt-cacher-ng.service
            └─2718 /usr/sbin/apt-cacher-ng SocketPath=/run/apt-cacher-ng/socket -c /etc/apt-cacher-ng ForeGround=1
 Sep 03 17:47:34 apt systemd[1]: Starting Apt-Cacher NG software download proxy…
 Sep 03 17:47:34 apt apt-cacher-ng[2718]: WARNING: No configuration was read from file:sfnet_mirrors
 Sep 03 17:47:34 apt systemd[1]: Started Apt-Cacher NG software download proxy.
root@apt:~#
Server-side configuration completed.
Client-Side Cache Configuration
Once we completed with the Apt Cache server-side configuration start to configure the client-side.
By default, the below apt proxy configuration will not be in place. We need to create it manually.
# vim /etc/apt/apt.conf.d/02proxyAppend the Proxy configuration as shown below to acquire packages from Apt-cache server.
Acquire::http::{ Proxy "http://192.168.107.99:3142"; };Additionally, we need to add cache server details to the beginning of all the source list URL’s
# vim /etc/apt/sources.listBefore changing the URL to look for the apt server it will look as follows.
deb http://us.archive.ubuntu.com/ubuntu/ bionic main restricted
deb http://us.archive.ubuntu.com/ubuntu/ bionic-updates main restricted
deb http://us.archive.ubuntu.com/ubuntu/ bionic universe
deb http://us.archive.ubuntu.com/ubuntu bionic-security main restricted
deb http://us.archive.ubuntu.com/ubuntu bionic-backports main restricted universe multiverse

deb [arch=amd64] https://download.docker.com/linux/ubuntu bionic stable
deb https://apt.kubernetes.io/ kubernetes-xenial main
After changing the URL it will look as follows.
deb http://192.168.107.99:3142/us.archive.ubuntu.com/ubuntu/ bionic main restricted
deb http://192.168.107.99:3142/us.archive.ubuntu.com/ubuntu/ bionic-updates main restricted
deb http://192.168.107.99:3142/us.archive.ubuntu.com/ubuntu/ bionic universe
deb http://192.168.0.99:3142/us.archive.ubuntu.com/ubuntu bionic-security main restricted
deb http://192.168.0.99:3142/us.archive.ubuntu.com/ubuntu bionic-backports main restricted universe multiverse

deb [arch=amd64] http://192.168.107.99:3142/download.docker.com/linux/ubuntu bionic stable
deb http://192.168.0.99:3142/apt.kubernetes.io/ kubernetes-xenial main
If you are using with Ubuntu 20.04.1 LTS make below changes.
deb http://192.168.0.20:3142/ae.archive.ubuntu.com/ubuntu focal main restricted
deb http://192.168.0.20:3142/ae.archive.ubuntu.com/ubuntu focal-updates main restricted
deb http://192.168.0.20:3142/ae.archive.ubuntu.com/ubuntu focal universe
deb http://192.168.0.20:3142/ae.archive.ubuntu.com/ubuntu focal-updates universe
deb http://192.168.0.20:3142/ae.archive.ubuntu.com/ubuntu focal multiverse
deb http://192.168.0.20:3142/ae.archive.ubuntu.com/ubuntu focal-updates multiverse
deb http://192.168.0.20:3142/ae.archive.ubuntu.com/ubuntu focal-backports main restricted universe multiverse
deb http://192.168.0.20:3142/ae.archive.ubuntu.com/ubuntu focal-security main restricted
deb http://192.168.0.20:3142/ae.archive.ubuntu.com/ubuntu focal-security universe
deb http://192.168.0.20:3142/ae.archive.ubuntu.com/ubuntu focal-security multiverse

deb [arch=amd64] http://192.168.0.20:3142/download.docker.com/linux/ubuntu focal stable
deb http://192.168.0.20:3142/apt.kubernetes.io/ kubernetes-xenial main
Testing from the Client
Once all the client-side configuration completed, let us install some packages on the client.
root@client1:~# apt install mysql-server
 The following additional packages will be installed:
   libtimedate-perl liburi-perl mysql-client-5.7 mysql-client-core-5.7 mysql-server mysql-server-5.7
   mysql-server-core-5.7
 0 upgraded, 20 newly installed, 0 to remove and 28 not upgraded.
 Need to get 21.1 MB of archives.
 After this operation, 162 MB of additional disk space will be used.
 Do you want to continue? [Y/n] Y
 Get:1 http://192.168.107.99:3142/us.archive.ubuntu.com/ubuntu bionic-updates/main amd64 libaio1 amd64 0.3.110-5ubuntu0.1 [6,476 B]
 ---------OutPut truncated---------
 Get:20 http://192.168.107.99:3142/us.archive.ubuntu.com/ubuntu bionic-updates/main amd64 mysql-server all 5.7.27-0ubuntu0.18.04.1 [9,948 B]
Fetched 21.1 MB in 1s (17.5 MB/s)
You can notice at the last line how long it took to download 21.1 MB.
Whenever you try to install some packages on any clients the copy of those packages will be stored in apt-cacher server under /var/cache/apt-cacher-ng.
root@apt:/var/cache/apt-cacher-ng# tree .
 .
 ├── 192.168.107.99
 │   ├── apt.kubernetes.io
 │   │   ├── dists
 │   │   │   └── kubernetes-xenial
 │   │   │       ├── InRelease
 │   │   │       ├── InRelease.head
 │   │   │       └── main
 │   │   │           └── binary-amd64
 │   │   │               └── by-hash
 │   │   │                   └── SHA256
 │   │   │                       ├── a6addab35c121b023f10ebd511d00b8cebf177f240e9c6456e727db1a86a938c
 │   │   │                       └── a6addab35c121b023f10ebd511d00b8cebf177f240e9c6456e727db1a86a938c.head
 │   │   └── pool
 │   │       ├── cri-tools_1.13.0-00_amd64_6930e446a683884314deef354fbd8a7c5fc2be5c69c58903ad83b69b42529da4.deb
 │   │       └── kubernetes-cni_0.7.5-00_amd64_b38a324bb34f923d353203adf0e048f3b911f49fa32f1d82051a71ecfe2cd184.deb.head
 │   ├── download.docker.com
 │   │   └── linux
 │   │       └── ubuntu
 │   │           └── dists
 │   │               └── bionic
 │   │                   ├── InRelease
 │   │                   ├── InRelease.head
 │   │                   ├── pool
 │   │                   │   └── stable
 │   │                   │       └── amd64
 │   │                   │           ├── docker-ce_18.06.2~ce~3-0~ubuntu_amd64.deb
 │   │                   │           └── docker-ce_18.06.2~ce~3-0~ubuntu_amd64.deb.head
 │   │                   └── stable
 │   │                       └── binary-amd64
 │   │                           ├── Packages.bz2
 │   │                           └── Packages.bz2.head
When you download something from any other version of Ubuntu, Debian, Fedora it will store the same in different directories according to the Version/Arch.
Accessing Configuration and Statistics
By accessing the IP: Port number you will get to know about a few configuration guidance and transfer statistics report page.
http://192.168.107.99:3142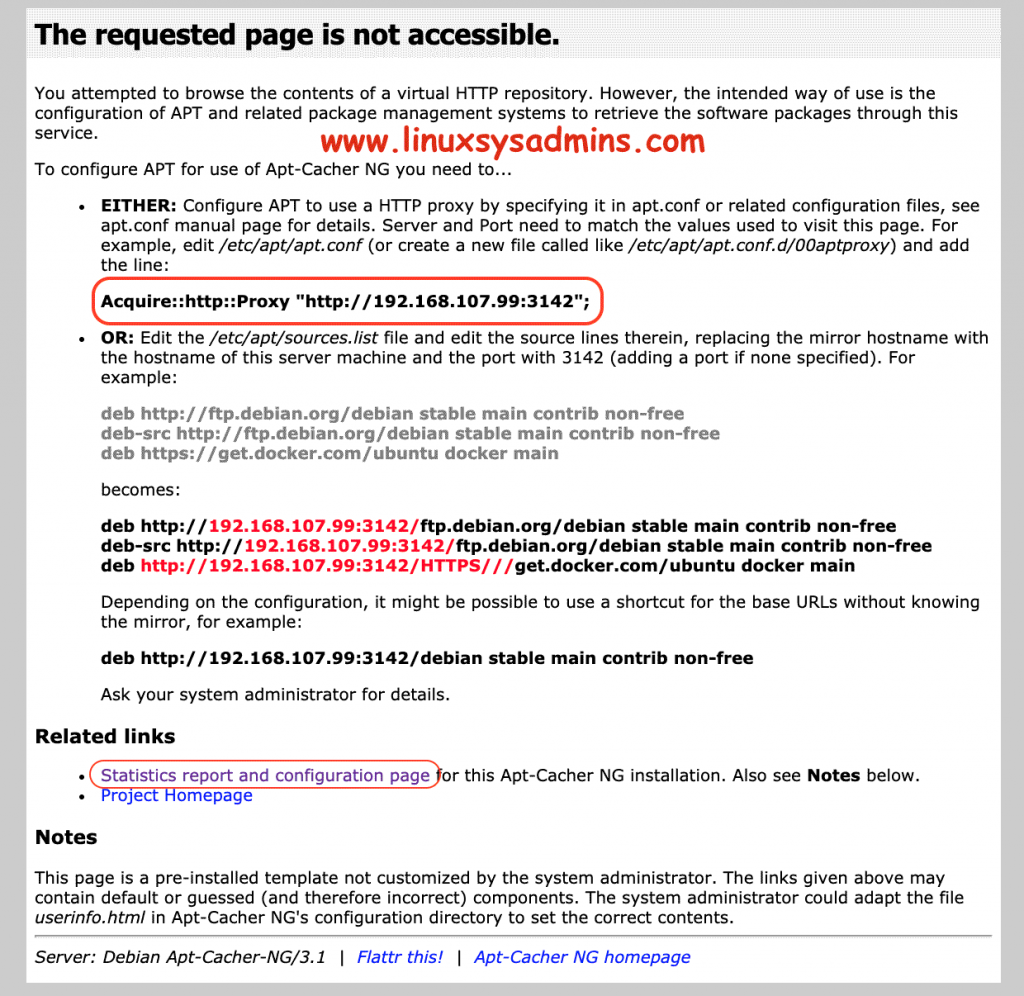
By following in our upcoming step, we will show how to access the statistics report of downloaded, missed packages. To access the statistics page click on “Statistics report and configuration page” as shown in the above figure.
Or the reports can be viewed from the below URL.
http://192.168.107.99:3142/acng-report.html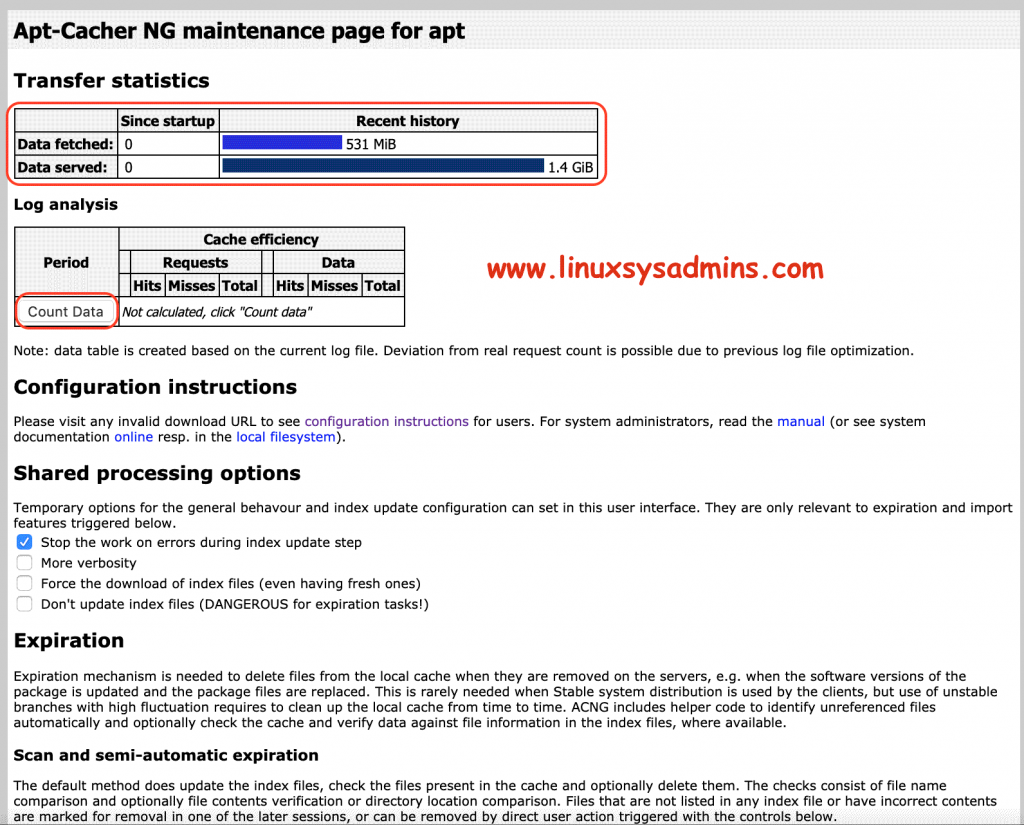
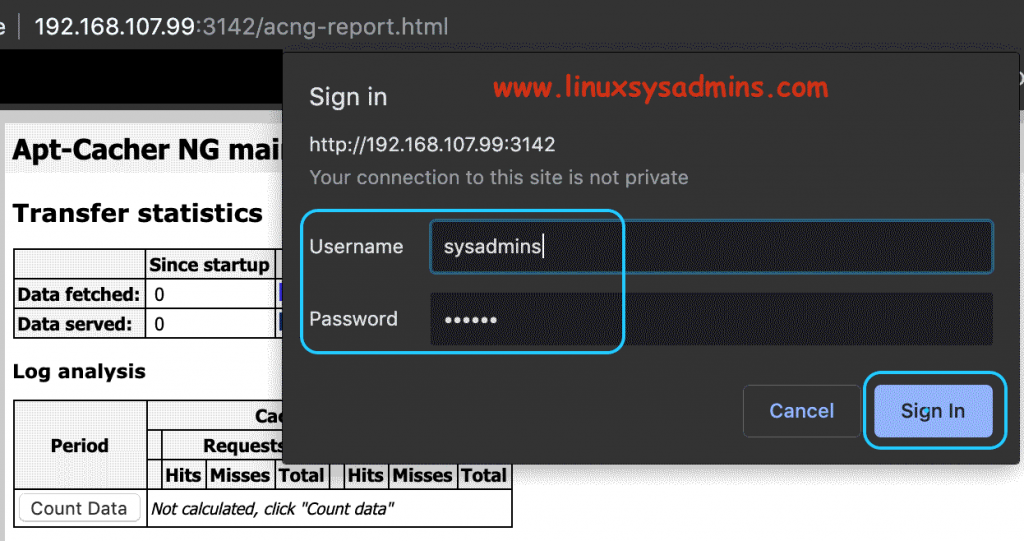
While click on “Count Data” It will prompt for credentials. Login with the credentials we configured in our security step.
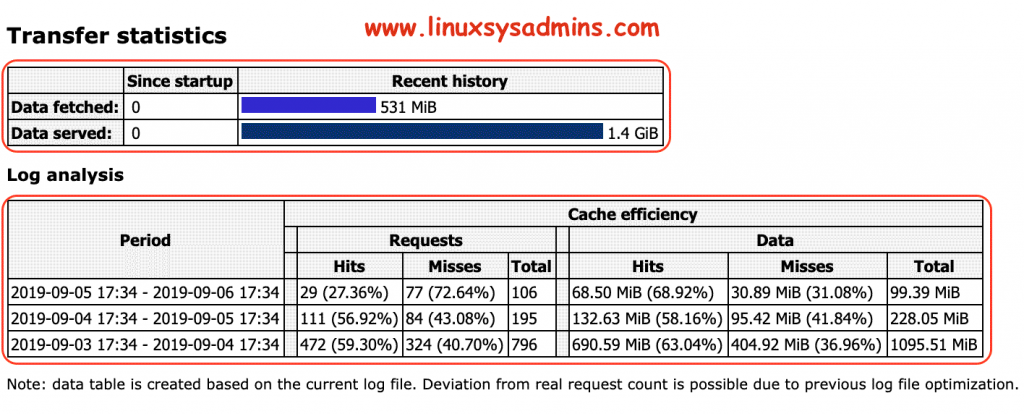
Now, you will get to know the transfer statistics.
That’s it, we have successfully completed with setting up an Apt Cacher server on Ubuntu 18.04 LTS.
Conclusion
Apt Cache Server or apt-cacher-ng help to cache the downloaded packages on any Debian based or RPM-based operating systems. Apt Cache help to save our bandwidth and save a lot of time without relay on internet speed. If you have any query kindly let us know through below comment section. Subscribe to our newsletter and keep yourself updated.