Introduction to MongoDB Replication
In our previous guide, we have gone through how to install and configure MongoDB on CentOS / RHEL 7 servers. By following in this guide we are about to set up redundancy and high data availability of MongoDB., MongoDB provides a functionality known as a replica set. Let us start to build a MongoDB Replication setup in our test environment.
What is MongoDB Replica?
Replica sets are basically multiple mongod processes running on multiple servers that maintain the same data set. The replica set can have a minimum of three nodes. These multiple nodes in a replica set play different roles and all together forming one replica set.
Read more about MongoDB
Roles in the replica set
- Primary
- Secondary
- Arbiter
Primary node: It is the master server of the replica set and all the read and write operations will be performed on it.
Secondary node: Thes secondary node will sync with the primary node and thus maintains the copy of the same data set of the primary. There can be multiple secondary nodes in one replica set. While the unavailability of the primary node it will start an election between the available secondary nodes and out of these nodes one will become the next primary node of this replica set and continues the normal operations, thus providing high data availability to the database clients.
Arbiter: Most Importantly this will not hold any copies of data, only votes in elections to decide which node will be the next primary. Commonly used in infrastructures where multiple secondary nodes are contesting to become the next primary, this will help in reducing the election time.
In our Setup
For demonstration purpose, we will configure at least three servers with
Server1:        192.168.10.7            mongodb-server-1a
Server2:        192.168.10.8            mongodb-server-1b
Server3:        192.168.10.9            mongodb-server-1c
Out of these three, one of them will become the primary node and the remaining two will act as secondary nodes.
Verify IP Address across all the servers using “
Installation of MongoDB instance
Follow below guide to perform the installation.
Install MongoDB by following the above method on all three servers. After a successful installation, we will now configure it on all three servers. MongoDB default config file location will be reside under ‘/etc/mongod.conf’
Replication Configuration
# vi /etc/mongod.confWe will configure it as follows for all three nodes:
- Log File Path: /var/log/mongodb/mongod.log
- DB Path: /var/lib/mongo
- Port: Default is 27017
- Bind IP: By default listens on 127.0.0.1 But we will set it to 0.0.0.0 to be able to listen on different ipv4 addresses
- Replication: Uncomment it to enable replication and set it as:
- replSetName: “
mongodb -rs”
Note: You can name the replica set of your choice but it must be same across all members.

Restarting MongoDB service
After properly configuring it on all three nodes, restart “
# systemctl restart mongod
# systemctl status mongod
Mongo Shell, Initiate the Replica
We can now access the MongoDB via mongo shell to initiate the instance and add replica set members. You can access mongo shell by simply typing the below command on any one of the above servers.
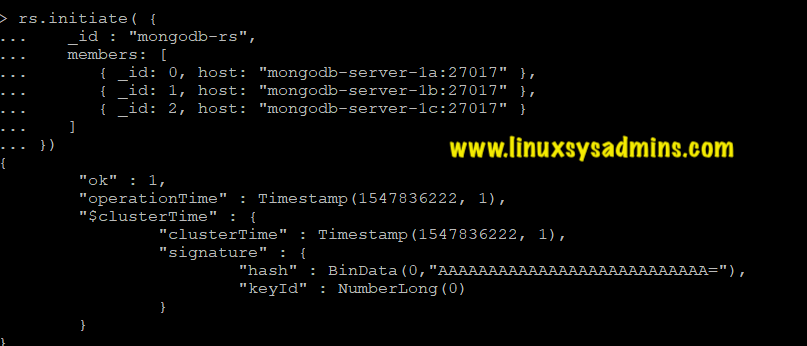
# mongoIn the mongo shell, we can initiate the replica set by the following command where “_id” contains the replica set name
   rs.initiate( {
      _id : "rs0",
      members: [
         { _id: 0, host: "mongodb-server-1a:27017" },
         { _id: 1, host: "mongodb-server-1b:27017" },
         { _id: 2, host: "mongodb-server-1c:27017" }
      ]
}) 
We can see the confirmation that the operation is successful as:
Check replica set status
We can check the current replica set status in mongo shell by:
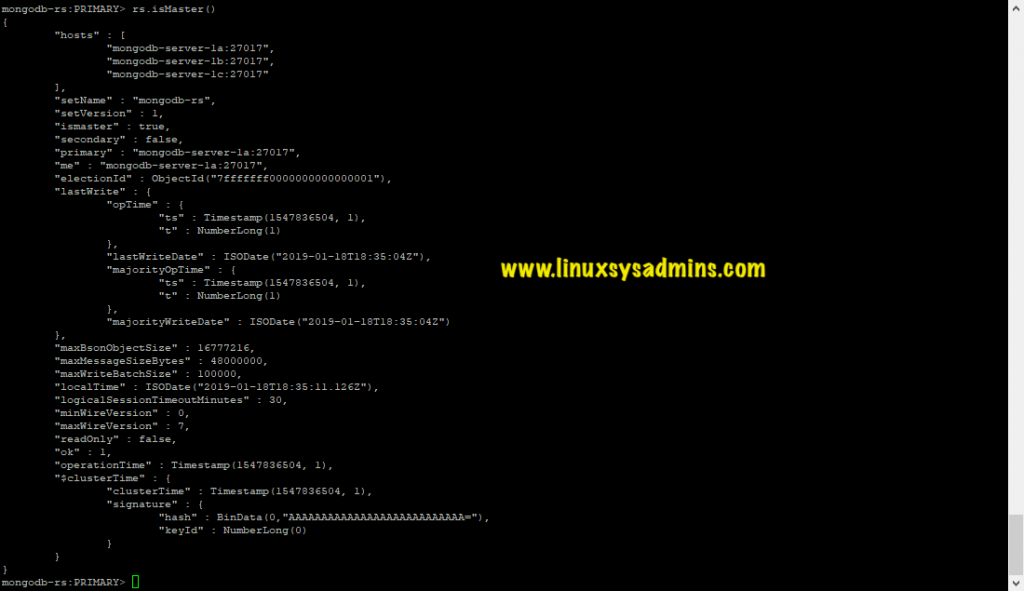
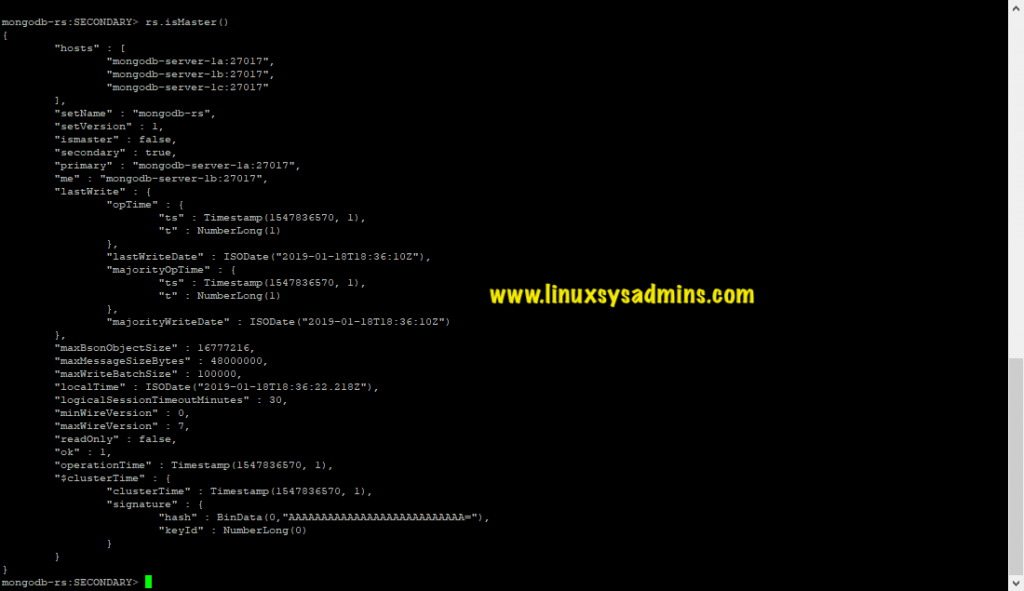
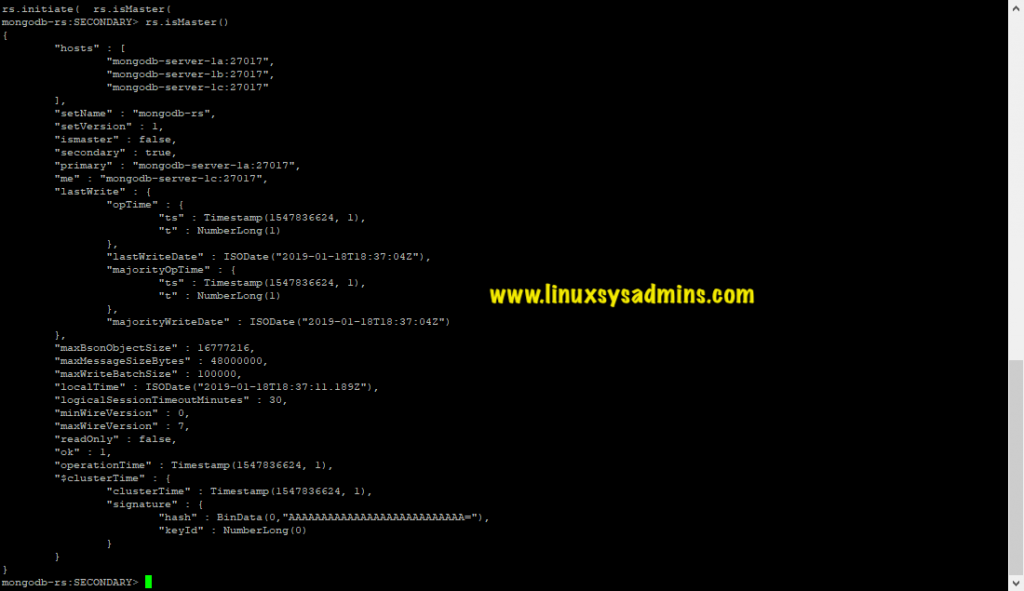
> rs.status() To check the status of any node and it’s primary or more information, simply type the below command:
> rs.isMaster() From this, we can see that our replica set has been initiated successfully. And below roles have been assigned to current replica set members:
Primary Node: mongodb-server-1a
Secondary Nodes: mongodb-server-1b and mongodb-server-1c
From the shell of server MongoDB-server-1a:
The shell of mongodb-server-1b
From the MongoDB-server-1c
Testing High Availability of Replica Set
To test the high availability feature of the replica set, if the primary server goes down or becomes unavailable for whatever reason, there must be an election and as a result one of the secondary servers should become the new primary.
In my case, myself intentionally stopped the mongodb-server-1a, thus making the replica set to hold an election and as a result of this mongodb-sever-1c becomes the new primary.
Note: While in an election, the process by which one of the secondary nodes is chosen to become the next primary node is based entirely upon the M
As you can see that after the election
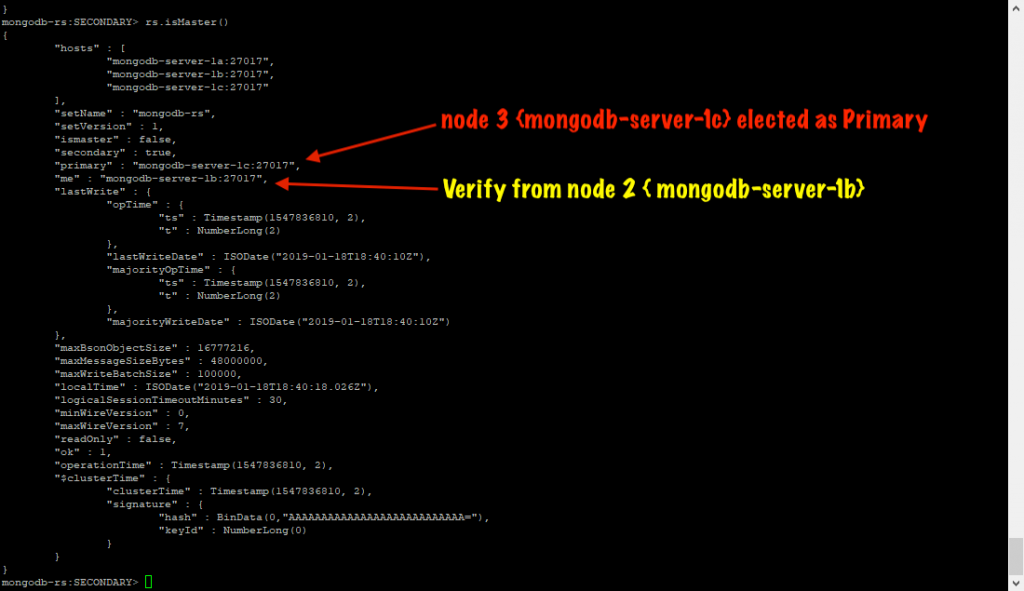
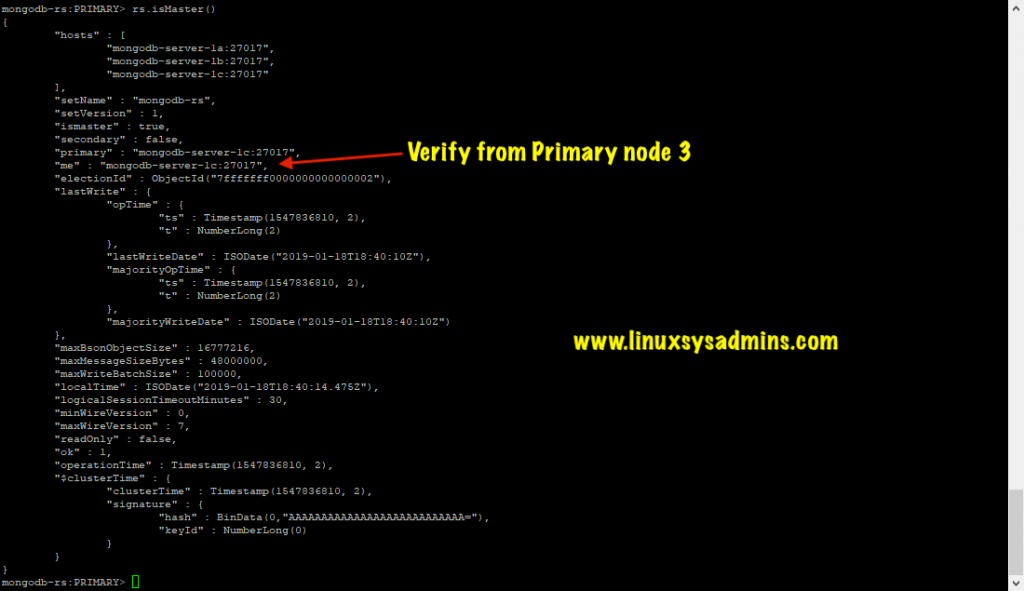
That’s it we have successfully tested and confirmed everything in our MongoDB Replication setup working as expected.
Conclusion
We have successfully deployed a highly available MongoDB cluster (MongoDB Replication) which has three nodes, one is a primary node and the others are secondary nodes which are in sync with the primary node and maintain the same data set to provide reliability to our database infrastructure. Subscribe to our newsletter to read more about MongoDB articles. Your comments are most welcome.
Thanks for your steps, we need to configure
mongo db ip in the web application, then which mongodb ip should i need to use in the webserver?
totally agreed with @aqib
I like to intregate it with my application
what should be the end point i primary goes down
Hi Deepanjan,
Replica sets are configured for exactly this purpose i.e if primary nodes become unavailable, secondary node will be elected as new primary
The answer is that you would use replica set endpoints in your application properties, for example:
mongodb://mongodb0.example.com:27017,mongodb1.example.com:27017,mongodb2.example.com:27017/?replicaSet=myRepl
You can follow the guide from here: https://docs.mongodb.com/manual/reference/connection-string/
Hi, thanks for the awesome guide! I am being asked to add an arbiter to the environment, and I am a little lost.
I have a 2 node environment, and the tests appear good. I would like to add an arbiter, but I am totally new at trying to get this up and running. The doc on mongodb states that I need to “Disable Read Concern Majority.” Where would I make the change(s)? Any help would be greatly appreciated.
Step by steps to configure MongoDB replication. I was searching to setup MongoDB replication. This article helped me.
This Article is really helpful…but in my case, my VMs are in Azure IAAS and when i followed this article its not working. Could you please let me know do we need any more configuration to configure 3 node replica set on azure.
NOTE: My VMs are in different region but interconnected with Peering.
Thanks for your comment Sekhar. Could you describe what sort of error you are getting?
My guess is to check firewall settings that all VMs should be able to access each other and for mongodb port 27017 is accessible as well
Thanks for your comment.Regarding your question, the mongodb primary node will be in contact with the application and will be responsible for all read & write operations. The secondary nodes will only be responsible for read operations
Thats very good Article, please let me know that how i would use this cluster in my code? I mean what end point will be used in my application code to access this cluster, so in case of any node failure, application may not be effected.