Introduction to Linux Cluster with Pacemaker
Linux Cluster with Pacemaker is one of the common clusters we can set up on Linux servers. The pacemaker was available for both RPM-based and Debian based operating system.
The Pacemaker is a high-availability cluster resource manager it will run on all the hosts which we suppose to use in the cluster to make sure our services up and running to reduce the downtime. Pacemaker supports following node redundancy configuration Active/Active, Active/Passive, N+1, N+M, N-to-1 and N-to-N. The maximum numbers of nodes accepted in a cluster are 16.
As common in every cluster, the underlying operating system distribution and version should be the same for all the nodes. We are going to use CentOS 7.6 in our setup. Moreover, the hardware specification should match as well.
Perform a Minimal OS installation to start with setting up the Cluster. Follow below guide to setup your minimal installation on all the nodes planned to set up as a cluster.
Step by step CentOS Linux 7.5 Installation guide with screenshots
Cluster setup is very sensible and needs proper time sync. While following above guide for minimal OS installation make sure to use a proper time/date and a static IP with network configuration and disk setup.
Pacemaker Linux Cluster Series
- Install and configure High Availability Linux Cluster with Pacemaker on CentOS 7.6
- How to Manage Pacemaker Linux cluster from Web GUI
Our Lab Setup
In our setup, we are about to use with below hostnames and IP information for all the node’s in our cluster.
| S:NO: | HOSTNAME | SHORT NAME | IPADDRESS |
|---|---|---|---|
| 1. | corcls1 | corcls1.linuxsysadmins.local | 192.168.107.200 |
| 2. | corcls2 | corcls2.linuxsysadmins.local | 192.168.107.201 |
| 3. | corcls3 | corcls3.linuxsysadmins.local | 192.168.107.202 |
| 4. | corcls4 | corcls4.linuxsysadmins.local | 192.168.107.203 |
| 5. | VirtualIP | web-vip | 192.168.107.225 |
In our first guide, we will use only two nodes, later we will use the remaining two nodes to add as an additional node to the cluster.
All the below steps need to be carried on each node except “Configure CoroSync” which need to be carried out only on node1.
Network Setup
If you need to skip network, NTP and do as part of post-installation skip the graphical demonstration. Below you will find the commands to configure Host-name, Interface and NTP. But, make sure to never skip the disk partitioning.
We need to configure a static IP to make the cluster stable by eliminating IP assignment from DHCP servers. Because DHCP’s periodic address renewal will interfere with corosync. To sync the date/time first we need to complete the network configuration.
To download the packages from the Internet make sure to reach the gateway.
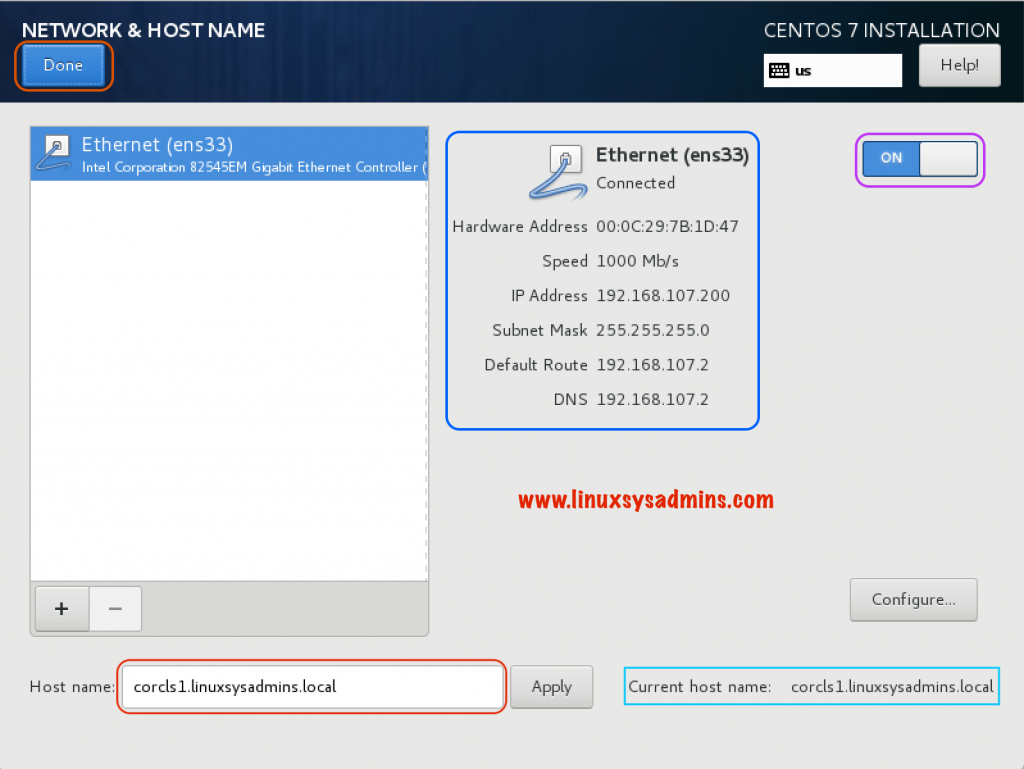
Type the hostname in the designated area and click Apply to make the changes.
Configure Timezone and NTP server
Choose your timezone where your server resides.
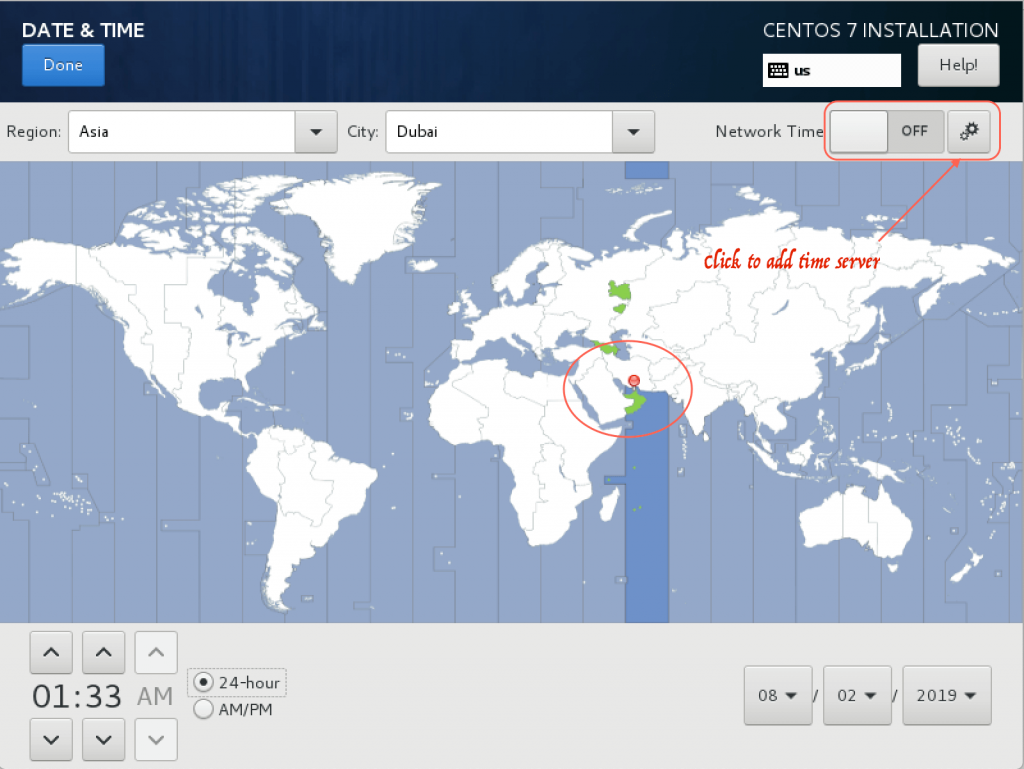
To configure the NTP server, click on the Gear icon and add the timeserver or use the default existing ones.
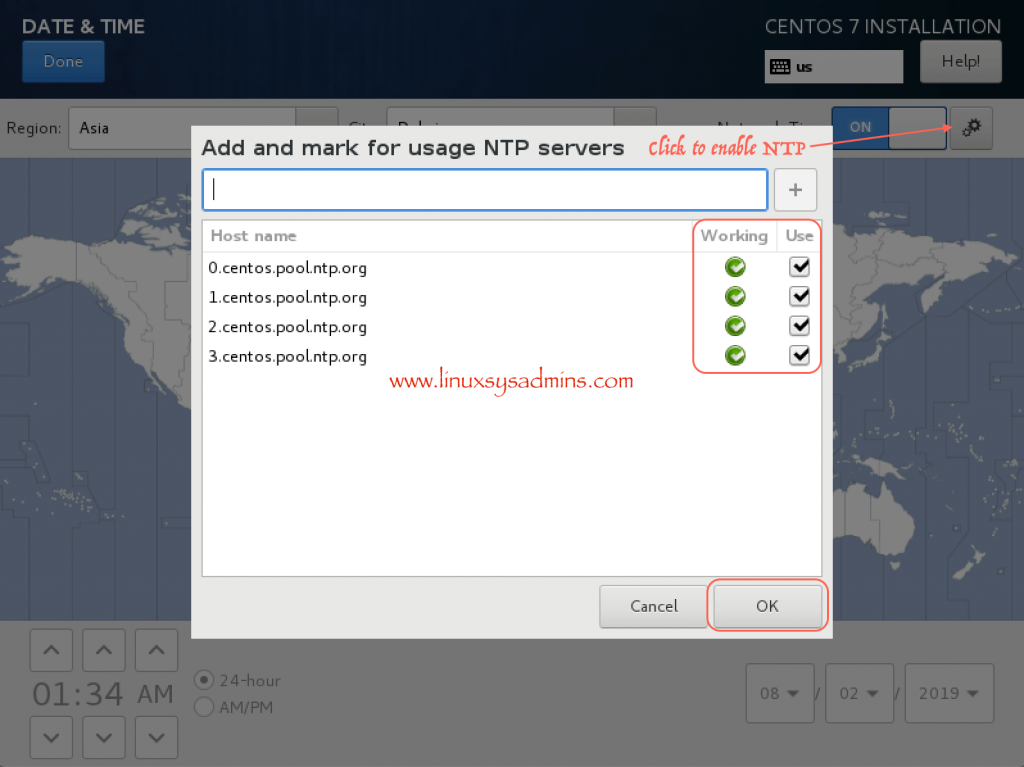
The working servers can be identified by there status in green.
Partitioning the Disk
The partitioning should be defined as small in size for /, /home and swap. Remaining size can be left for future use under the volume group.
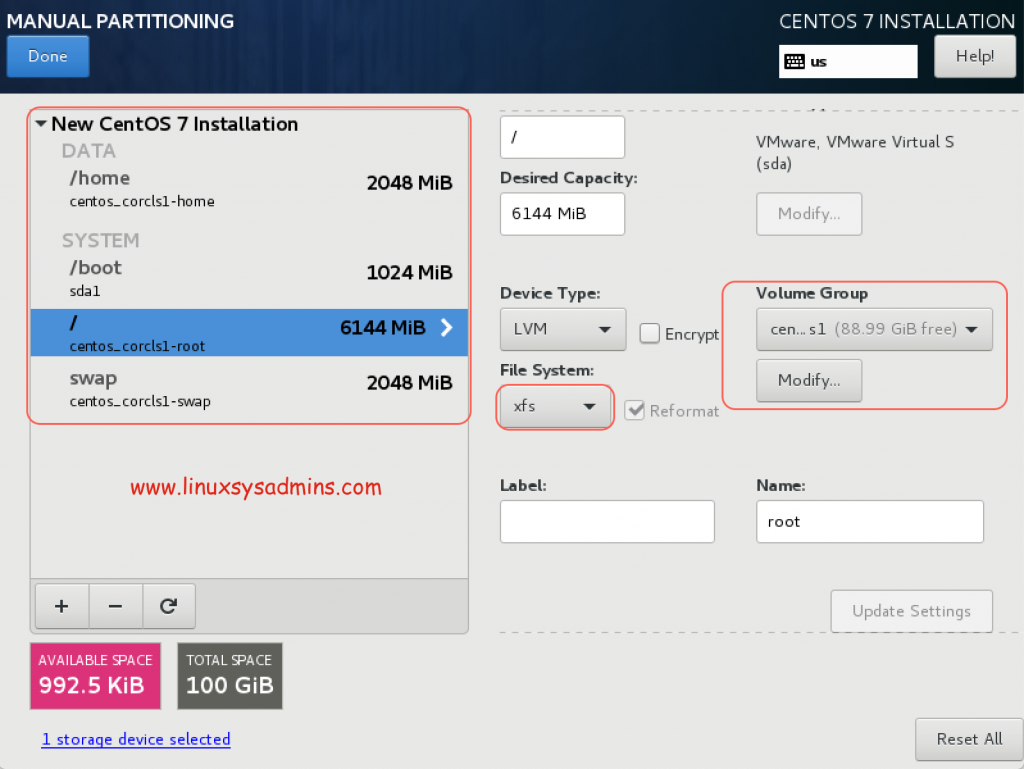
Select the filesystem type as XFS and device type as LVM.
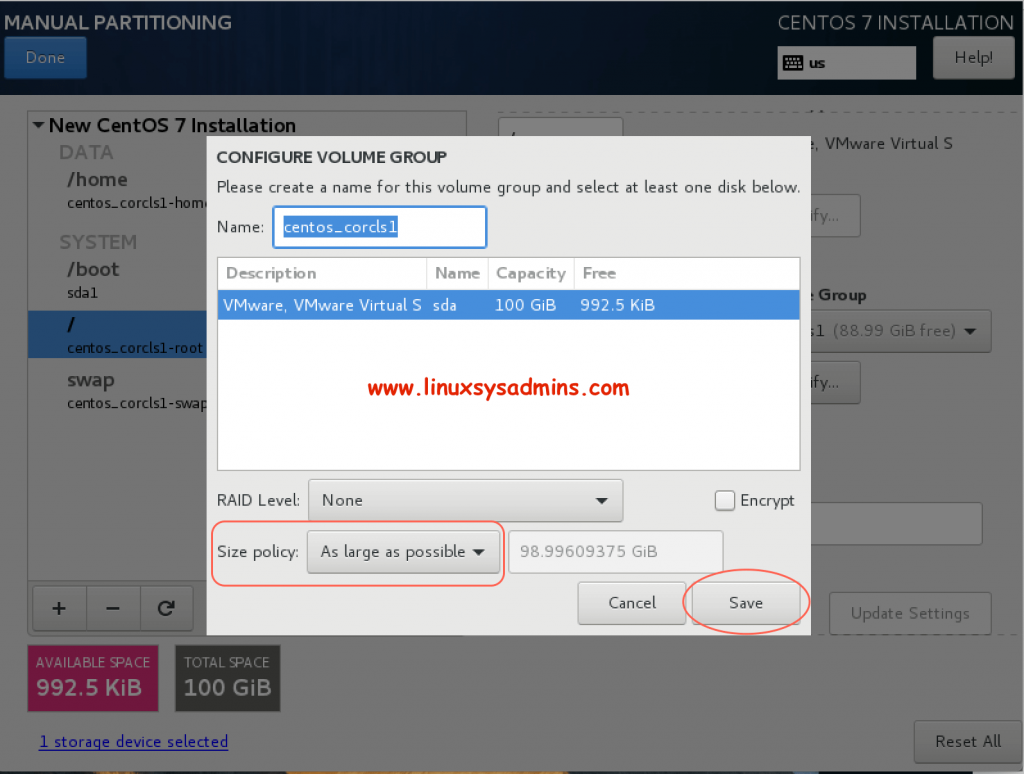
Click on Modify under Volume Group. You will get the above window, choose the Size policy “As large as possible” to leave the remaining space under Volume Group.
Remaining steps are the same as installing a minimal Operating system.
Set the System Locale
If your setup with a minimal installation is required to set the C Type locale language to en_US.utf8.
# localectl set-locale LC_CTYPE=en_US.utf8Print the status to verify the same.
[root@corcls1 ~]# localectl status
   System Locale: LC_CTYPE=en_US.utf8
       VC Keymap: us
      X11 Layout: us
[root@corcls1 ~]#
Assigning Static IP Address from CLI
If you have skipped the network settings during OS installation later we can configure the same by running nmcli command to configure the static IP.
On node 1
# nmcli connection add con-name ens33 type ethernet ifname ens33 ipv4.addresses 192.168.107.200/24 ipv4.gateway 192.168.107.2 ipv4.dns 192.168.107.2 ipv4.dns-search linuxsysadmins.local ipv4.method manual autoconnect yesOn node 2
# nmcli connection add con-name ens33 type ethernet ifname ens33 ipv4.addresses 192.168.107.201/24 ipv4.gateway 192.168.107.2 ipv4.dns 192.168.107.2 ipv4.dns-search linuxsysadmins.local ipv4.method manual autoconnect yesSet Hostname from CLI
Configure a Hostname for each server.
# hostnamectl set-hostname corcls1
# hostnamectl set-hostname corcls2
Moreover, it’s good to add localhost entry for all the nodes in our cluster.
# vim /etc/hostsEntre both FQDN and hostname with respective IP Address.
127.0.0.1   localhost localhost.localdomain localhost4 localhost4.localdomain4
::1         localhost localhost.localdomain localhost6 localhost6.localdomain6
192.168.107.200         corcls1.linuxsysadmins.local    corcls1
192.168.107.201         corcls2.linuxsysadmins.local    corcls2
Date and Timezone configuration from CLI
If you have missed assigning the timezone during the graphical installation, we can configure the same after installing the operating system by performing post configuration.
 # timedatectl set-timezone Asia/Dubai
 # timedatectl set-ntp true
 # timedatectl status
NTP time sync is enabled and looking good.
[root@corcls1 ~]# timedatectl status
       Local time: Sat 2019-08-03 17:02:49 +04
   Universal time: Sat 2019-08-03 13:02:49 UTC
         RTC time: Sat 2019-08-03 13:02:49
        Time zone: Asia/Dubai (+04, +0400)
      NTP enabled: yes
 NTP synchronized: yes
  RTC in local TZ: no
       DST active: n/a
[root@corcls1 ~]#
Verify the sync status, Use -v to get more informative output.
[root@corcls1 ~]# chronyc sources
 210 Number of sources = 3
 MS Name/IP address         Stratum Poll Reach LastRx Last sample
 ^- 40.123.207.142                2  10   377   696  +2119us[+2119us] +/-   34ms
 ^* 5.32.10.108                   1  10   377   902    +12ms[  +13ms] +/-   19ms
 ^? 2402:f000:1:416:101:6:6:>     0   6     0     -     +0ns[   +0ns] +/-    0ns
[root@corcls1 ~]#
Configure Passwordless SSH Authentication
To perform admin tasks, running privileged commands or to copy any files set-up an SSH passwordless authentication by generation an SSH key.
# ssh-keygen[root@corcls1 ~]# ssh-keygen
Generating public/private rsa key pair.
Enter file in which to save the key (/root/.ssh/id_rsa):
Created directory '/root/.ssh'.
Enter passphrase (empty for no passphrase):
Enter same passphrase again:
Your identification has been saved in /root/.ssh/id_rsa.
Your public key has been saved in /root/.ssh/id_rsa.pub.
The key fingerprint is:
SHA256:ATVwcKf58ApvYaWsURZVOabinsQBGaSwiuwAGCW0BzY root@corcls1.linuxsysadmins.local
The key's randomart image is:
+---[RSA 2048]----+
|+Eo .***.o… |
|oo+o .o+ * + |
|o…. .B .o . |
|+.. +oB. |
|+. ooSoo |
|o *+o |
| . .o+. |
| .o |
| |
+----[SHA256]-----+
[root@corcls1 ~]#Copy the generated SSH key to all the nodes.
# ssh-copy-id root@corcls2[root@corcls1 ~]# ssh-copy-id root@corcls2
/usr/bin/ssh-copy-id: INFO: Source of key(s) to be installed: "/root/.ssh/id_rsa.pub"
The authenticity of host 'corcls2 (192.168.107.201)' can't be established.
ECDSA key fingerprint is SHA256:Q6D+CZ+PH9PEmUIJwOkJeWBz91z273zwXEBPjk81mX0.
ECDSA key fingerprint is MD5:a3:35:63:21:01:ae:df:3e:6d:b3:6b:79:d9:0d:ff:a8.
Are you sure you want to continue connecting (yes/no)? yes
/usr/bin/ssh-copy-id: INFO: attempting to log in with the new key(s), to filter out any that are already installed
/usr/bin/ssh-copy-id: INFO: 1 key(s) remain to be installed -- if you are prompted now it is to install the new keys
root@corcls2's password:
Number of key(s) added: 1
Now try logging into the machine, with: "ssh 'root@corcls2'"
and check to make sure that only the key(s) you wanted were added.
[root@corcls1 ~]#Verify the passwordless authentication by login into all the nodes.
[root@corcls1 ~]#
[root@corcls1 ~]# ssh root@corcls2
Last login: Fri Aug  2 12:14:21 2019 from 192.168.107.1
[root@corcls2 ~]# exit
logout
Connection to corcls2 closed.
[root@corcls1 ~]#
Allow Cluster services through Firewall
Enable the required ports by enabling High-Availability firewall service.
Below is the firewalld service available to enable the service.
[root@corcls1 ~]# cat /usr/lib/firewalld/services/high-availability.xml
<?xml version="1.0" encoding="utf-8"?>
<service>
  <short>Red Hat High Availability</short>
  <description>This allows you to use the Red Hat High Availability (previously named Red Hat Cluster Suite). Ports are opened for corosync, pcsd, pacemaker_remote, dlm and corosync-qnetd.>/description>
  <port protocol="tcp" port="2224"/>
  <port protocol="tcp" port="3121"/>
  <port protocol="tcp" port="5403"/>
  <port protocol="udp" port="5404"/>
  <port protocol="udp" port="5405"/>
  <port protocol="tcp" port="9929"/>
  <port protocol="udp" port="9929"/>
  <port protocol="tcp" port="21064"/>
</service>
[root@corcls1 ~]#
By running below command it will enable all ports. Reload the firewalld service to make the changes.
# firewall-cmd --add-service=high-availability --permanent
# firewall-cmd --reload
Finally, list the enabled ports by running
# firewall-cmd --list-all[root@corcls1 ~]#
[root@corcls1 ~]# firewall-cmd --list-all
public (active)
target: default
icmp-block-inversion: no
interfaces: ens33
sources:
services: ssh high-availability
ports:
protocols:
masquerade: no
forward-ports:
source-ports:
icmp-blocks:
rich rules:
[root@corcls1 ~]#Install the Cluster Service Packages
Once completed with all the above steps across all the nodes it’s time to install the Cluster service packages.
# yum install pacemaker pcs psmisc policycoreutils-python -yThe required packages will be installed with their dependencies.
Installed:
   pacemaker.x86_64 0:1.1.19-8.el7_6.4         pcs.x86_64 0:0.9.165-6.el7.centos.2         policycoreutils-python.x86_64 0:2.5-29.el7_6.1         psmisc.x86_64 0:22.20-15.el7
 Dependency Installed:
   audit-libs-python.x86_64 0:2.8.4-4.el7                avahi-libs.x86_64 0:0.6.31-19.el7                                   bc.x86_64 0:1.06.95-13.el7
   checkpolicy.x86_64 0:2.5-8.el7                        cifs-utils.x86_64 0:6.2-10.el7                                      clufter-bin.x86_64 0:0.77.1-1.el7
   clufter-common.noarch 0:0.77.1-1.el7                  corosync.x86_64 0:2.4.3-4.el7                                       corosynclib.x86_64 0:2.4.3-4.el7
   cups-libs.x86_64 1:1.6.3-35.el7                       fontpackages-filesystem.noarch 0:1.44-8.el7                         gnutls.x86_64 0:3.3.29-9.el7_6
   gssproxy.x86_64 0:0.7.0-21.el7                        keyutils.x86_64 0:1.5.8-3.el7                                       libbasicobjects.x86_64 0:0.1.1-32.el7
   libcgroup.x86_64 0:0.41-20.el7                        libcollection.x86_64 0:0.7.0-32.el7                                 liberation-fonts-common.noarch 1:1.07.2-16.el7
   liberation-sans-fonts.noarch 1:1.07.2-16.el7          libevent.x86_64 0:2.0.21-4.el7                                      libini_config.x86_64 0:1.3.1-32.el7
   libldb.x86_64 0:1.3.4-1.el7                           libnfsidmap.x86_64 0:0.25-19.el7                                    libpath_utils.x86_64 0:0.2.1-32.el7
   libqb.x86_64 0:1.0.1-7.el7                            libref_array.x86_64 0:0.1.5-32.el7                                  libsemanage-python.x86_64 0:2.5-14.el7
   libtalloc.x86_64 0:2.1.13-1.el7                       libtdb.x86_64 0:1.3.15-1.el7                                        libtevent.x86_64 0:0.9.36-1.el7
   libtirpc.x86_64 0:0.2.4-0.15.el7                      libverto-libevent.x86_64 0:0.2.5-4.el7                              libwbclient.x86_64 0:4.8.3-6.el7_6
   libxslt.x86_64 0:1.1.28-5.el7                         libyaml.x86_64 0:0.1.4-11.el7_0                                     net-snmp-libs.x86_64 1:5.7.2-38.el7_6.2
   net-tools.x86_64 0:2.0-0.24.20131004git.el7           nettle.x86_64 0:2.7.1-8.el7                                         nfs-utils.x86_64 1:1.3.0-0.61.el7
   overpass-fonts.noarch 0:2.1-1.el7                     pacemaker-cli.x86_64 0:1.1.19-8.el7_6.4                             pacemaker-cluster-libs.x86_64 0:1.1.19-8.el7_6.4
   pacemaker-libs.x86_64 0:1.1.19-8.el7_6.4              perl-TimeDate.noarch 1:2.30-2.el7                                   python-IPy.noarch 0:0.75-6.el7
   python-backports.x86_64 0:1.0-8.el7                   python-backports-ssl_match_hostname.noarch 0:3.5.0.1-1.el7          python-clufter.noarch 0:0.77.1-1.el7
   python-ipaddress.noarch 0:1.0.16-2.el7                python-lxml.x86_64 0:3.2.1-4.el7                                    python-setuptools.noarch 0:0.9.8-7.el7
   quota.x86_64 1:4.01-17.el7                            quota-nls.noarch 1:4.01-17.el7                                      resource-agents.x86_64 0:4.1.1-12.el7_6.19
   rpcbind.x86_64 0:0.2.0-47.el7                         ruby.x86_64 0:2.0.0.648-35.el7_6                                    ruby-irb.noarch 0:2.0.0.648-35.el7_6
   ruby-libs.x86_64 0:2.0.0.648-35.el7_6                 rubygem-bigdecimal.x86_64 0:1.2.0-35.el7_6                          rubygem-io-console.x86_64 0:0.4.2-35.el7_6
   rubygem-json.x86_64 0:1.7.7-35.el7_6                  rubygem-psych.x86_64 0:2.0.0-35.el7_6                               rubygem-rdoc.noarch 0:4.0.0-35.el7_6
   rubygems.noarch 0:2.0.14.1-35.el7_6                   samba-client-libs.x86_64 0:4.8.3-6.el7_6                            samba-common.noarch 0:4.8.3-6.el7_6
   samba-common-libs.x86_64 0:4.8.3-6.el7_6              setools-libs.x86_64 0:3.3.8-4.el7                                   tcp_wrappers.x86_64 0:7.6-77.el7
   trousers.x86_64 0:0.3.14-2.el7
 Dependency Updated:
   audit.x86_64 0:2.8.4-4.el7                      audit-libs.x86_64 0:2.8.4-4.el7          libselinux.x86_64 0:2.5-14.1.el7          libselinux-python.x86_64 0:2.5-14.1.el7
   libselinux-utils.x86_64 0:2.5-14.1.el7          libsemanage.x86_64 0:2.5-14.el7          libsepol.x86_64 0:2.5-10.el7              policycoreutils.x86_64 0:2.5-29.el7_6.1
 Complete!
 [root@corcls1 ~]#
Completed with installing the required packages.
List the features of Pacemaker was built with by running option –features with pacemakerd.
# pacemakerd --features[root@corcls1 ~]# pacemakerd --features
Pacemaker 1.1.19-8.el7_6.4 (Build: c3c624ea3d)
Supporting v3.0.14: generated-manpages agent-manpages ncurses libqb-logging libqb-ipc systemd nagios corosync-native atomic-attrd acls
[root@corcls1 ~]#The version of Corosync we are installed with.
# corosync -v[root@corcls1 ~]# corosync -v
Corosync Cluster Engine, version '2.4.3'
Copyright (c) 2006-2009 Red Hat, Inc.
[root@corcls1 ~]#Start the Cluster Service
Once the cluster packages installed. Start the cluster service pcsd and enable the cluster service persistently to start the service during the system reboot.
# systemctl start pcsd.service
# systemctl enable pcsd.service
[root@corcls1 ~]# systemctl start pcsd.service
[root@corcls1 ~]# systemctl enable pcsd.service
Created symlink from /etc/systemd/system/multi-user.target.wants/pcsd.service to /usr/lib/systemd/system/pcsd.service.
[root@corcls1 ~]#Create a password for the Cluster user
While installing the packages it will create a user with no login called “hacluster” to run the pcs command across all the nodes.
[root@corcls1 ~]# tail -n1 /etc/passwd
 hacluster:x:189:189:cluster user:/home/hacluster:/sbin/nologin
[root@corcls1 ~]#
We need to create a password for this user across all the nodes. It can be done by running on individual nodes or by running from any one of the nodes using SSH.
# echo clusterpassword123 | passwd --stdin haclusterMake sure to use an encrypted password instead of using plain text.
[root@corcls1 ~]# echo clusterpassword123 | passwd --stdin hacluster
Changing password for user hacluster.
passwd: all authentication tokens updated successfully.
[root@corcls1 ~]#
Configure CoroSync
To configure the corosync first we need to authenticate as the hacluster user on all the nodes by running below command, use an encrypted password.
# pcs cluster auth -u hacluster -p clusterpassword123 corcls1 corcls2
The authorization tokens are stored in /var/lib/pcsd/tokens. By default, all nodes are also authenticated to each other.
# cat /var/lib/pcsd/tokensTokens will be stored as shown below.
[root@corcls1 ~]# cat /var/lib/pcsd/tokens
 {
   "format_version": 3,
   "data_version": 3,
   "tokens": {
     "corcls1": "26918338-3f19-4713-8700-03991dfa8257",
     "corcls2": "9a8b8c8e-983b-468d-83e5-ccb2a0fc4e97"
   },
   "ports": {
     "corcls1": 2224,
     "corcls2": 2224
   }
 }
 [root@corcls1 ~]#
Run the pcs cluster setup command to generate and synchronize the corosync configuration.
# pcs cluster setup --name linuxsysadmins-cls corcls1 corcls2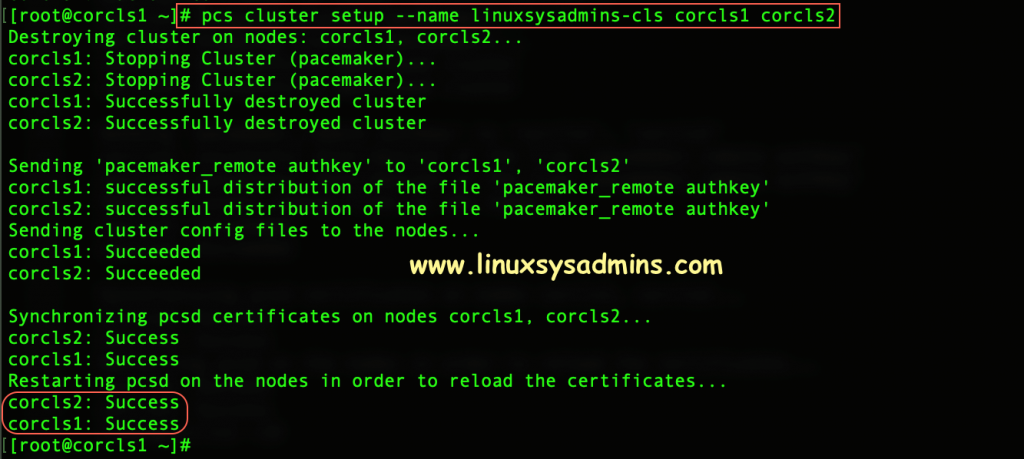
We need to provide a name for our cluster with –name and mention all the list of servers we about to authenticate.
Start the cluster service once setup completed.
# pcs cluster start --all[root@corcls1 ~]# pcs cluster start --all
corcls1: Starting Cluster (corosync)...
corcls2: Starting Cluster (corosync)...
corcls1: Starting Cluster (pacemaker)...
corcls2: Starting Cluster (pacemaker)...
[root@corcls1 ~]#Verify the cluster status, we should now get the status for both serves as online.
# pcs cluster status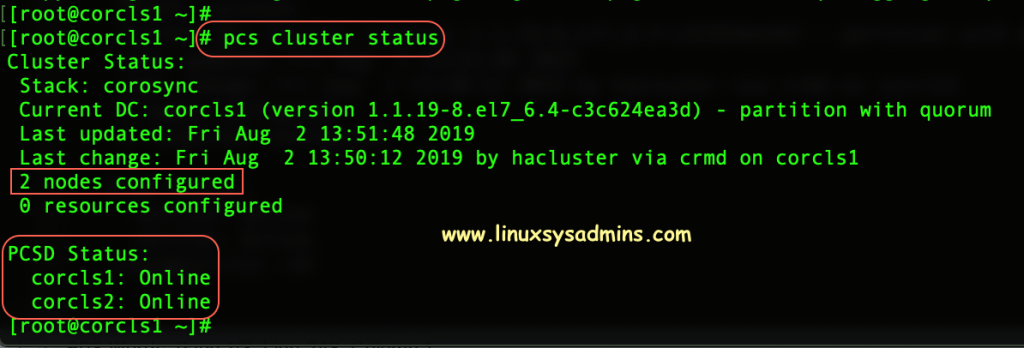
We can verify below command as well to check the cluster status.
# pcs status
Enable the Cluster Service Persistently
To bring up the cluster service and join the node automatically to the cluster. To start the cluster service persistently use “enable” option with the pcs command.
# pcs cluster enable --allBelow output shows cluster services are persistently enabled.
[root@corcls1 ~]# pcs cluster enable --all
corcls1: Cluster Enabled
corcls2: Cluster Enabled
[root@corcls1 ~]#
Check the Quorum Status
Verify the Quorum and voting status with anyone of below command.
# pcs status quorum
# corosync-quorumtool
[root@corcls1 ~]# pcs status quorum
Quorum information
------------------
Date: Fri Aug 2 13:53:31 2019
Quorum provider: corosync_votequorum
Nodes: 2
Node ID: 1
Ring ID: 1/8
Quorate: Yes
Votequorum information
----------------------
Expected votes: 2
Highest expected: 2
Total votes: 2
Quorum: 1
Flags: 2Node Quorate WaitForAll
Membership information
----------------------
Nodeid Votes Qdevice Name
1 1 NR corcls1 (local)
2 1 NR corcls2
[root@corcls1 ~]#Check the status of CoroSync
CoroSync is the cluster engine which provides services like membership, messaging and quorum.
# pcs status corosync[root@corcls1 ~]# pcs status corosync
Membership information
----------------------
Nodeid Votes Name
1 1 corcls1 (local)
2 1 corcls2
[root@corcls1 ~]#Verify the CoroSync & CIB Configuration
It’s better to know the corosync and CIB configuration files.
[root@corcls1 ~]# cat /etc/corosync/corosync.conf
totem {
    version: 2
    cluster_name: linuxsysadmins-cls
    secauth: off
    transport: udpu
}

nodelist {
    node {
        ring0_addr: corcls1
        nodeid: 1
    }

    node {
        ring0_addr: corcls2
        nodeid: 2
    }
}

quorum {
    provider: corosync_votequorum
    two_node: 1
}

logging {
    to_logfile: yes
    logfile: /var/log/cluster/corosync.log
    to_syslog: yes
}
[root@corcls1 ~]#
The CIB file or Cluster information base will be saved in an XML format which will take care of all nodes and resources state. The CIB will be synchronized across the cluster and handles requests to modify it.
To view the cluster information base use option cib with pcs command.
# pcs cluster cib[root@corcls1 ~]# pcs cluster cib
<ib crm_feature_set="3.0.14" validate-with="pacemaker-2.10" epoch="5" num_updates="4" admin_epoch="0" cib-last-written="Fri Aug 2 13:50:12 2019" update-origin="corcls1" update-client="crmd" update-user="hacluster" have-quorum="1" dc-uuid="1">
<configuration>
<crm_config>
<cluster_property_set id="cib-bootstrap-options">
<nvpair id="cib-bootstrap-options-have-watchdog" name="have-watchdog" value="false"/>
<nvpair id="cib-bootstrap-options-dc-version" name="dc-version" value="1.1.19-8.el7_6.4-c3c624ea3d"/>
<nvpair id="cib-bootstrap-options-cluster-infrastructure" name="cluster-infrastructure" value="corosync"/>
<nvpair id="cib-bootstrap-options-cluster-name" name="cluster-name" value="linuxsysadmins-cls"/>
</cluster_property_set>
</crm_config>
<nodes>
<node id="1" uname="corcls1"/>
<node id="2" uname="corcls2"/>
</nodes>
<resources/>
<constraints/>
</configuration>
<status>
<node_state id="1" uname="corcls1" in_ccm="true" crmd="online" crm-debug-origin="do_state_transition" join="member" expected="member">
<lrm id="1">
<lrm_resources/>
</lrm>
</node_state>
<node_state id="2" uname="corcls2" in_ccm="true" crmd="online" crm-debug-origin="do_state_transition" join="member" expected="member">
<lrm id="2">
<lrm_resources/>
</lrm>
</node_state>
</status>
</cib>
[root@corcls1 ~]#
The same thing we can find in a file under /var/lib/pacemaker/cib
[root@corcls1 cib]# pwd
/var/lib/pacemaker/cib
[root@corcls1 cib]#
[root@corcls1 cib]# cat cib.xml
<cib crm_feature_set="3.0.14" validate-with="pacemaker-2.10" epoch="5" num_updates="0" admin_epoch="0" cib-last-written="Fri Aug  2 13:50:12 2019" update-origin="corcls1" update-client="crmd" update-user="hacluster">
  <configuration>
    <crm_config>
      <cluster_property_set id="cib-bootstrap-options">
        <nvpair id="cib-bootstrap-options-have-watchdog" name="have-watchdog" value="false"/>
        <nvpair id="cib-bootstrap-options-dc-version" name="dc-version" value="1.1.19-8.el7_6.4-c3c624ea3d"/>
        <nvpair id="cib-bootstrap-options-cluster-infrastructure" name="cluster-infrastructure" value="corosync"/>
        <nvpair id="cib-bootstrap-options-cluster-name" name="cluster-name" value="linuxsysadmins-cls"/>
      </cluster_property_set>
    </crm_config>
    <nodes>
      <node id="1" uname="corcls1"/>
      <node id="2" uname="corcls2"/>
    </nodes>
    <resources/>
    <constraints/>
  </configuration>
</cib>
[root@corcls1 cib]#
You can notice the configuration with node information, cluster name and much more.
Logs to looks for
The log file we need to look for anything related to cluster service.
# tail -f /var/log/cluster/corosync.log[root@corcls1 ~]# tail -n 10 /var/log/cluster/corosync.log
Aug 03 14:01:49 [1406] corcls1.linuxsysadmins.local cib: info: cib_file_backup: Archived previous version as /var/lib/pacemaker/cib/cib-10.raw
Aug 03 14:01:49 [1406] corcls1.linuxsysadmins.local cib: info: cib_file_write_with_digest: Wrote version 0.7.0 of the CIB to disk (digest: b1e78c0e1364bb94dec0fefdd2ff1bd1)
Aug 03 14:01:49 [1406] corcls1.linuxsysadmins.local cib: info: cib_file_write_with_digest: Reading cluster configuration file /var/lib/pacemaker/cib/cib.PeKvG9 (digest: /var/lib/pacemaker/cib/cib.GkgYGD)
Aug 03 14:01:54 [1406] corcls1.linuxsysadmins.local cib: info: cib_process_ping: Reporting our current digest to corcls2: 2e36d8d0181912ebe6a1f058cb613057 for 0.7.4 (0x55c951db95f0 0)
Aug 03 14:01:58 [1414] corcls1.linuxsysadmins.local crmd: info: crm_procfs_pid_of: Found cib active as process 1406
Aug 03 14:01:58 [1414] corcls1.linuxsysadmins.local crmd: notice: throttle_check_thresholds: High CPU load detected: 1.390000
Aug 03 14:01:58 [1414] corcls1.linuxsysadmins.local crmd: info: throttle_send_command: New throttle mode: 0100 (was ffffffff)
Aug 03 14:02:28 [1414] corcls1.linuxsysadmins.local crmd: info: throttle_check_thresholds: Moderate CPU load detected: 0.920000
Aug 03 14:02:28 [1414] corcls1.linuxsysadmins.local crmd: info: throttle_send_command: New throttle mode: 0010 (was 0100)
Aug 03 14:02:58 [1414] corcls1.linuxsysadmins.local crmd: info: throttle_send_command: New throttle mode: 0000 (was 0010)
[root@corcls1 ~]#That’s it we have completed with the basic pacemaker cluster setup.
In our next guide let see how to manage the cluster from the GUI.
Conclusion
The basic pacemaker Linux cluster setup will provide high availability for any services configured to use with it. Let see how to create a resource, about fencing and much more on upcoming articles. Subscribe to our newsletter and stay with us to receive the updates. Your feedbacks are most welcome in below comment section.
3 thoughts on “Install and configure High Availability Linux Cluster with Pacemaker on CentOS 7.6”
Comments are closed.
Hello. I have a question, so I wrote it down. I tried to check the source part of the pacemaker by inserting a drbd, and I succeeded But I wonder if there is a way to put monitoring tools such as nagios in the resource section.
Hi,
We are new to Apache CloudStack. We are looking for a Primary Storage (NFS share) solution, where it does not fail because of single node failure. Is there a way where I can use the NFS via any kind of clustering, so that when one node fails i will still have the VM’s working from another node which is in cluster.
Basically we need a system that has as follows:-
1. One single point IP address with the shared mount point being same
2. NFS storage, as Apache CloudStack supports HA only with NFS.
3. I need to deploy around around 60 VM’s for our application.
Regards,
Mark
Excellent guide