Introduction
In our previous how-to guide, we have seen how to reduce a “/” filesystem with ext4 file system type. In this guide let’s focus on how to Shrink XFS partition for a root logical volume. To be clear the filesystem reduce word is not applicable yet for the XFS file system. However, if you need to reduce XFS filesystem on a logical volume is possible only by taking a backup and restore and recreating the logical volume.
If you are looking for more Logical Volume Management guide search in below search box with keyword “Logical Volume“.
The Current filesystem Layout
This is the current filesystem layout in my home lab. Currently “/” filesystem was created with 64 GB.
[root@prod-srv-01 ~]# df -hPT
Filesystem            Type      Size  Used Avail Use% Mounted on
devtmpfs              devtmpfs  889M     0  889M   0% /dev
tmpfs                 tmpfs     909M     0  909M   0% /dev/shm
tmpfs                 tmpfs     909M  8.6M  900M   1% /run
tmpfs                 tmpfs     909M     0  909M   0% /sys/fs/cgroup
/dev/mapper/rhel-root xfs        64G  1.8G   62G   3% /
/dev/sda2             xfs      1014M  187M  828M  19% /boot
/dev/mapper/rhel-home xfs        31G  254M   31G   1% /home
/dev/sda1             vfat      599M  6.9M  592M   2% /boot/efi
tmpfs                 tmpfs     182M     0  182M   0% /run/user/0
[root@prod-srv-01 ~]#
Our intention is only to reduce the size of “/” partition which running with XFS filesystem.
[root@prod-srv-01 ~]# df -hPT /
Filesystem            Type  Size  Used Avail Use% Mounted on
/dev/mapper/rhel-root xfs    64G  1.8G   62G   3% /
[root@prod-srv-01 ~]#
Right now the logical volume size is 64 GB. On our first single disk there are 3 partitions created and “/” is assigned with more space which is not required at all.
[root@prod-srv-01 ~]# lvs
  LV   VG   Attr       LSize  Pool Origin Data%  Meta%  Move Log Cpy%Sync Convert
  home rhel -wi-ao---- 30.98g
  root rhel -wi-ao---- 63.46g
  swap rhel -wi-ao----  3.96g
[root@prod-srv-01 ~]#

[root@prod-srv-01 ~]# lsblk
NAME          MAJ:MIN RM  SIZE RO TYPE MOUNTPOINT
sda             8:0    0  100G  0 disk
├─sda1          8:1    0  600M  0 part /boot/efi
├─sda2          8:2    0    1G  0 part /boot
└─sda3          8:3    0 98.4G  0 part
  ├─rhel-root 253:0    0 63.5G  0 lvm  /
  ├─rhel-swap 253:1    0    4G  0 lvm  [SWAP]
  └─rhel-home 253:2    0   31G  0 lvm  /home
sr0            11:0    1 1024M  0 rom
[root@prod-srv-01 ~]#
Backup your Data
Before performing shrink XFS or reduce XFS make sure to take a full backup of yours filesystem. In the worst case, we need to rollback from the backup if something goes wrong.
Booting to Rescue Mode
Boot from any ISO/DVD and select the “Troubleshooting” option.

By following select the “Rescue a Red Hat Enterprise Linux system” to boot into rescue environment.

As we mentioned in the previous guide to perform a Shrink XFS we should not mount the filesystem. Type 3 and enter into Rescue shell. To perform any actions on logical volumes we shouldn’t enter into chroot environment.
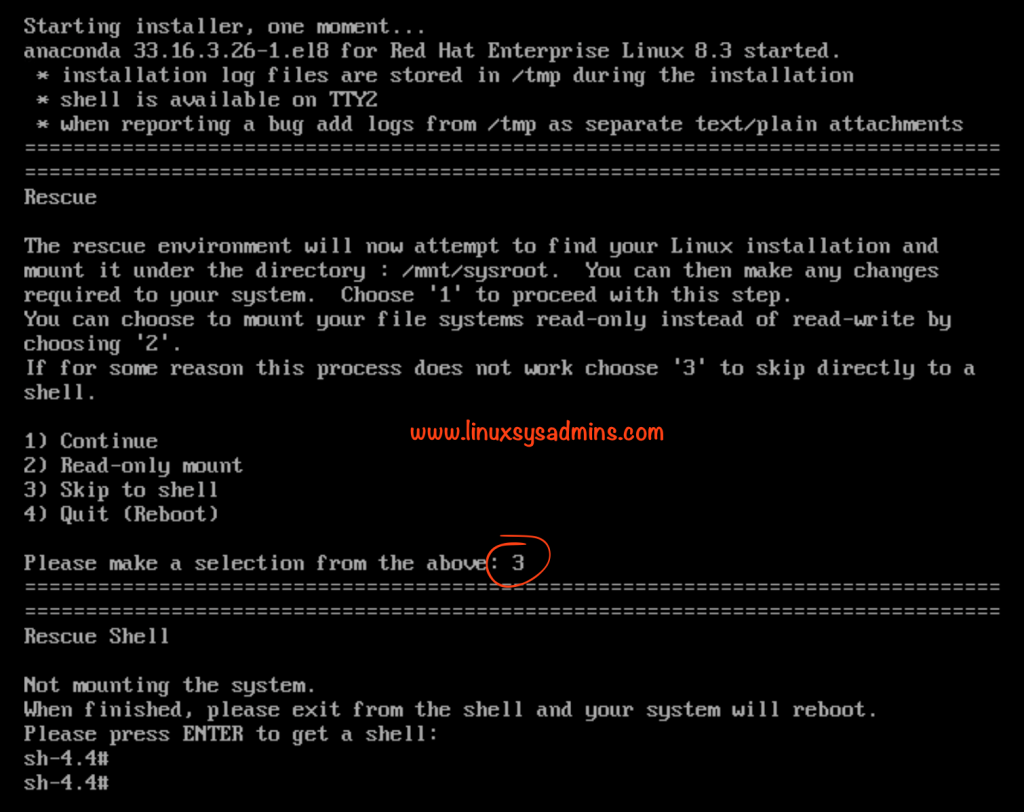
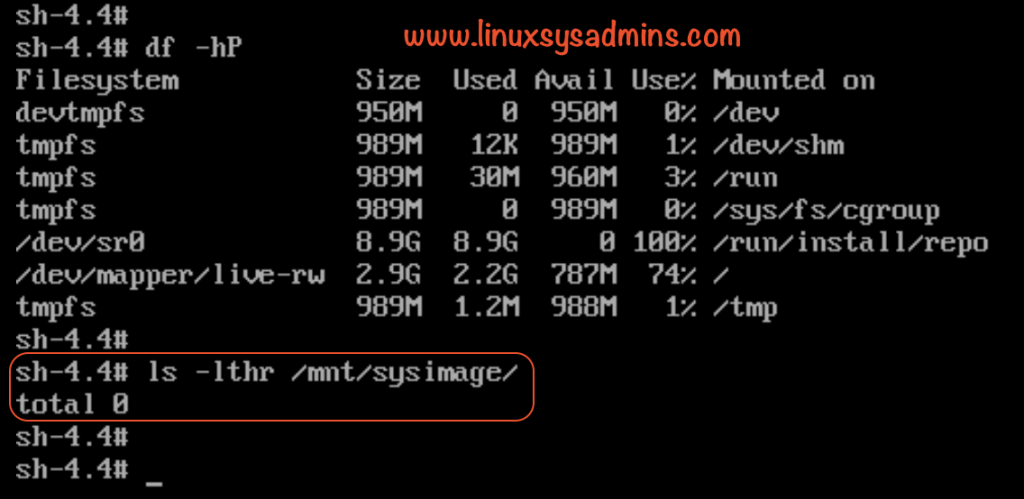
The filesystem is not mounted.
# ls -lthr /mnt/sysimage/
Activate the volume group
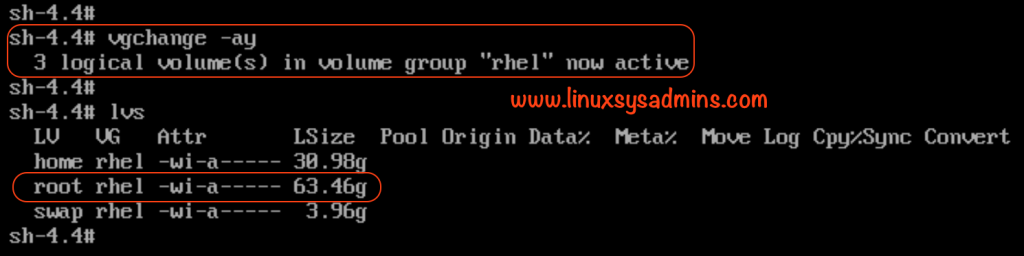
To start with XFS reduce first we need to activate the volume group.
# vgchange -ay
Temporarily Mount the Logical volumes
Starting with backup, first, we need to mount the logical volumes under some location. By temporarily mounting it we can do a backup of “/” partition to any other location and it needs to be accessed while we perform the restore.
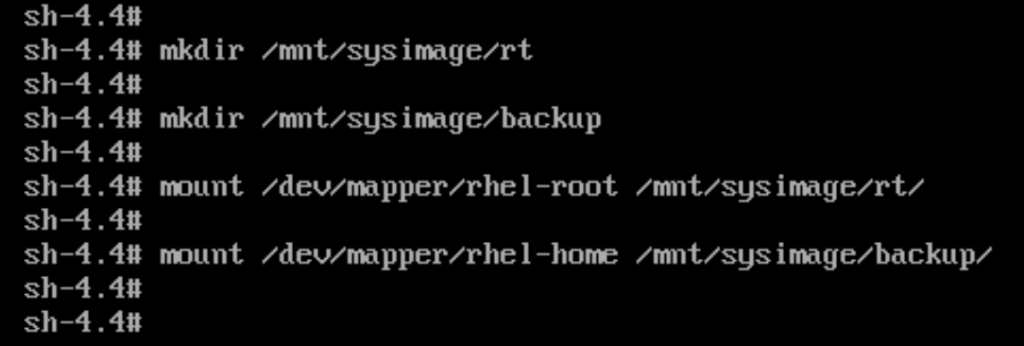
Now, create two directories under /mnt/sysimage/. 1 will be used to mount the actual “/” filesystem of this server and another one is to store the backup of “/” filesystem.
# mkdir /mnt/sysimage/rt
# mkdir /mnt/sysimage/backup
# mount /dev/mapper/rhel-root /mnt/sysimage/rt/
# mount /dev/mapper/rhel-home /mnt/sysimage/backup/
We have enough free space on “/home” filesystem, so instead of adding a new disk, we are going to use it for taking the backup.
xfsdump to backup the filesystem
Initiate the backup by running xfsdump command.
# xfsdump -l 0 -L "root lv backup" -M "backup" -f /mnt/sysimage/backup/root_backup.img /mnt/sysimage/rt
While taking the dump use level 0 which will dump all the files, It will prompt to enter a dump session label and media label, we can avoid the prompt by adding -L and -M by the following use -f to save the dump as a file.
-l 0 – Dump level is set to 0, A level 0 dump is absolute, all files are dumped.-L – Specifies a label for the dump session-M – Specifies a label for the first media object-f – Specifies a dump destination to a file or device like tape drives
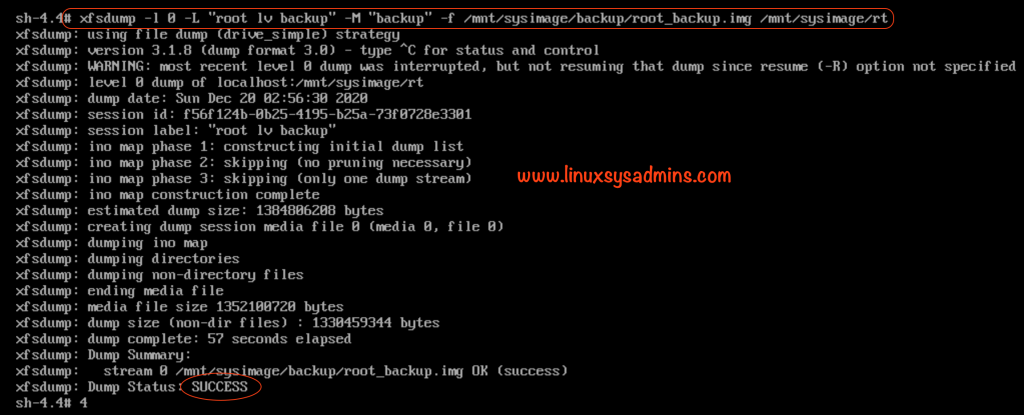
At the end of dump output we can see the dump status as SUCCESS
Unmount the filesystems
Once completed with backup we can unmount the filesystem. If you face any issue similar to below

Find what currently using the filesystem and kill the PIDS.

Once the PIDS are cleared, now unmount only the current “/” file system.
# umount /mnt/sysimage/rt/
Shrink XFS | Recreating Logical volume
The 64 GB of logical volume need to be deleted. Use lvremove to delete the logical volume.
Create a logical volume with the new desired size for the root “/” file system. Use -Zy to zero the first 4KiB of data in the new LV.
-Z --zero-y - yes
To delete the logical volume use
# lvremove /dev/mapper/rhel-root
Right after that, create the desired size of the logical volume. I’m creating with a 15 GB of the logical volume in the same existing (rhel) volume group.
# lvcreate -Zy -L 15G -n root rhel
Finally, print the created logical volume using lvs command.
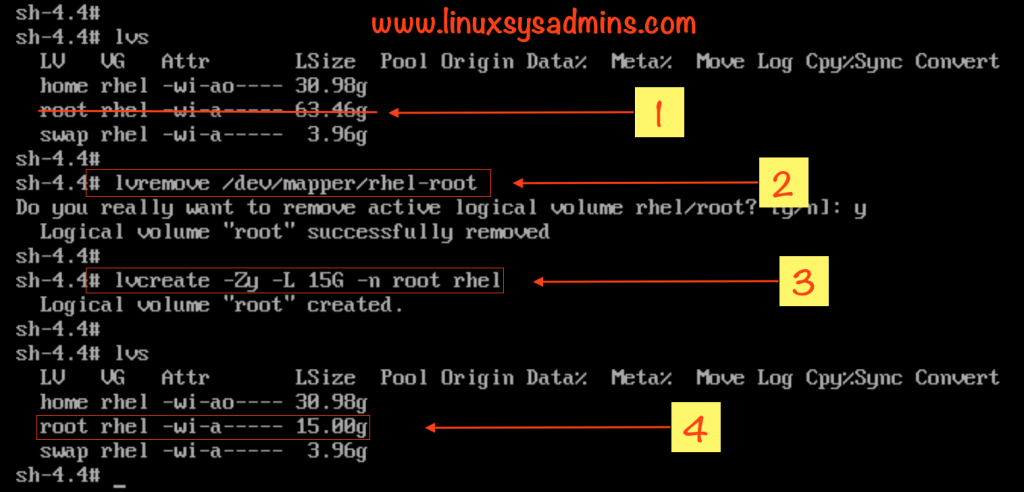
- Remove the root logical volume with 64 GB in size.
- Use
lvremoveto delete the logical volume - Recreate the logical volume
- Newly created logical volume
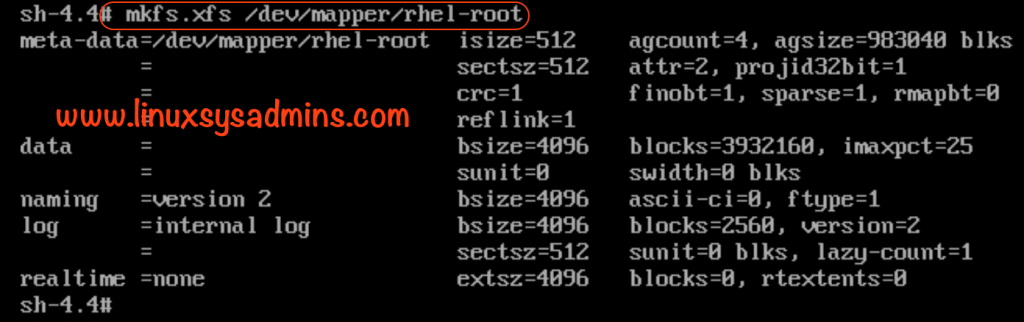
Creating an XFS file System
Now format the newly created logical volume and create the XFS file system.
Mount and Restore
Once the file system is ready, mount it under the same mount point at /mnt/sysimage/rt
# mount /dev/mapper/rhel-root /mnt/sysimage/rt
Start with the restore by pointing to existing back file
# xfsrestore -f /mnt/sysimage/backup/root_backup.img /mnt/sysimage/rt
The restore will take some time depends on how many GB of data have in the dump file.
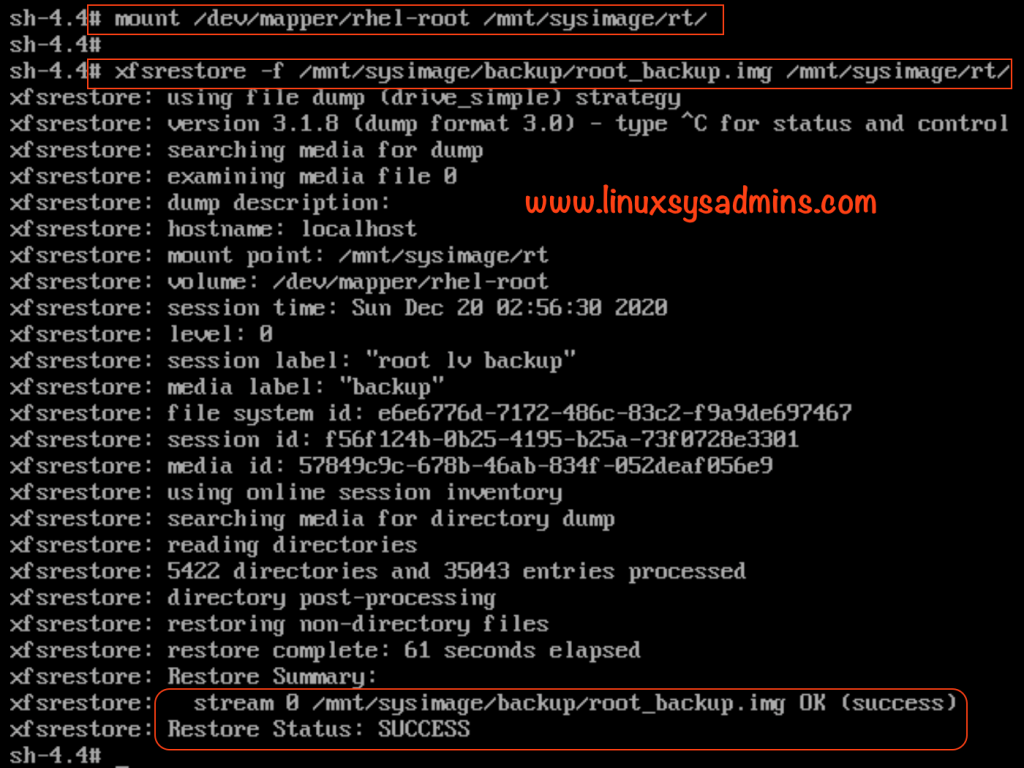
We could see the restore from .img file was SUCCESS.
Unmount all the filesystems
We are almost done with shrink XFS, now unmount all the filesystem which ever we have mounted in earlier steps.

Exit and reboot from the rescue shell by typing “exit“.
Up and Running with new LV size
After the reboot, we could see the desired size for “/” filesystem as 15 GB and logical volumes too with the same size.
[root@prod-srv-01 ~]# lvs
  LV   VG   Attr       LSize  Pool Origin Data%  Meta%  Move Log Cpy%Sync Convert
  home rhel -wi-ao---- 30.98g
  root rhel -wi-ao---- 15.00g
  swap rhel -wi-ao----  3.96g
[root@prod-srv-01 ~]#

[root@prod-srv-01 ~]# df -hPT /
Filesystem            Type  Size  Used Avail Use% Mounted on
/dev/mapper/rhel-root xfs    15G  1.5G   14G  10% /
[root@prod-srv-01 ~]#

[root@prod-srv-01 ~]# lsblk
 NAME          MAJ:MIN RM  SIZE RO TYPE MOUNTPOINT
 sda             8:0    0  100G  0 disk
 ├─sda1          8:1    0  600M  0 part /boot/efi
 ├─sda2          8:2    0    1G  0 part /boot
 └─sda3          8:3    0 98.4G  0 part
   ├─rhel-root 253:0    0   15G  0 lvm  /
   ├─rhel-swap 253:1    0    4G  0 lvm  [SWAP]
   └─rhel-home 253:2    0   31G  0 lvm  /home
 sr0            11:0    1  8.8G  0 rom
 [root@prod-srv-01 ~]#
That’s it, we have completed with Shrinking an XFS filesystem and a logical volume with the help of xfsdump and xfsrestore utility.
Conclusion
To reduce a root LVM with XFS filesystem is not possible by running lvreduce, Instead, we need to back up the files and restore from the dump using xfsdump and xfsrestore. In our one of the previous guide, we have covered with XFS filesystem dump and restore, However, this guide is focused on how to resize the root logical volume with XFS.
To perform the LV reduce, first, we need to boot into rescue mode, then we need to activate the volume group and mount the old filesystem which is about to dump. Then remove the old logical volume and create a new logical volume with the desired size. Right after that create the XFS file system and restore the dump using xfsrestore command. Finally, reboot the server to back online with the new size of LV and XFS filesystem with the existing data.
Subscribe to our newsletter for more guide related to nix, stay safe and stay tune. If you like the above write-up provide your feedback in below comment section.
Thanks a lot. Great article. /device/mapper/root-name did not work for me.
Instead I use /dev/Volname/ root-name