Introduction
Resize root LVM or Reducing “/” filesystem is one of the most required guides for new sysadmins. It will be the case if best practice is not followed in advance while creating the filesystem layout during the OS installation.
FYI, This guide is focused on ext4 filesystem.
Extending the “/” root file system and any other file systems can be performed on the fly. While coming into reducing a filesystem can be done only after unmounting it. However, it’s not applicable for reducing a “/” filesystem. To perform a reduce for “/” filesystem, we need to enter into rescue mode.
If you are looking for extending any filesystem look into this, How to Extend and Reduce Logical Volume in Linux
Why reducing root lvm or “/” filesystem is required?
This requirement will kick in only while we need to take back some unused space from “/” filesystem. This can be avoided during the initial OS installation by defining each logical volumes with the required size. If we leave the disk to be partitioned by anaconda installer, then it will decide to define its own disk layout by creating the default one with random size.
Logical volume management guide series:
- Create Logical volume management LVM file-system in Linux
- Shrink a Volume Group in Logical Volume Management (LVM2)
- Striped Logical Volume in Logical volume management (LVM)
- Migrating Logical Volumes in Logical Volume Management
- Create a Thinly Provisioned Logical Volume on Linux
- Moving a Volume Group from one Server to another Server
- Recover a deleted Logical Volume in LVM
- Recover a failed or deleted Physical Volume (PV) in LVM
- Create a Logical volume using Ansible
The Current FileSystem Layout
The current filesystem layout was defined automatically by the anaconda installer. During the server installation, I have not done any manual disk layout configuration, that the reason anaconda installer kicked in.
[root@prod-srv-01 ~]# df -hP
Filesystem             Size  Used Avail Use% Mounted on
devtmpfs               889M     0  889M   0% /dev
tmpfs                  909M     0  909M   0% /dev/shm
tmpfs                  909M  8.6M  900M   1% /run
tmpfs                  909M     0  909M   0% /sys/fs/cgroup
/dev/mapper/rhel-root   63G  1.6G   58G   3% /
/dev/sda2              976M  151M  759M  17% /boot
/dev/mapper/rhel-home   30G   45M   28G   1% /home
/dev/sda1              599M  6.9M  592M   2% /boot/efi
tmpfs                  182M     0  182M   0% /run/user/0
[root@prod-srv-01 ~]#
While anaconda handled the partition creation, it created 64 GB of the size of “/” partition. But actually, we don’t require this much size under a “/” partition. The minimum size required for “/” filesystem is not more than 6 GB if we have defined separated logical volume partitions for all other filesystems as per standard Linux installation.
In my setup, I’m about to allocate 15 to 20 GB of size, Even this is more than enough.
[root@prod-srv-01 ~]# df -hP /
 Filesystem             Size  Used Avail Use% Mounted on
 /dev/mapper/rhel-root   63G  1.6G   58G   3% /
[root@prod-srv-01 ~]#
The Current Logical Volumes
The current logical volumes are below, Our goal is to resize root lvm size to 15 GB.
[root@prod-srv-01 ~]# lvs
  LV   VG   Attr       LSize  Pool Origin Data%  Meta%  Move Log Cpy%Sync Convert
  home rhel -wi-ao---- 30.00g
  root rhel -wi-ao---- 64.00g
  swap rhel -wi-ao----  4.00g
[root@prod-srv-01 ~]#
Let’s start with reducing the “/” partition.
Boot into Rescue mode
To start with resize root lvm, we need to boot the server in rescue mode using ISO/DVD.
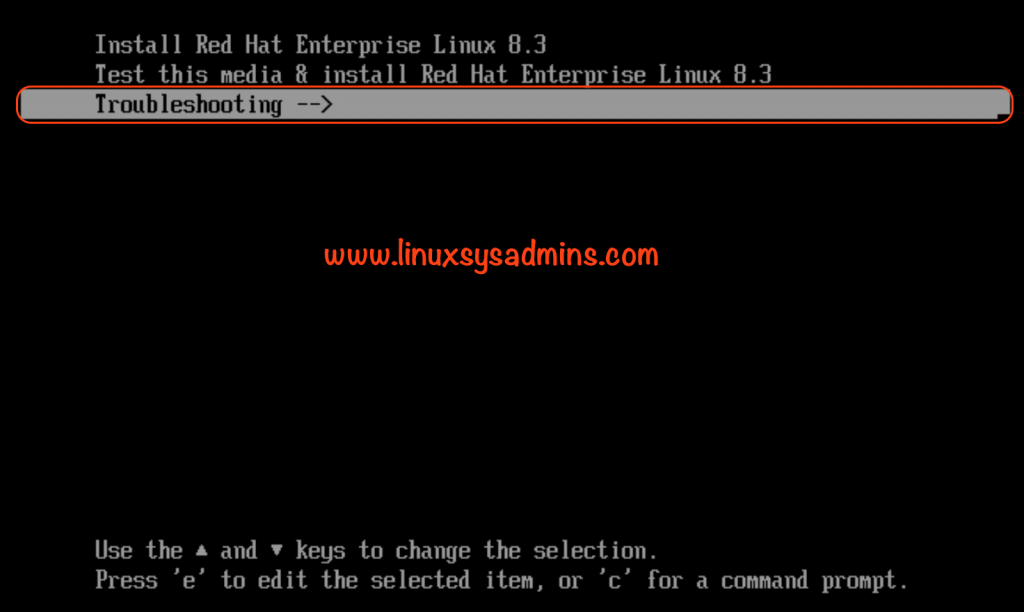
Once it booted, select the “Troubleshooting” option from the list.
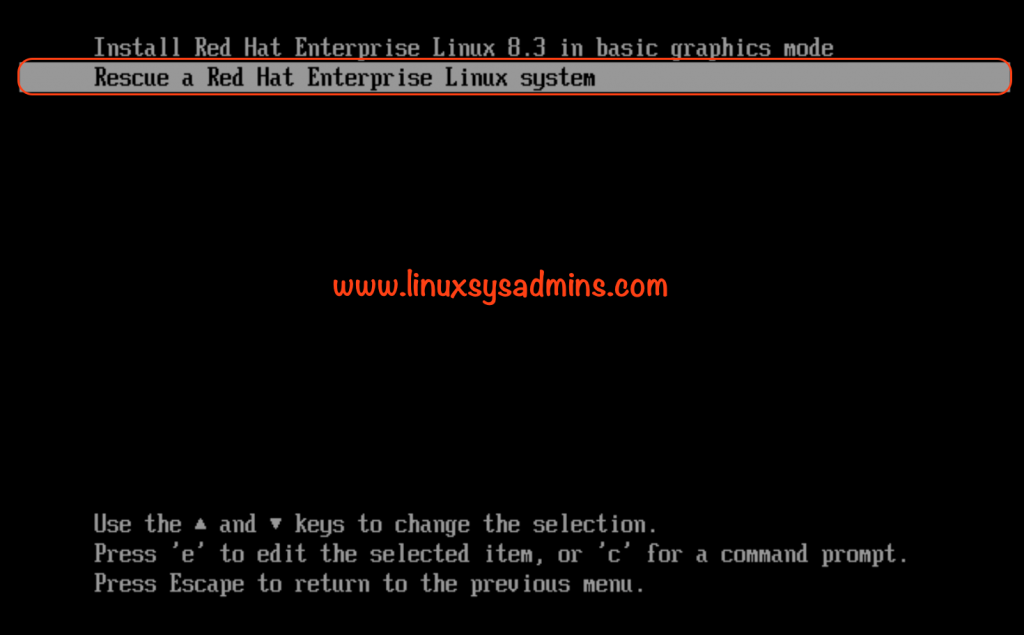
Again we will get two options, to install a fresh operating system or entering into rescue mode. Select “Rescue a Red Hat Enterprise Linux System“
We will get the below rescue environment menu. Select the third option to enter into shell.
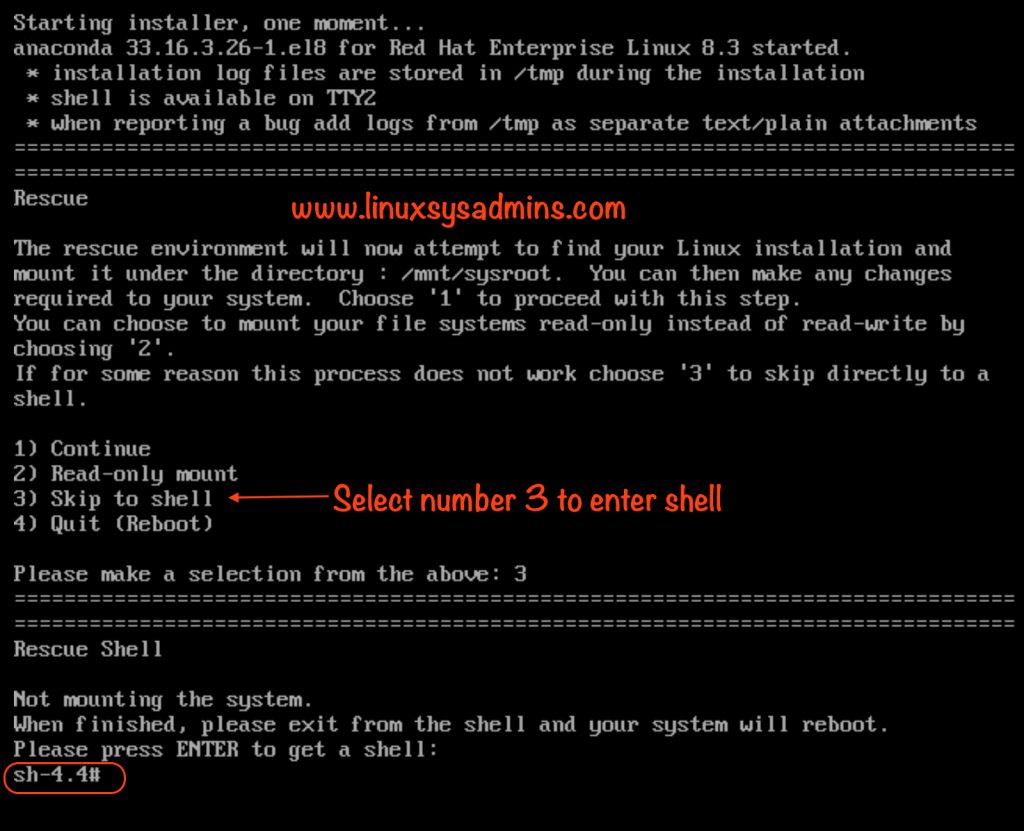
We will get a shell without mounting any filesystem, This is important to perform the resize root lvm.
Activating Volume Group
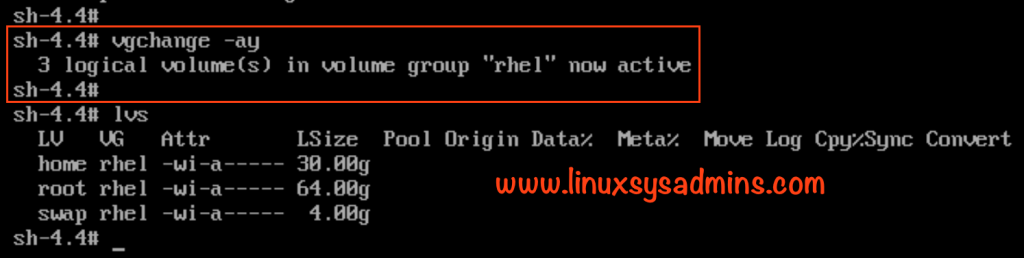
Right after getting into the shell, activate the VG.
# vgchange -ay
Once we run the command the logical volumes under all available volume group will be activated. However, it won’t mount the filesystem.
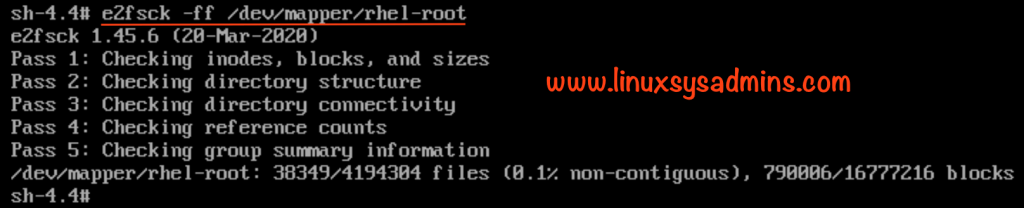
Check for file System error
As per Red Hat maneuver we need to check for the file system error.
# e2fsck -ff /dev/mapper/rhel-root
As shown in the below snip, the 5 checks should pass before proceeding with the resize.
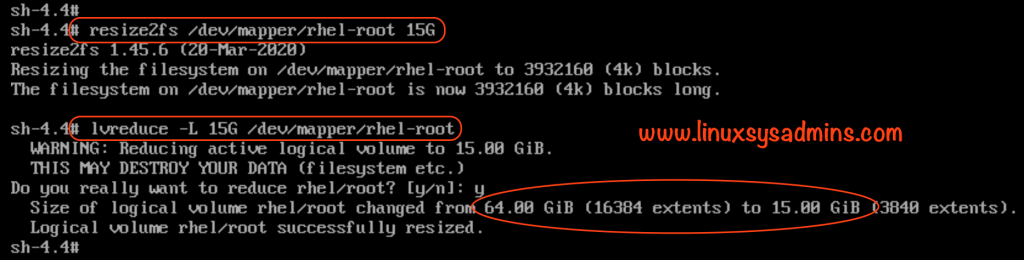
Resize and Reduce the filesystem
Next step is, resize and reduce the filesystem from 64 GB to 15 GB.
First, resize the filesystem with desire size for “/” logical volume we are about to reduce the size. Then run the lvreduce to reduce the logical volume.
# resize2fs /dev/mapper/rhel-root 15G
# lvreduce -L 15G /dev/mapper/rhel-root
The output shows it has been resized from 64 GB to 15 GB.
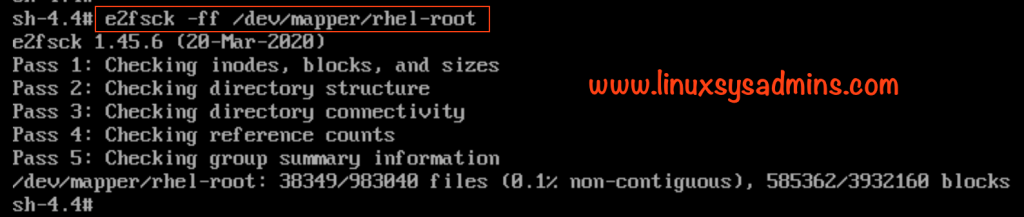
Checking Filesystem for error
After resizing the logical volume, we need to once again run the e2fsck command to verify the filesystem.
# e2fsck -ff /dev/mapper/rhel-root
Once all the checks show pass, we are good.
Type “exit” to exit from the shell and reboot the server.
Up and running with new LV Size
After the reboot, we could see the “/” filesystem is reduced to 15 GB.
[root@prod-srv-01 ~]# df -hP
 Filesystem             Size  Used Avail Use% Mounted on
 devtmpfs               889M     0  889M   0% /dev
 tmpfs                  909M     0  909M   0% /dev/shm
 tmpfs                  909M  8.6M  900M   1% /run
 tmpfs                  909M     0  909M   0% /sys/fs/cgroup
 /dev/mapper/rhel-root   15G  1.6G   12G  12% /
 /dev/sda2              976M  151M  759M  17% /boot
 /dev/mapper/rhel-home   30G   45M   28G   1% /home
 /dev/sda1              599M  6.9M  592M   2% /boot/efi
 tmpfs                  182M     0  182M   0% /run/user/0
[root@prod-srv-01 ~]#

[root@prod-srv-01 ~]# lvs
   LV   VG   Attr       LSize  Pool Origin Data%  Meta%  Move Log Cpy%Sync Convert
   home rhel -wi-ao---- 30.00g
   root rhel -wi-ao---- 15.00g
   swap rhel -wi-ao----  4.00g
[root@prod-srv-01 ~]#
That’s it, we have successfully completed with reducing “/” logical volume in a RHEL 8 server with ext4 filesystem.
Conclusion
To resize root lvm the only way is we need to boot into rescue mode and need the filesystem in the unmounted state. Moreover, while performing the resize, first, activate the volume group, then check for filesystem error and reduce the filesystem and logical volume.
Finally, once again check for the filesystem error and reboot the server. Now we should be up and running with new size for “/” filesystem. Let’s catch in another logical volume guide in future, if you feel this guide helped you for knowledge, subscribe to our newsletter for more.