Introduction
Provisioning Bare metal or virtual machine is the most important requirement for any system admin to eliminate the manual intervention to build a server. The opensource foreman tool provides us with production-grade features totally free of cost.
If you are looking for preparing Red Hat certification RH403 or RH404 this is your playground. You will get all the features available in Red Hat Satellite 6.x.
In our previous guide, we have gone through how to set up a foreman and how to register a Linux client with it. Now’s it’s time to provision few physical hosts from the foreman user interface. At the end of this guide, you will be more confident how it easy to provision a bare metal without any manual intervention.
For successful provisioning we need to have a Medium, Operating system, host groups, provisioning setup and Host creation. In this guide, Let’s start with creating a medium, To serve the Medium/Packages we will set up a local Apache webserver on our foreman server. Instead, you can set up the same in other servers as well.
Apart from this, we need to have a working DNS and DHCP. The DHCP server from the router should not overlap with the foreman DHCP we are about to set up. So make sure to use a different range of scopes.
Firewall Requirement
Enable the required ports by allowing the service.
# firewall-cmd --add-service=RH-Satellite-6 --permanent
# firewall-cmd --reload
Make sure to run --reload option to take effect.
Knowing Organization & Location
To create a medium and creating Operating System we need to make sure creating under the right organisation and location. In our setup we have only one location and organisation.
[root@foreman ~]# hammer organization list
---|-----------------------|-----------------------|-------------|----------------------
ID | TITLE                 | NAME                  | DESCRIPTION | LABEL
---|-----------------------|-----------------------|-------------|----------------------
1  | LinuxSys Organization | LinuxSys Organization |             | LinuxSys_Organization
---|-----------------------|-----------------------|-------------|----------------------
[root@foreman ~]#
The location is as follow.
[root@foreman ~]# hammer location list
---|-----------|-----------|------------
ID | TITLE     | NAME      | DESCRIPTION
---|-----------|-----------|------------
2  | MyHomeLab | MyHomeLab |
---|-----------|-----------|------------
[root@foreman ~]#
Once we get that information we need to substitute that information with the hammer command and options to create the remaining steps to successfully set up provisioning on foreman server.
Running a Temporary Web Server
In our setup we are not going to get the medium from online, Instead, we will try to mount a medium locally under the default document root of the Apache webserver.
Let’s run a local temporary web server using python. Mount the ISO file under any location and navigate to the mount location, by following run the python command.
# mount -t iso9660 /var/lib/vz/template/iso/CentOS-7-x86_64-Everything-2003.iso /mnt/
# cd /mnt/
# python -m SimpleHTTPServer 80
Now you will get a working web server with your mounted medium.
http://192.168.0.11/This is just a temporary solution.
Running a Permanent WebServer
To make a permanent solution for serving our medium let’s set up an apache web server by installing httpd package.
# yum install httpd -yEnable and start the service.
# systemctl enable httpd
# systemctl start httpd
As we know the default root directory of apache web server let’s mount the DVD under document root by creating a directory.
# mkdir /var/www/html/pub/CentOS78
# mount /dev/sr0 /var/www/html/pub/CentOS78/
Now we are good with accessing below URL.
http://192.168.0.19/pub/CentOS78/Next step is to create a medium for our provisioning.
Listing the available Medium
Before creating any medium, we will get the listed medium by default.
To list the currently available medium from CLI.
[root@foreman ~]# hammer medium list
---|----------------------|------------------------------------------------------------------------------
ID | NAME | PATH
---|----------------------|------------------------------------------------------------------------------
1 | CentOS mirror | http://mirror.centos.org/centos/$major/os/$arch
8 | CoreOS mirror | http://$release.release.core-os.net
2 | Debian mirror | http://ftp.debian.org/debian
4 | Fedora Atomic mirror | http://dl.fedoraproject.org/pub/alt/atomic/stable/Cloud_Atomic/$arch/os/
3 | Fedora mirror | http://dl.fedoraproject.org/pub/fedora/linux/releases/$major/Server/$arch/os/
5 | FreeBSD mirror | http://ftp.freebsd.org/pub/FreeBSD/releases/$arch/$version-RELEASE/
6 | OpenSUSE mirror | http://download.opensuse.org/distribution/leap/$version/repo/oss
9 | RancherOS mirror | https://github.com/rancher/os/releases/download/v$version
7 | Ubuntu mirror | http://archive.ubuntu.com/ubuntu
---|----------------------|------------------------------------------------------------------------------
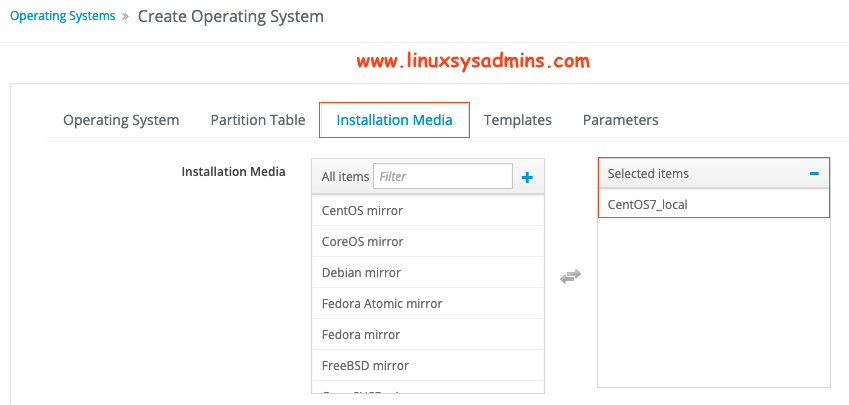
[root@foreman ~]#Creating the Installation Media
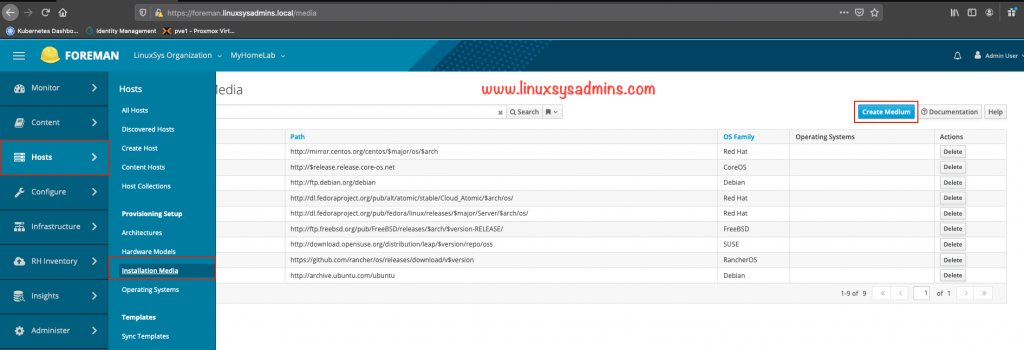
To create a installation medium navigate to
hosts –> Installation Media –> Create Medium
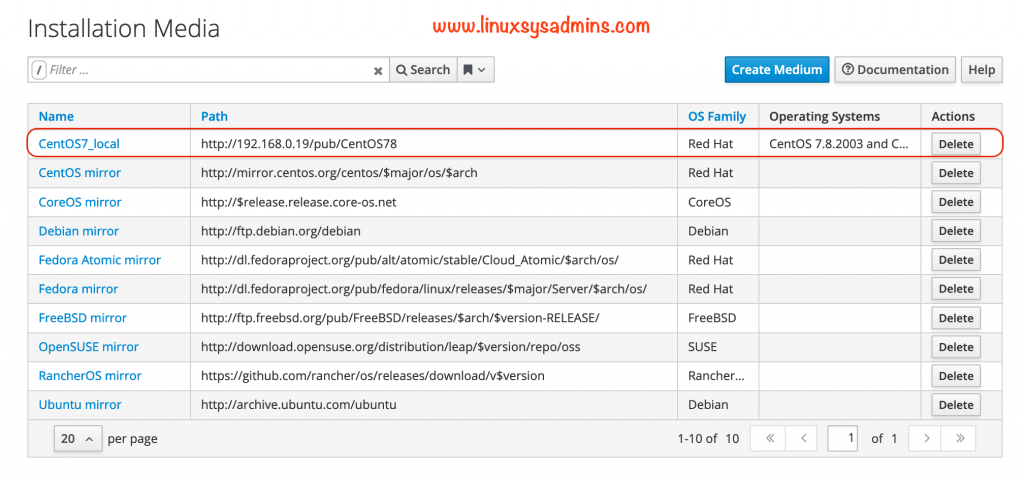
Enter the name “CentOS7_local” and URL as “http://192.168.0.19/pub/CentOS78” and click create.
To create one from the command line is super easy by running hammer command with options and arguments.
# hammer medium create --location "MyHomeLab" --organization "LinuxSys Organization" --name "CentOS7_local" --path "http://192.168.0.19/pub/CentOS78/" --os-family "Redhat"List the created medium from the command line.
[root@foreman ~]# hammer medium list
---|----------------------|------------------------------------------------------------------------------
ID | NAME                 | PATH
---|----------------------|------------------------------------------------------------------------------
10 | CentOS7_local        | http://192.168.0.19/pub/CentOS78
1  | CentOS mirror        | http://mirror.centos.org/centos/$major/os/$arch
8  | CoreOS mirror        | http://$release.release.core-os.net
2  | Debian mirror        | http://ftp.debian.org/debian
4  | Fedora Atomic mirror | http://dl.fedoraproject.org/pub/alt/atomic/stable/Cloud_Atomic/$arch/os/
3  | Fedora mirror        | http://dl.fedoraproject.org/pub/fedora/linux/releases/$major/Server/$arch/os/
5  | FreeBSD mirror       | http://ftp.freebsd.org/pub/FreeBSD/releases/$arch/$version-RELEASE/
6  | OpenSUSE mirror      | http://download.opensuse.org/distribution/leap/$version/repo/oss
9  | RancherOS mirror     | https://github.com/rancher/os/releases/download/v$version
7  | Ubuntu mirror        | http://archive.ubuntu.com/ubuntu
---|----------------------|------------------------------------------------------------------------------
[root@foreman ~]#
Creating an Operating System
Let’s create an Operating system for provisioning. Navigate to
Hosts –> Operating Systems –> Create Operating System
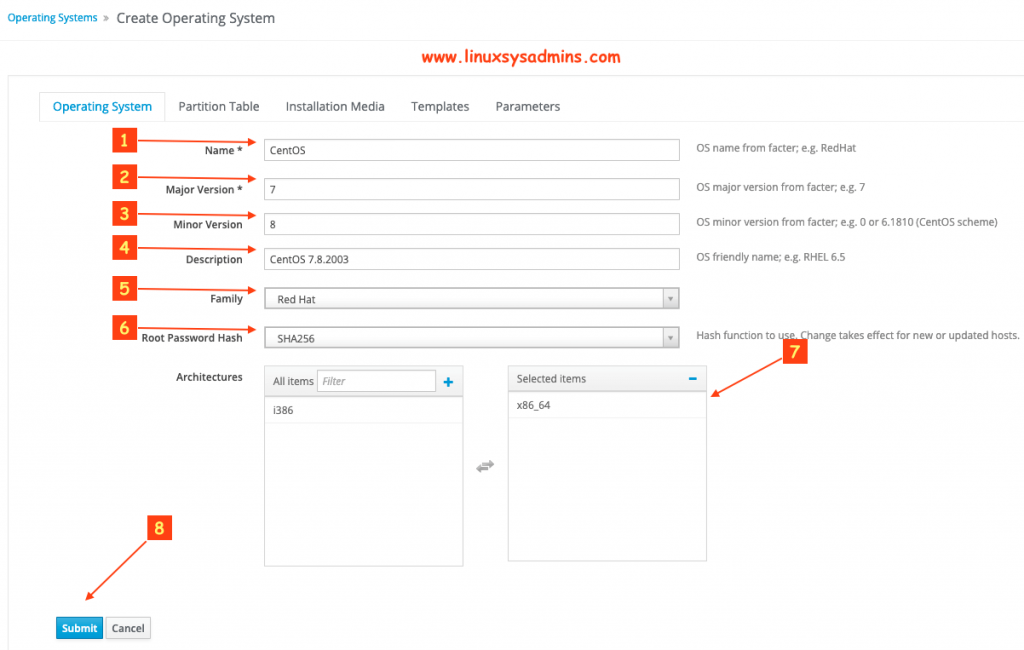
- Name of the Operating System.
- The major version of the Operating system we are about to create.
- The minor version of the Operating system.
- Give short description for our Operating system.
- Select the family from the drop-down list as Red Hat.
- The Root password hash required to use.
- select the applicable architectures by clicking on the arrow in the middle.
- Click “Submit” to create the Operating system. But this will be done after selecting a few more options from other tabs.
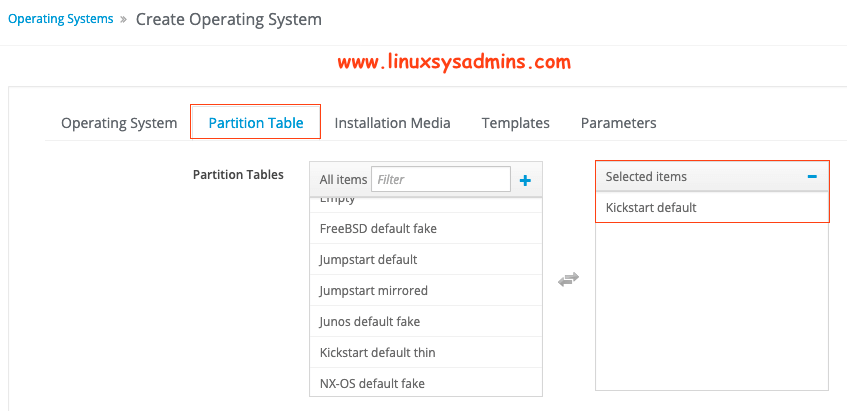
Select the Partition Table tab and assign the Kickstart default by clicking on it.
By following, we need to select the appropriate installation media which we created in our earlier step. If you need to download the package from internet choose “CentOS mirror” from the list other than CentOS_local.
Once the Operating System created we should get the all available OS as shown below.

Let’s start with configuring provisioning.
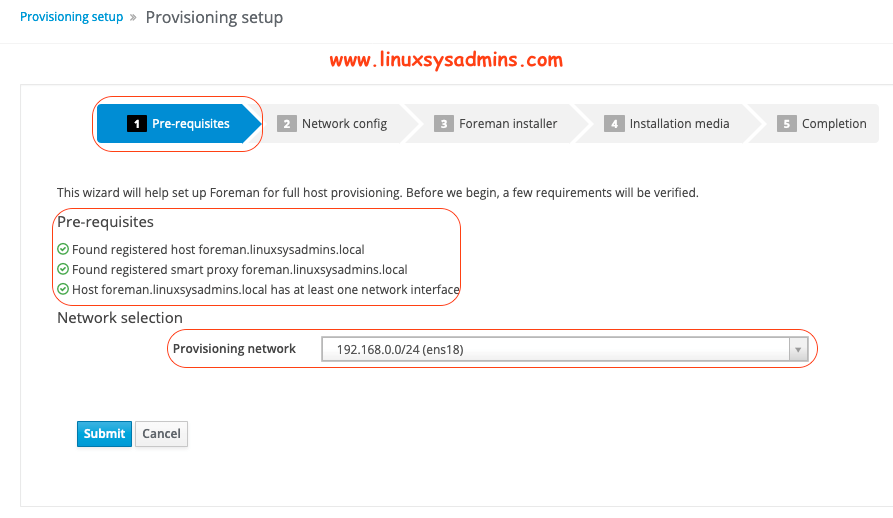
Preparing Provisioning setup
Once our medium and Operating systems are in place, the next step is to create the provisioning by navigating to
Infrastructure –> Provisioning setup
Here, there are 5 steps need to be completed for setting up provisioning.
Resolving Pre-Requisties
Before continuing with any steps we should have a working foreman with at-least one network interface. If we have multiple interfaces it can choose from the list.
Configuring Network for Provisioning Bare Metal
In the second step of provisioning setup we need to configure the network configuration.
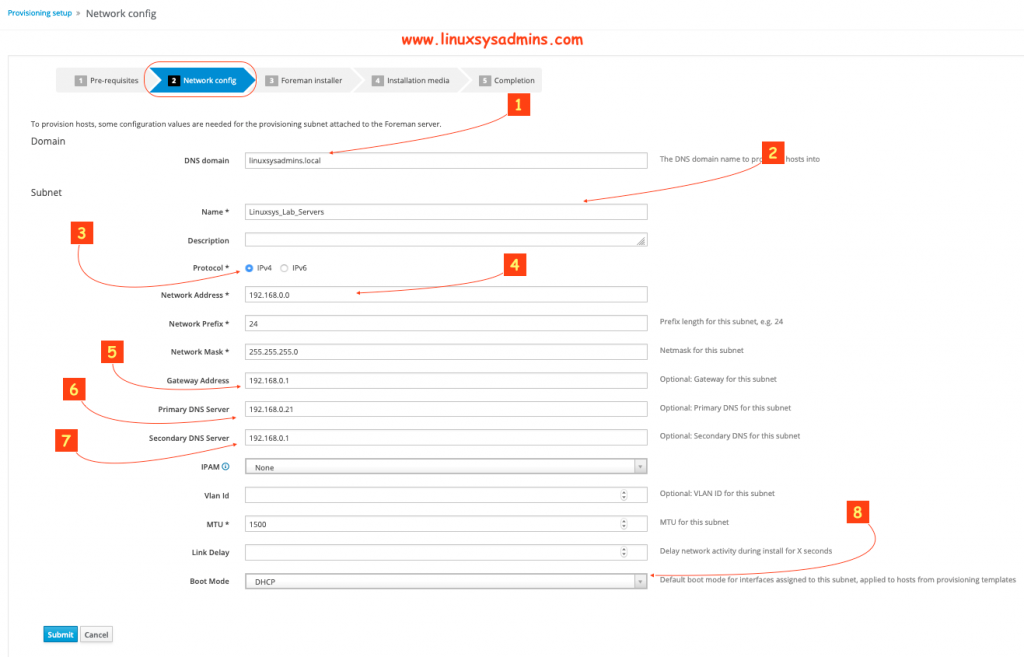
- The default domain will be there.
- Give a name for your new subnet about to create for provisioning.
- Select the IPv4 to enter the IPv4 details.
- Gateway of your network.
- A valid local DNS server to resolve the hostname and it’s important for Provisioning.
- The default boot mode for the interface.
Click the Submit button to move forward.
Running and installing Foreman Installer
In this step, we need to copy the output from the screen which populated by the collected information in our earlier provisioning setup steps. Switch back to foreman server shell and run it to complete the setup.
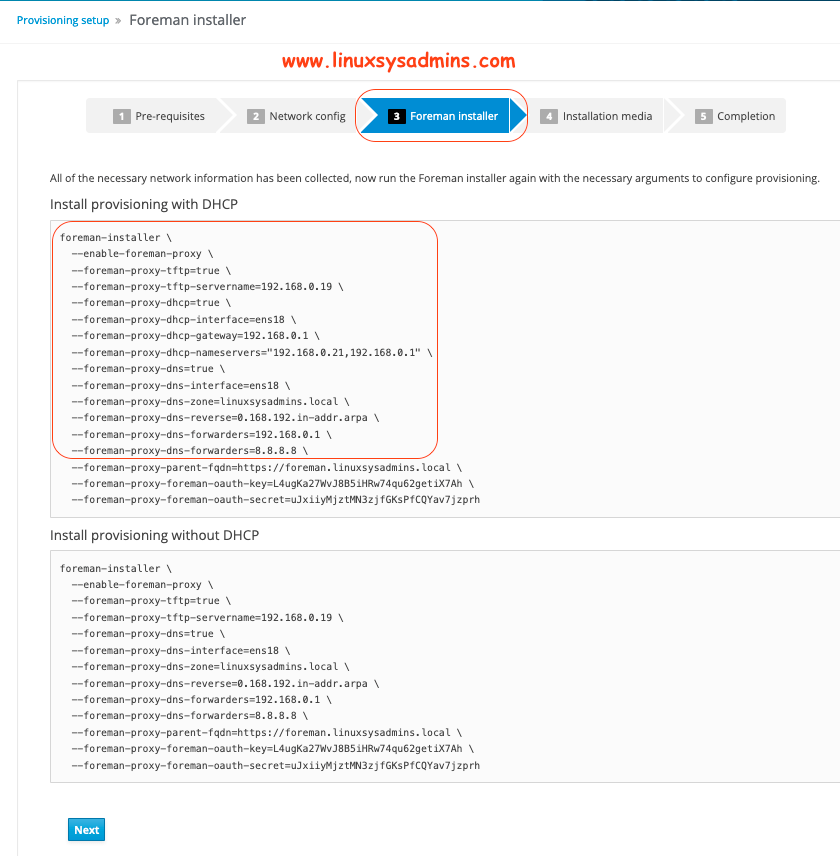
The output will be different in your setup according to your network.
foreman-installer \
  --enable-foreman-proxy \
  --foreman-proxy-tftp=true \
  --foreman-proxy-tftp-servername=192.168.0.19 \
  --foreman-proxy-dhcp=true \
  --foreman-proxy-dhcp-interface=ens18 \
  --foreman-proxy-dhcp-gateway=192.168.0.1 \
  --foreman-proxy-dhcp-nameservers="192.168.0.21,192.168.0.1" \
  --foreman-proxy-dns=true \
  --foreman-proxy-dns-interface=ens18 \
  --foreman-proxy-dns-zone=linuxsysadmins.local \
  --foreman-proxy-dns-reverse=0.168.192.in-addr.arpa \
  --foreman-proxy-dns-forwarders=192.168.0.21 \
  --foreman-proxy-dns-forwarders=192.168.0.1 \
  --foreman-proxy-dns-forwarders=8.8.8.8
Once the setup completed we should get the output similar to below.
Preparing installation Done
  Success!
  * Katello is running at https://foreman.linuxsysadmins.local
  * To install an additional Foreman proxy on separate machine continue by running:

      foreman-proxy-certs-generate --foreman-proxy-fqdn "$FOREMAN_PROXY" --certs-tar "/root/$FOREMAN_PROXY-certs.tar"
  The full log is at /var/log/foreman-installer/katello.log
[root@foreman ~]#
Click Next
Selecting Installation Media
In the next step select the existing custom medium we created.
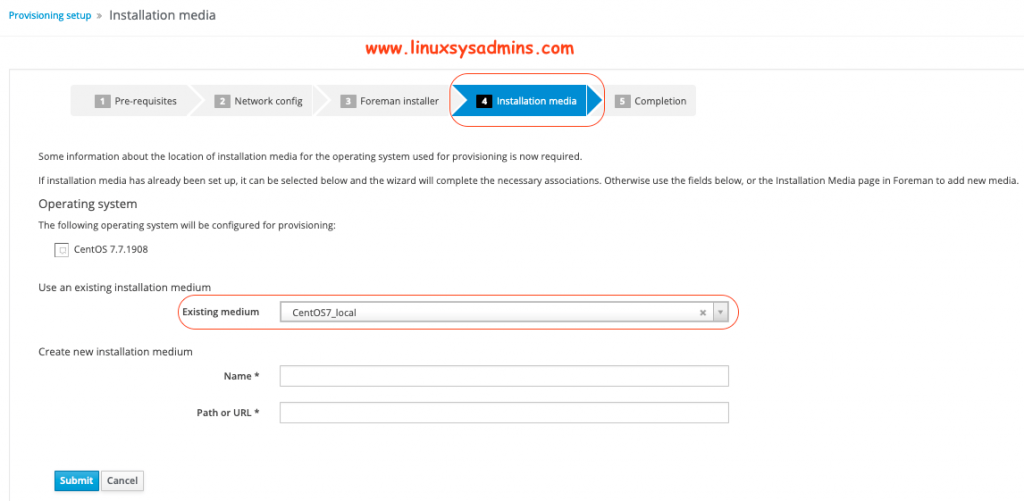
Click Submit to complete the provisioning setup.
Completed Provisioning Setup
Once we get the completion stage it’s time to continue with remaining configuration by configuring hosts groups and creating hosts.
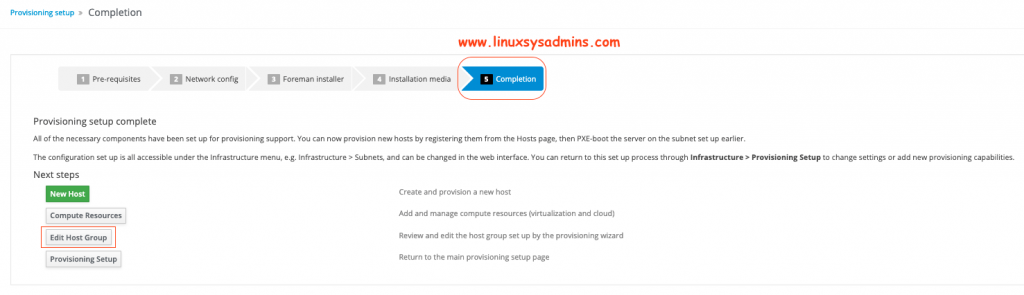
The next step we are going to perform is to configure the Host Groups.
Configure Host Groups
To configure the host groups, navigate to
Configure –> Host Groups –> Click on “Provision from foreman.linuxsysadmins.local“
If we select the appropriate options here, later in our host creation step it can be skipped. The hosts coming under this group will be applied with these configurations.
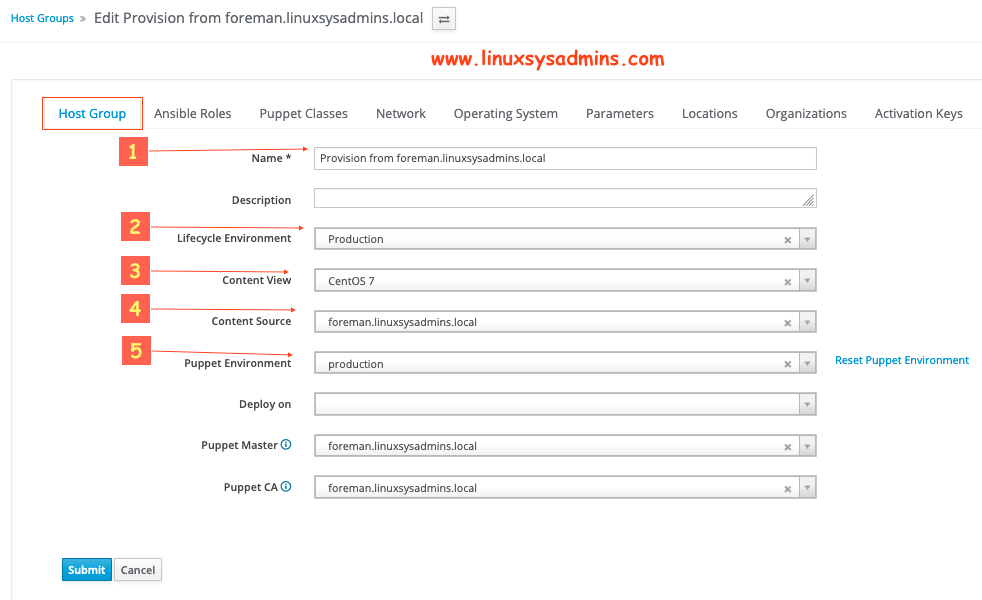
- This option already in place which created during the provisioning setup.
- Select the life Cycle environment to be used under the host group.
- The content view needs to be used for the group.
- This options will be in place by default.
- At last, the puppet environment needs to be used.
Jump to Operating System tab and select the required options as well. Most of the options are already in place.
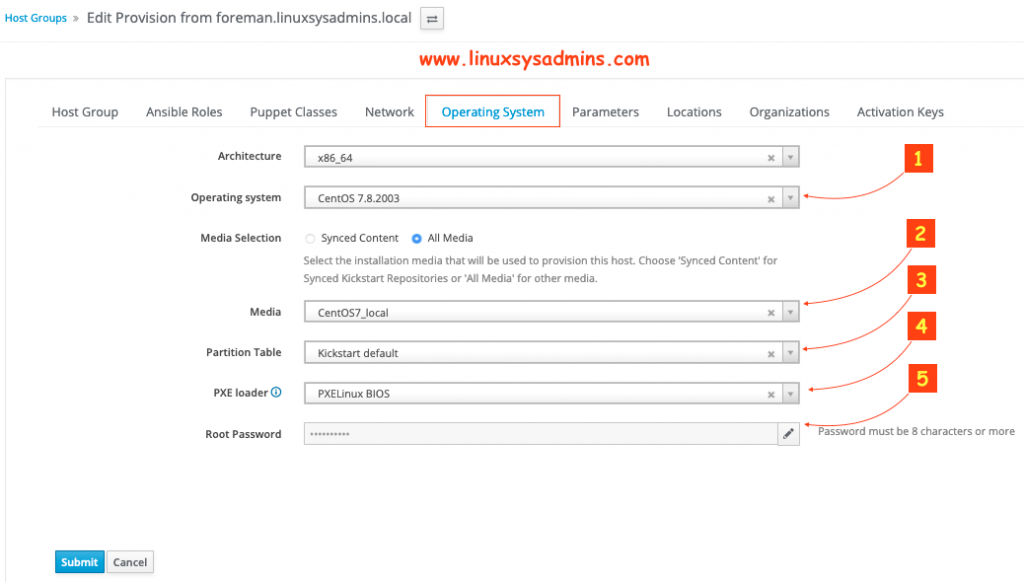
- Select the operating System version (CentOS 7.8.2003) from the drop down list.
- Choose the media which need to be used for this host group.
- Pick the partition table.
- Select the PXE loader
- Finally, type the password. This could be a encrypted password using python script.
# python -c 'import crypt,getpass;pw=getpass.getpass(); print(crypt.crypt(pw)) if (pw==getpass.getpass("Confirm: ")) else exit()'Creating Hosts
The last step of Provisioning bare metal is to create the hosts. To create one, navigate to
Hosts –> Create Host
Creating the same from CLI
# hammer host create --name "pve" --organization "LinuxSys Organization" \
--location "MyHomeLab" --hostgroup "Provision from foreman.linuxsysadmins.local" --mac "xx:xx:xx:xx:xx" \
--build true --enabled true --managed true
Host Details
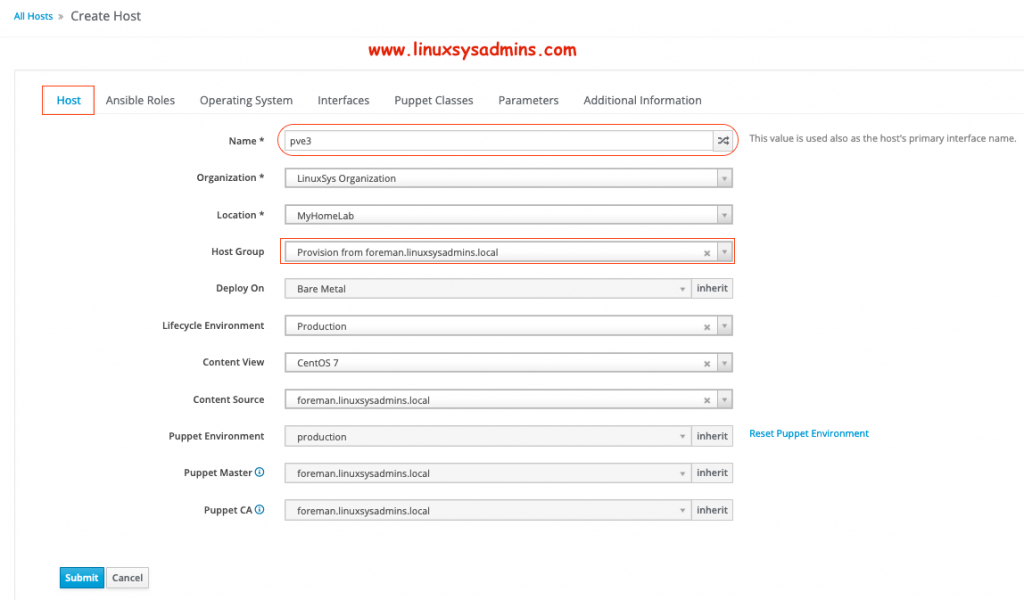
Click on the Host tab and provide the name “pve3”. After that, once we select the Host group all the options will be auto-filled because we have configured those in our earlier step where we configured Host Group.
Selecting Operating System
Switch to Operating System tab to select the required OS versions.
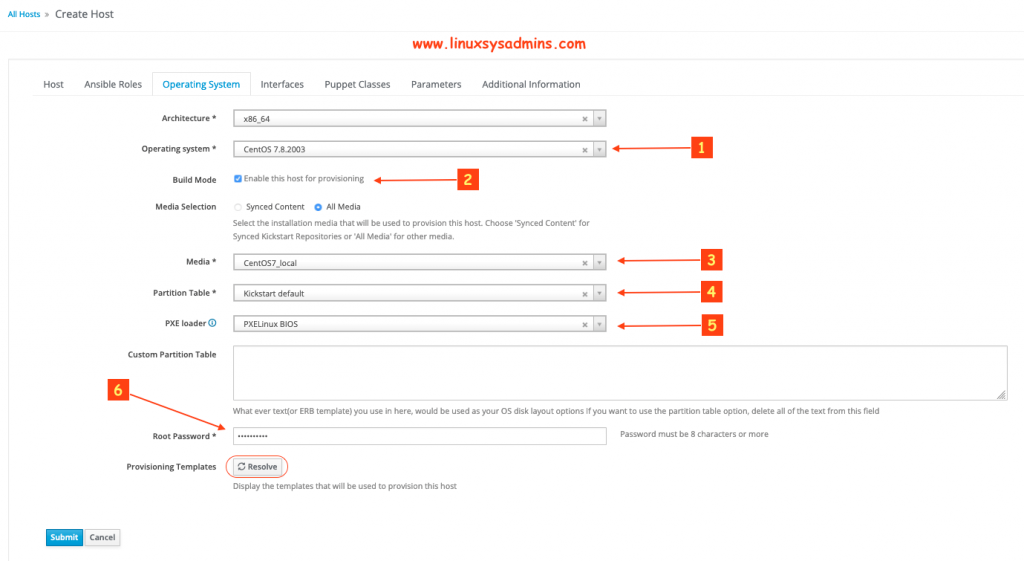
- Select the Operating System as CentOS 7.8.2003
- To build the host by provisioning, we should select this option.
- Select the media as local
- Pick the Partition table for host
- Choose the PXE Loader as PXELinux BIOS.
- Finally, type the password or create an encrypted password using below python script.
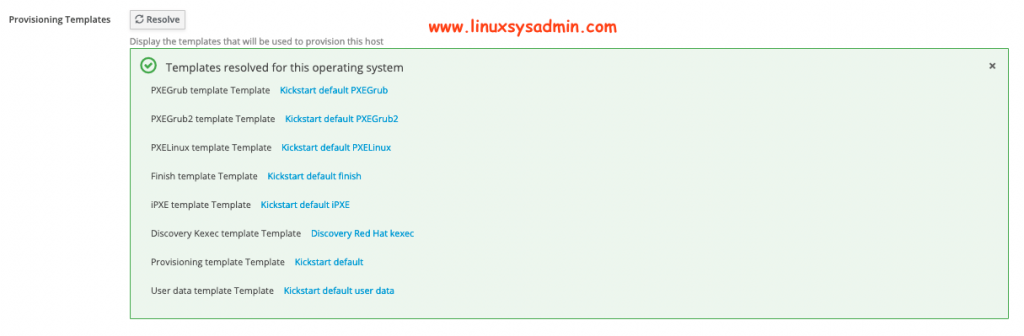
# python -c 'import crypt,getpass;pw=getpass.getpass(); print(crypt.crypt(pw)) if (pw==getpass.getpass("Confirm: ")) else exit()'To list all the available templates click resolve.
Configure Interface of Host
Enter the host details like Interface type and IP informations.
# hammer host interface update --host "pve3" --identifier "eno1" --ip "192.168.0.13" --managed true --primary true --provision trueDoing the same from Graphical user interface.
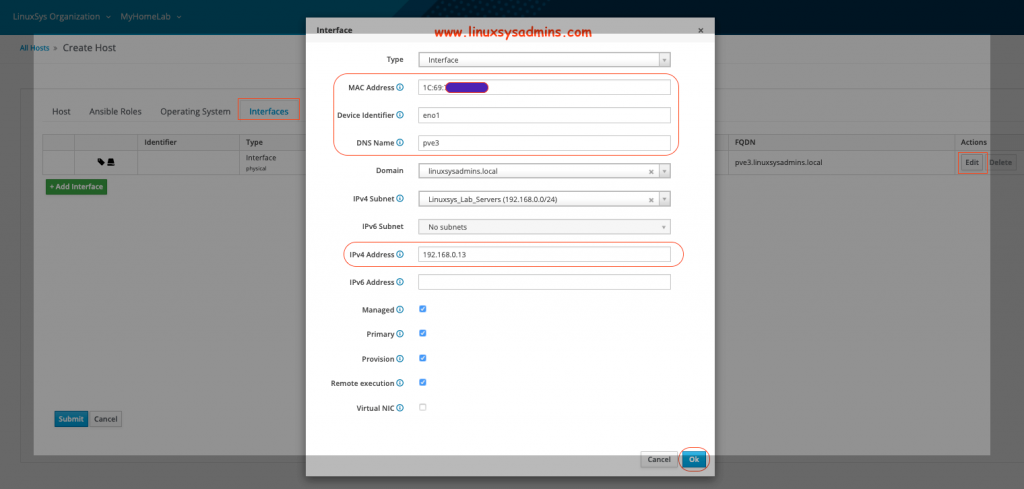
- Select the type of interface
- Enter the MAC address of the host
- Interface name on the host, example eth0 or eno1.
- The IP address of the host and click Ok.
Will look like below once it configured.

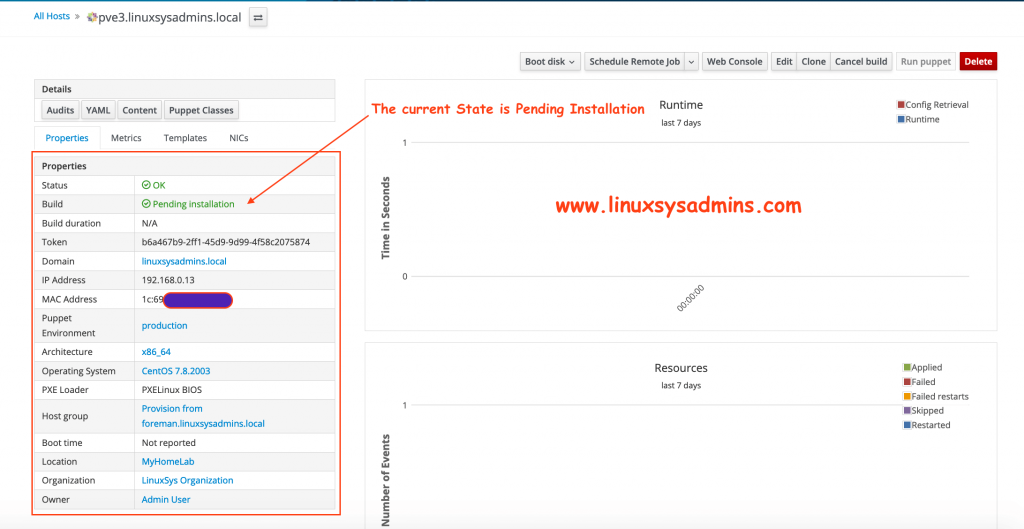
Selecting the Hardware Model
Navigate to Additional information tab and select the correct Hardware mode.
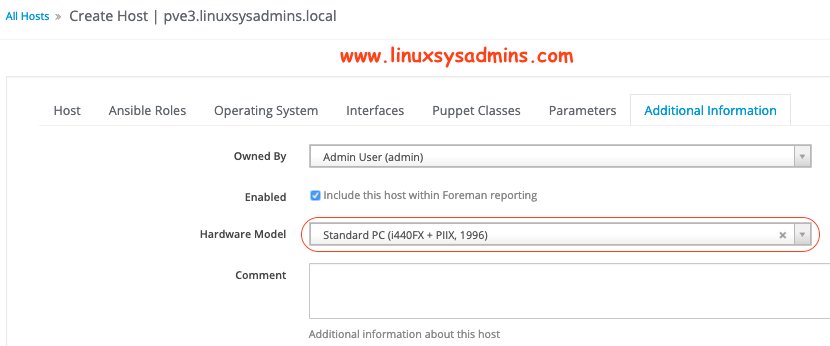
Once all done, click Submit to create the Host. The status of the host should be now as “Pending Installation“.
Starting Provisioning
Let’s PowerON the physical host to start the provisioning. It should now start with PXE boot and assign the IP address.
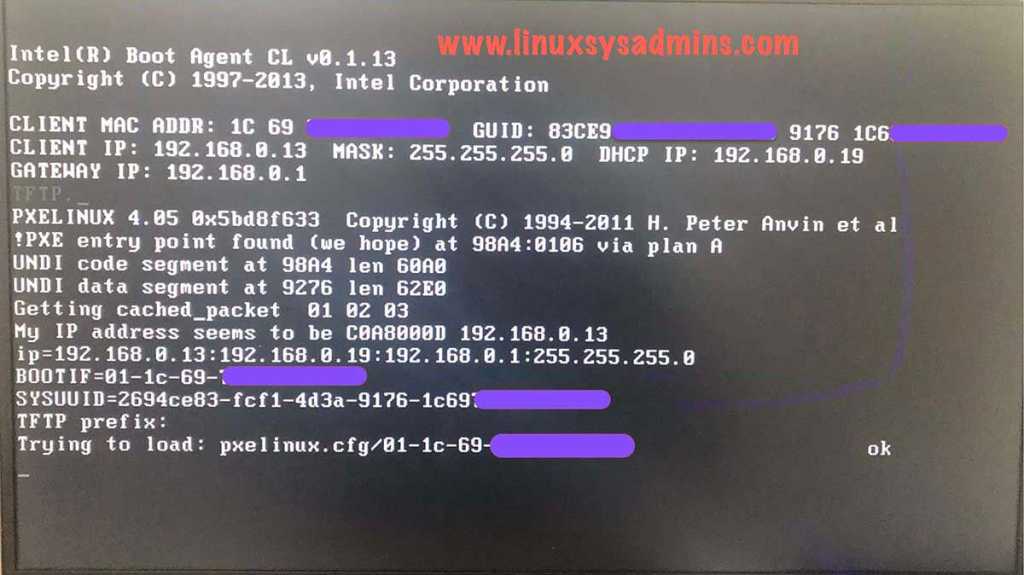
By following we will get the Installer Boot screen. Hit Enter key or wait for 10 seconds.
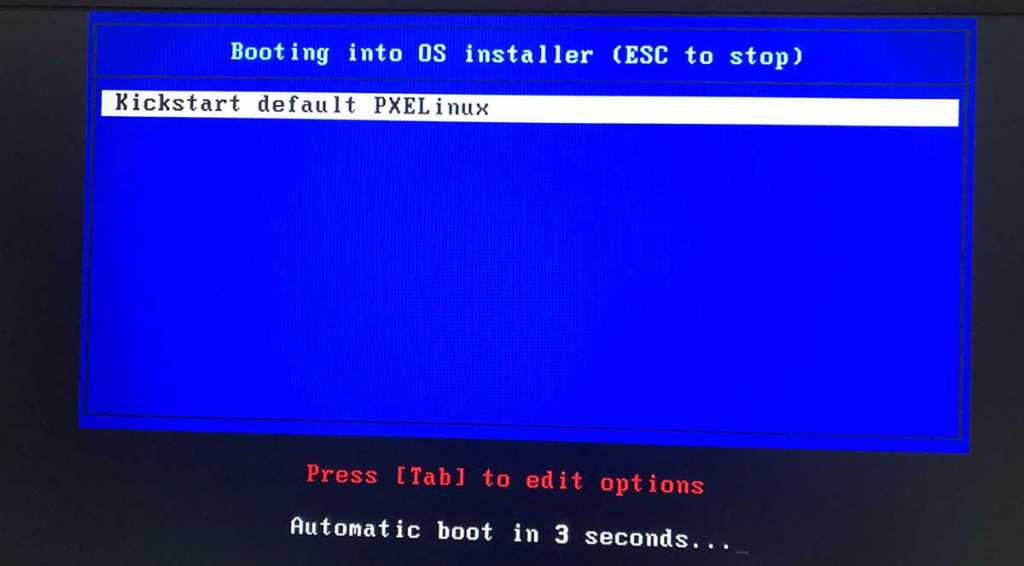
The anaconda installer will start the installation. Refer below snip for more information.

Right after installing all the packages, Provisioning will install the EPEL repository package. This requires an internet connection on your host. If you have not configured with the proper gateway, DNS in earlier steps in this stage it will fail/skip the EPEL installation.
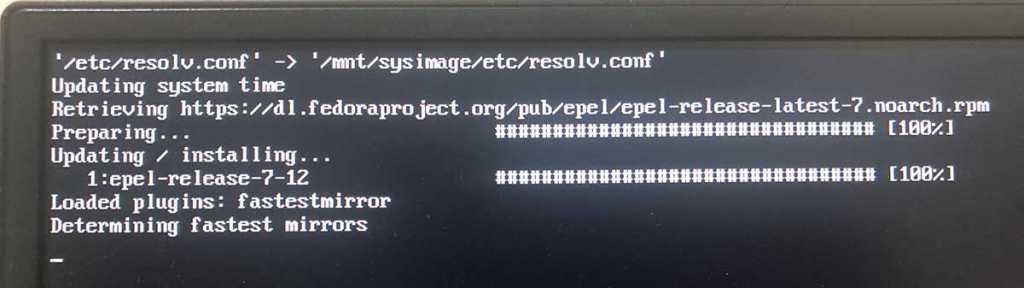
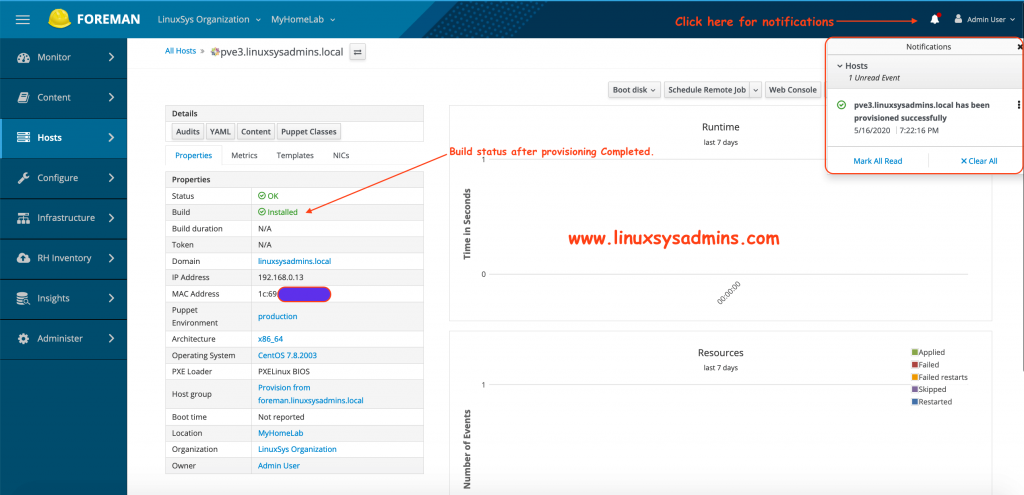
Once the EPEL installation completes the host will be rebooted and status on foreman will be Installed as shown below.
Additionally, we will get the notification in right side top corner.
Let’s try with Provisioning one more host.
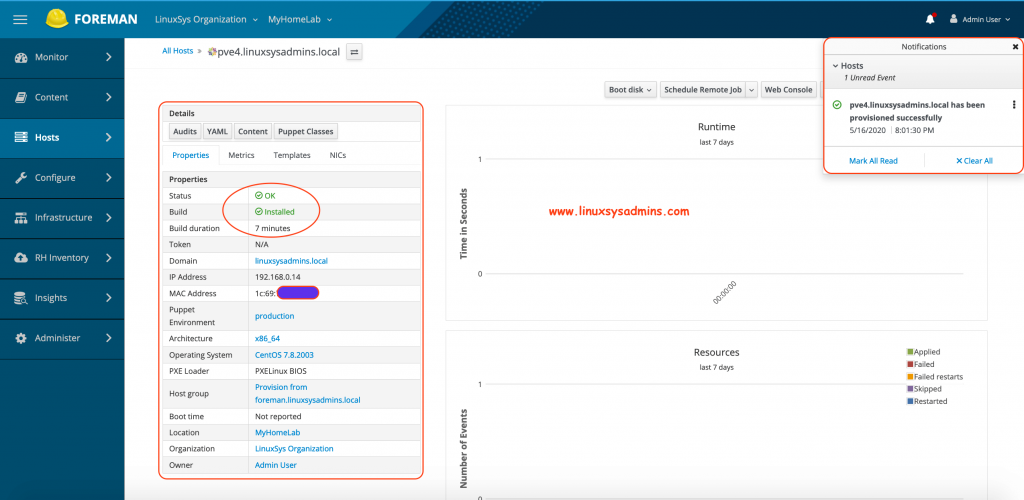
Successfully completed with Provisioning.
Watching logs for Provisioning Status
To know the provisioning status from the log run the command
# foreman-tailYou should get the status as shown below.
==> /var/log/foreman/production.log <==
2020-05-16T20:01:30 [I|app|8fefcd5e] Started POST "/unattended/built?token=[FILTERED]" for 192.168.0.14 at 2020-05-16 20:01:30 +0400
2020-05-16T20:01:30 [I|app|8fefcd5e] Processing by UnattendedController#built as TEXT
2020-05-16T20:01:30 [I|app|8fefcd5e] Parameters: {"token"=>"[FILTERED]"}
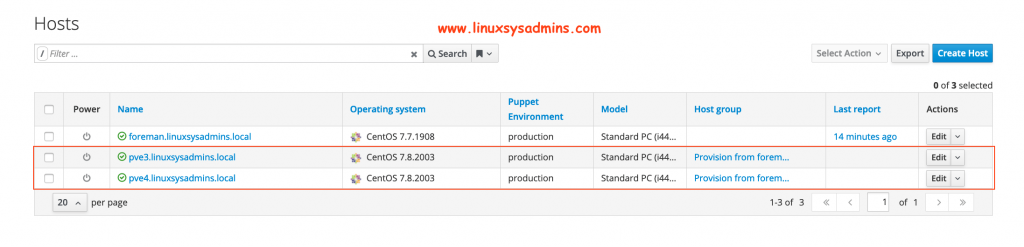
2020-05-16T20:01:30 [I|app|8fefcd5e] unattended: pve4.linuxsysadmins.local is built!After two successful provisionings, we should get the list of hosts as shown below.
That’s it, we have successfully completed with Provisioning Bare Metal.
Conclusion
To automate the physical or virtual server build we can use the OpenSource tool foreman. Setting up a provisioning bare metal set up with a host group will automate the group of hosts with the same version of Operating system and disk Partition structure. Will come up with custom partitioning and template in a future guide. Subscribe to our newsletter, Any query or document update required comment below the same in the comment section. Your valuable feedback is important to us.
You guide is excellent. However, there is one section that is out dated. There is no
Infrastructure –> Provisioning setup
in recent foreman setup. It will be great if you can update the guide as it is dated May 2020 so should cover the recent foreman changes.
Thanks
Richard
Hi Richard Chen,
I have quickly done an upgrade and still find the provisioning option under Infrastructure. Might be you have missed something in answer file configuration. However, I’m not sure about it. Anyway, will try with a fresh installation during next weekend and let you know if me too missing with Infrastructure –> Provisioning setup.
I have done a yum update 2 days back, noticed new package has been upgraded. So upgraded the foreman as well.
[root@foreman ~]# cat /var/log/yum.log* | grep foreman-installer-katello
Jul 10 10:41:13 Updated: 1:foreman-installer-katello-1.24.3-1.el7.noarch
Apr 26 16:21:17 Installed: 1:foreman-installer-katello-1.24.2-1.el7.noarch
[root@foreman ~]#
=============================================
Upgrade Step 2/3: katello:correct_puppet_environments. This may take a long while.
Processing Puppet Environment 1/3: 1-CentOS_7-v1_0-puppet-3840fae6-9670-40f2-a0f4-66daac03e437 (1)
Processing Puppet Environment 2/3: 1-CentOS_7-v2_0-puppet-dd885c43-ee23-49f8-9cf7-255258ed90f9 (3)
Processing Puppet Environment 3/3: 1-CentOS_7-v3_0-puppet-62169603-2bea-4623-aa4b-174405adee2b (4)
=============================================
Upgrade Step 3/3: katello:clean_backend_objects. This may take a long while.
0 orphaned consumer id(s) found in candlepin.
Candlepin orphaned consumers: []
0 orphaned consumer id(s) found in pulp.
Pulp orphaned consumers: []
foreman-rake upgrade:run finished successfully!
Upgrade completed!
[root@foreman yum.repos.d]#
Thanks & Regards,
Babin Lonston
You forgot to enable plugin setup (–enable-foreman-plugin-setup) while doing installation