Introduction
Using Podman to manage the containers on an RHEL based operating system is similar to using the docker command. The options available for podman command is exactly the same as the docker command. The advantage of podman is, we don’t need to start or manage a daemon as we do for docker. The images of docker will be saved under /var/lib/docker, however, the podman images will be saved under /var/run/containers/storage
Containers running under the podman can be run by the root user or by a normal user. While we use the docker command to manage and build the images, we need to use only the docker command. But, while we use podman we need to use buildah which is more secure. Using podman make life easier to migrate towards Kubernetes by generating YAML files of a running container.
Installing Podman
We can easily install the required package by running yum or dnf command with module. List the module for container-tools
$ sudo dnf module list container-toolsInstall the container-tools
$ sudo dnf module install container-tools/commonInstalled:
buildah-1.16.7-4.module_el8.3.0+699+d61d9c41.x86_64
cockpit-podman-27.1-3.module_el8.3.0+699+d61d9c41.noarch
container-selinux-2:2.155.0-1.module_el8.3.0+699+d61d9c41.noarch
containernetworking-plugins-0.9.0-1.module_el8.3.0+699+d61d9c41.x86_64
criu-3.15-1.module_el8.3.0+699+d61d9c41.x86_64
crun-0.16-2.module_el8.3.0+699+d61d9c41.x86_64
fuse-overlayfs-1.3.0-2.module_el8.3.0+699+d61d9c41.x86_64
podman-2.2.1-7.module_el8.3.0+699+d61d9c41.x86_64
python-podman-api-1.2.0-0.2.gitd0a45fe.module_el8.3.0+475+c50ce30b.noarch
runc-1.0.0-70.rc92.module_el8.3.0+699+d61d9c41.x86_64
containers-common-1:1.2.0-9.module_el8.3.0+699+d61d9c41.x86_64
libnet-1.1.6-15.el8.x86_64
podman-catatonit-2.2.1-7.module_el8.3.0+699+d61d9c41.x86_64
Complete!
[root@openshift-lab ~]#It will install the latest available version from CentOS or RHEL repository.
Verify Version of the installed Podman
Verify the installed Version by running anyone of method
# podman --version
# podman version
[root@openshift-lab ~]# podman version
Version: 2.2.1
API Version: 2
Go Version: go1.14.12
Built: Mon Feb 22 08:51:35 2021
OS/Arch: linux/amd64
[root@openshift-lab ~]#Getting Help for Using Podman
To know the available options for podman command we can quickly run a help option.
$ podman --helpThis output is exactly the same for docker commands which we went through earlier. Reboot the server to make the installation effective.
Running first Podman Command
Let’s run our first podman command.
# podman info
# podman system info
This will show us brief information about the podman, the long output has been truncated.
[root@openshift-lab ~]# podman system info
host:
  arch: amd64
  buildahVersion: 1.18.0
  cgroupManager: systemd
  cgroupVersion: v1
  conmon:
    package: conmon-2.0.22-3.module_el8.3.0+699+d61d9c41.x86_64
    path: /usr/bin/conmon
    version: 'conmon version 2.0.22, commit: 01898f0a68e4bf403cba544b87ecd260545ae25a'
  cpus: 1
  distribution:
    distribution: '"centos"'
    version: "8"
Configuring Image Registry
If we have a plan to make any changes to the registry configuration below file needs to be modified.
# cat /etc/containers/registries.confBy default, the below line will be uncommented.
registries = ['registry.access.redhat.com', 'registry.redhat.io', 'docker.io']Whenever we search for an image the image will be listed in the above order. If a searched image from the docker registry should be listed at top of the output we can arrange the order of registry in the above configuration.
[root@openshift-lab ~]# podman search redis
INDEX       NAME                                                          DESCRIPTION                                      STARS   OFFICIAL  AUTOMATED
redhat.com  registry.access.redhat.com/rhscl/redis-32-rhel7               Redis in-memory data structure store, used a...  0
redhat.com  registry.access.redhat.com/rhmap45/redis                      RHMAP image that provides the Redis Server.      0
redhat.com  registry.access.redhat.com/rhmap42/redis                      RHMAP Docker container that provides the Red...  0
redhat.io   registry.redhat.io/rhscl/redis-5-rhel7                        Redis in-memory data structure store, used a...  0
redhat.io   registry.redhat.io/rhscl/redis-32-rhel7                       Redis in-memory data structure store, used a...  0
redhat.io   registry.redhat.io/rhel8/redis-5                              Redis in-memory data structure store, used a...  0
redhat.io   registry.redhat.io/rhmap45/redis                              RHMAP image that provides the Redis Server.      0
redhat.io   registry.redhat.io/rhosp14/openstack-redis-base               Red Hat OpenStack Container image for openst...  0
docker.io   docker.io/library/redis                                       Redis is an open source key-value store that...  9325    [OK]
docker.io   docker.io/bitnami/redis                                       Bitnami Redis Docker Image                       178               [OK]
docker.io   docker.io/rediscommander/redis-commander                      Alpine image for redis-commander - Redis man...  57                [OK]
docker.io   docker.io/circleci/redis                                      CircleCI images for Redis                        5                 [OK]
Login for Registry
By default, all the searched packages will be listed, however, if we need to get access to any special subscriptions or to non-public images we need to log in. Very Importantly, this is required while we build an image and push it to our image repository.
# podman login [root@openshift-lab ~]# podman login registry.access.redhat.com
Username: babxxxxxxxxxx
Password:
Login Succeeded!
[root@openshift-lab ~]#Similarly to logout the session, we can use
# podman logout registry.access.redhat.com Searching for a Image
To search an image we can do
# podman search nginxThe long output has been truncated.
[root@openshift-lab ~]# podman search nginx
INDEX       NAME                                                          DESCRIPTION                                      STARS   OFFICIAL  AUTOMATED
redhat.com  registry.access.redhat.com/rhscl/nginx-112-rhel7              Nginx is a web server and a reverse proxy se...  0
redhat.com  registry.access.redhat.com/ubi8/nginx-118                     Platform for running nginx 1.18 or building ...  0
redhat.com  registry.access.redhat.com/rhscl/nginx-18-rhel7               Nginx 1.8 server and a reverse proxy server      0
docker.io   docker.io/library/nginx                                       Official build of Nginx.                         14717   [OK]
docker.io   docker.io/jwilder/nginx-proxy                                 Automated Nginx reverse proxy for docker con...  2009              [OK]
docker.io   docker.io/bitnami/nginx
Getting the Image
To download the image to our local image repository for podman
# podman pull docker.io/library/nginxThis will download the image
[root@openshift-lab ~]# podman pull docker.io/library/nginx
Trying to pull docker.io/library/nginx:latest...
Getting image source signatures
Copying blob c7d6bca2b8dc done
Copying blob f7ec5a41d630 done
Copying blob b78b95af9b17 done
Copying blob cf16cd8e71e0 done
Copying blob aa1efa14b3bf done
Copying blob 0241c68333ef done
Copying config 62d49f9bab done
Writing manifest to image destination
Storing signatures
62d49f9bab67f7c70ac3395855bf01389eb3175b374e621f6f191bf31b54cd5b
[root@openshift-lab ~]#
Creating Containers
Let’s launch two containers from the downloaded Nginx image.
[root@openshift-lab ~]# podman run -d --name webserver docker.io/library/nginx
ce824ee0c2301ddce97f82e5dac07411348903b1ed116012675c49d755ef9543
[root@openshift-lab ~]#

[root@openshift-lab ~]# podman run -d --name webserver1 docker.io/library/nginx
aa71eda89a74a8fe5464a2b9585daf5815c4977a380dc00a36ea1739386fe0bc
[root@openshift-lab ~]#
From a single image, we can launch N numbers of containers.
Listing and Stopping Containers
To list the running containers, we can use ps option
[root@openshift-lab ~]# podman ps
CONTAINER ID  IMAGE                    COMMAND               CREATED             STATUS                 PORTS   NAMES
aa71eda89a74  docker.io/library/nginx  nginx -g daemon o...  11 seconds ago      Up 11 seconds ago              webserver1
ce824ee0c230  docker.io/library/nginx  nginx -g daemon o...  About a minute ago  Up About a minute ago          webserver
[root@openshift-lab ~]#
To stop a running container
[root@openshift-lab ~]# podman stop webserver
ce824ee0c2301ddce97f82e5dac07411348903b1ed116012675c49d755ef9543
[root@openshift-lab ~]#
Verify whether it stopped by running ps option
[root@openshift-lab ~]# podman ps
CONTAINER ID  IMAGE                    COMMAND               CREATED         STATUS             PORTS   NAMES
aa71eda89a74  docker.io/library/nginx  nginx -g daemon o...  55 seconds ago  Up 55 seconds ago          webserver1
[root@openshift-lab ~]#
The ps the option will show only the running containers, to show all containers including stopped one, we need to use ps -a
[root@openshift-lab ~]# podman ps -a
CONTAINER ID  IMAGE                    COMMAND               CREATED             STATUS                    PORTS   NAMES
aa71eda89a74  docker.io/library/nginx  nginx -g daemon o...  58 seconds ago      Up 58 seconds ago                 webserver1
ce824ee0c230  docker.io/library/nginx  nginx -g daemon o...  About a minute ago  Exited (0) 7 seconds ago          webserver
[root@openshift-lab ~]#
Additionally, we can use a container list as well.
[root@openshift-lab ~]# podman container list
CONTAINER ID  IMAGE                    COMMAND               CREATED         STATUS             PORTS   NAMES
8a0c2b04ffce  docker.io/library/nginx  nginx -g daemon o...  11 minutes ago  Up 11 minutes ago          webserver3
740c01f1f952  docker.io/library/nginx  nginx -g daemon o...  11 minutes ago  Up 11 minutes ago          webserver2
0173da7d06f3  docker.io/library/nginx  nginx -g daemon o...  12 minutes ago  Up 12 minutes ago          webserver1
ce824ee0c230  docker.io/library/nginx  nginx -g daemon o...  17 minutes ago  Up 14 minutes ago          webserver
[root@openshift-lab ~]#
Starting a Container
To start a stopped container
[root@openshift-lab ~]# podman start webserver
webserver
[root@openshift-lab ~]#
Verify whether it started
[root@openshift-lab ~]# podman ps
CONTAINER ID  IMAGE                    COMMAND               CREATED             STATUS                 PORTS   NAMES
aa71eda89a74  docker.io/library/nginx  nginx -g daemon o...  About a minute ago  Up About a minute ago          webserver1
ce824ee0c230  docker.io/library/nginx  nginx -g daemon o...  2 minutes ago       Up 4 seconds ago               webserver
[root@openshift-lab ~]#
Deleting a Container
To delete a container first we need to stop the container. Once it stopped, remove the container by using rm option with container name.
[root@openshift-lab ~]# podman stop webserver1
aa71eda89a74a8fe5464a2b9585daf5815c4977a380dc00a36ea1739386fe0bc
[root@openshift-lab ~]#
[root@openshift-lab ~]# podman rm webserver1
aa71eda89a74a8fe5464a2b9585daf5815c4977a380dc00a36ea1739386fe0bc
[root@openshift-lab ~]#
A running container can be removed without stopping as well, we need to use --force option
# podman rm webserver1 --force Killing a Container
We can kill a container forcefully with anyone of the signal. Right now there are 5 containers running
[root@openshift-lab ~]# podman ps
CONTAINER ID  IMAGE                    COMMAND               CREATED         STATUS             PORTS   NAMES
73adcf8b8985  docker.io/library/nginx  nginx -g daemon o...  4 seconds ago   Up 4 seconds ago           webserver5
4fa131051f63  docker.io/library/nginx  nginx -g daemon o...  9 seconds ago   Up 9 seconds ago           webserver4
606b6ca73bfe  docker.io/library/nginx  nginx -g daemon o...  16 seconds ago  Up 15 seconds ago          webserver3
740c01f1f952  docker.io/library/nginx  nginx -g daemon o...  7 hours ago     Up 7 hours ago             webserver2
0173da7d06f3  docker.io/library/nginx  nginx -g daemon o...  7 hours ago     Up 7 hours ago             webserver1
[root@openshift-lab ~]#
Now, I need to kill anyone of the container
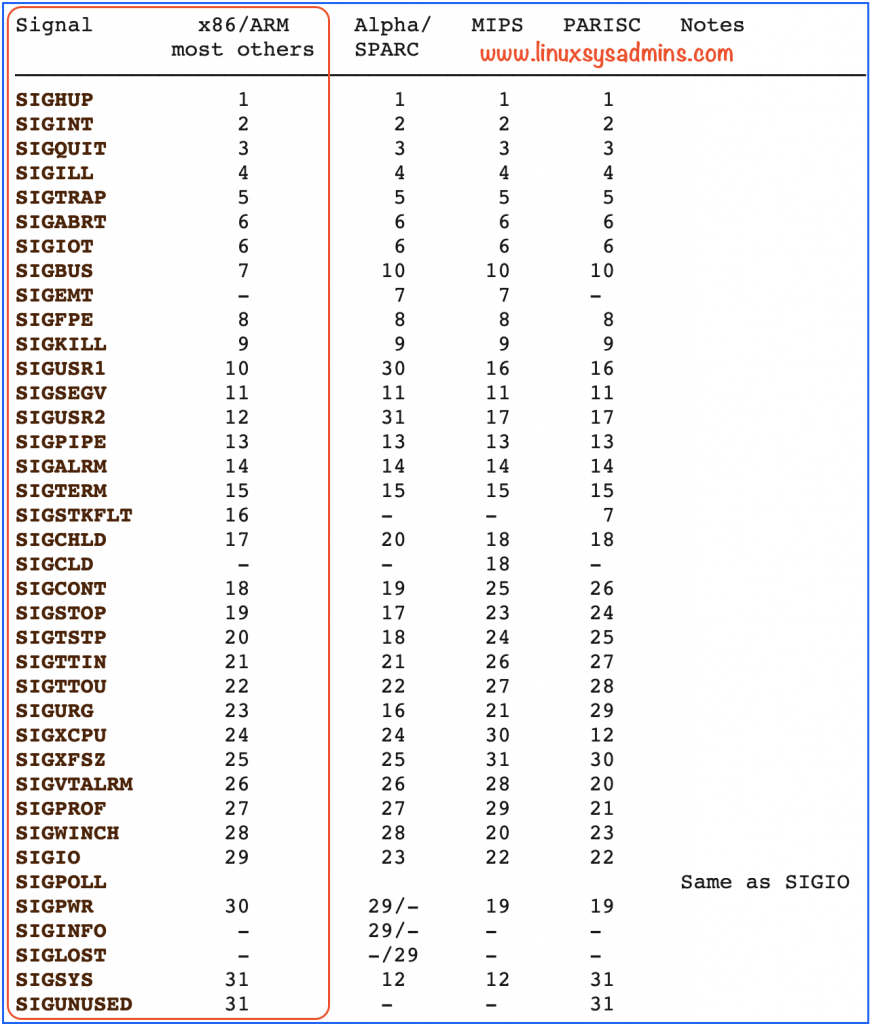
[root@openshift-lab ~]# podman kill -s 9 webserver5
73adcf8b89859e2917f55e8e8c5c6bd5155a6e24f72b38c47c8235d99ccb462d
[root@openshift-lab ~]#
The container has been killed using signal 9 (SIGKILL)
To kill all the containers use --all (-a) option, or to kill only the latest containers use --latest (-l)
[root@openshift-lab ~]# podman ps -a
CONTAINER ID  IMAGE                    COMMAND               CREATED             STATUS                       PORTS   NAMES
73adcf8b8985  docker.io/library/nginx  nginx -g daemon o...  About a minute ago  Exited (137) 45 seconds ago          webserver5
4fa131051f63  docker.io/library/nginx  nginx -g daemon o...  About a minute ago  Up About a minute ago                webserver4
606b6ca73bfe  docker.io/library/nginx  nginx -g daemon o...  About a minute ago  Up About a minute ago                webserver3
740c01f1f952  docker.io/library/nginx  nginx -g daemon o...  7 hours ago         Up 7 hours ago                       webserver2
0173da7d06f3  docker.io/library/nginx  nginx -g daemon o...  7 hours ago         Up 7 hours ago                       webserver1
[root@openshift-lab ~]#
These are the available signals, and we can use any signal as per our requirement
Killing a container will cause data loss, use with care only in a situation that needs to be used.
Using Podman to Remove Images
To delete locally available images use rmi the option
[root@openshift-lab ~]# podman rmi registry.access.redhat.com/rhel-minimal
Untagged: registry.access.redhat.com/rhel-minimal:latest
Deleted: 1e0ba694bbc3e627ec1039cbd44defe2e3cc373c1e5e551b6991595b6d804158
[root@openshift-lab ~]#
Using Podman for Container Statics
A simple command will show the statics of all running containers.
# podman stats 
We can run the top command for any container as well.
[root@openshift-lab ~]# podman top webserver3
USER    PID   PPID   %CPU    ELAPSED           TTY   TIME   COMMAND
root    1     0      0.000   1m53.162796417s   ?     0s     nginx: master process nginx -g daemon off;
nginx   29    1      0.000   1m52.162958275s   ?     0s     nginx: worker process
[root@openshift-lab ~]#
This will show only the process running inside a container and help to find which process consumes more resources.
Checking Logs of Containers
To check the logs of a container we have a few options, example the below command will show all the logs of a container.
# podman logs webserver
# podman container logs webserver
[root@openshift-lab ~]# podman container logs webserver
/docker-entrypoint.sh: /docker-entrypoint.d/ is not empty, will attempt to perform configuration
/docker-entrypoint.sh: Looking for shell scripts in /docker-entrypoint.d/
/docker-entrypoint.sh: Launching /docker-entrypoint.d/10-listen-on-ipv6-by-default.sh
10-listen-on-ipv6-by-default.sh: info: Getting the checksum of /etc/nginx/conf.d/default.conf
10-listen-on-ipv6-by-default.sh: info: Enabled listen on IPv6 in /etc/nginx/conf.d/default.conf
/docker-entrypoint.sh: Launching /docker-entrypoint.d/20-envsubst-on-templates.sh
------ output truncated ----
[root@openshift-lab ~]# However, if we need to list only the last 5 lines of a container log, use --tail option
# podman logs --tail=5 webserver[root@openshift-lab ~]# podman logs --tail=5 webserver
/docker-entrypoint.sh: Launching /docker-entrypoint.d/10-listen-on-ipv6-by-default.sh
10-listen-on-ipv6-by-default.sh: info: IPv6 listen already enabled
/docker-entrypoint.sh: Launching /docker-entrypoint.d/20-envsubst-on-templates.sh
/docker-entrypoint.sh: Launching /docker-entrypoint.d/30-tune-worker-processes.sh
/docker-entrypoint.sh: Configuration complete; ready for start up
[root@openshift-lab ~]#By default, while using the logs option it will not print the timestamps, to print the timestamp we need to use the option --timestamps, additionally, if we need to check the logs from the last 1 hour we can use --since
[root@openshift-lab ~]# podman logs --timestamps --since 1h --tail=5 webserver
2021-04-16T00:27:46.988280310+04:00 /docker-entrypoint.sh: Launching /docker-entrypoint.d/10-listen-on-ipv6-by-default.sh
2021-04-16T00:27:46.997470156+04:00 10-listen-on-ipv6-by-default.sh: info: IPv6 listen already enabled
2021-04-16T00:27:46.997470156+04:00 /docker-entrypoint.sh: Launching /docker-entrypoint.d/20-envsubst-on-templates.sh
2021-04-16T00:27:46.997470156+04:00 /docker-entrypoint.sh: Launching /docker-entrypoint.d/30-tune-worker-processes.sh
2021-04-16T00:27:46.997470156+04:00 /docker-entrypoint.sh: Configuration complete; ready for start up
[root@openshift-lab ~]#
History of Image
In case, if we are making some changes to anyone of images it will be recorded. To print the history information for an image, use
# podman history docker.io/library/nginx:latest [root@openshift-lab ~]# podman history docker.io/library/nginx:latest
ID CREATED CREATED BY SIZE COMMENT
62d49f9bab67 2 days ago /bin/sh -c #(nop) CMD ["nginx" "-g" "daem... 0 B
<missing> 2 days ago /bin/sh -c #(nop) STOPSIGNAL SIGQUIT 0 B
<missing> 2 days ago /bin/sh -c #(nop) EXPOSE 80 0 B
<missing> 2 days ago /bin/sh -c #(nop) ENTRYPOINT ["/docker-en... 0 B
<missing> 2 days ago /bin/sh -c #(nop) COPY file:09a214a3e07c91... 7.17 kB
<missing> 2 days ago /bin/sh -c #(nop) COPY file:0fd5fca330dcd6... 3.58 kB
<missing> 2 days ago /bin/sh -c #(nop) COPY file:0b866ff3fc1ef5... 4.1 kB
<missing> 2 days ago /bin/sh -c #(nop) COPY file:65504f71f5855c... 3.07 kB
<missing> 2 days ago /bin/sh -c set -x && addgroup --system... 64.8 MB
<missing> 2 days ago /bin/sh -c #(nop) ENV PKG_RELEASE=1~buster 0 B
<missing> 2 days ago /bin/sh -c #(nop) ENV NJS_VERSION=0.5.3 0 B
<missing> 2 days ago /bin/sh -c #(nop) ENV NGINX_VERSION=1.19.10 0 B
<missing> 5 days ago /bin/sh -c #(nop) LABEL maintainer=NGINX ... 0 B
<missing> 5 days ago /bin/sh -c #(nop) CMD ["bash"] 0 B
<missing> 5 days ago /bin/sh -c #(nop) ADD file:c855b3c65f5ba94... 72.5 MB
[root@openshift-lab ~]#Using Podman to Inspect a Container
The inspect option will print the information about a container. While running the inspect option without arguments it will print a long output. To filter the output we can do by running --format option.
For Instance, I need to print the IP of a container
[root@openshift-lab ~]# podman inspect webserver --format '{{.NetworkSettings.IPAddress}}'
10.88.0.4
[root@openshift-lab ~]#
If we need to make sure that, above running, container serves a web page, access the page using the above IP address.
[root@openshift-lab ~]# curl http://10.88.0.4
<!DOCTYPE html>
<html>
<head>
<title>Welcome to nginx!</title>
<p>If you see this page, the nginx web server is successfully installed and
working. Further configuration is required.</p>

<p><em>Thank you for using nginx.</em></p>
</body>
</html>
[root@openshift-lab ~]#
---- output truncate ---
Accessing Shell of a Container
Using podman command with exec an option we can access the shell of a container.
# podman exec -it webserver2 /bin/bash- -i, –interactive Keep STDIN open even if not attached
- -t, –tty Allocate a pseudo-TTY. The default is false
[root@openshift-lab ~]# podman exec -it webserver2 /bin/bash
root@740c01f1f952:/#
root@740c01f1f952:/#
root@740c01f1f952:/# env
HOSTNAME=
PWD=/
container=podman
PKG_RELEASE=1~buster
HOME=/root
NJS_VERSION=0.5.3
TERM=xterm
SHLVL=1
PATH=/usr/local/sbin:/usr/local/bin:/usr/sbin:/usr/bin:/sbin:/bin
NGINX_VERSION=1.19.10
_=/usr/bin/env
root@740c01f1f952:/#
Using Volumes and Environment Variables
Containers are ephemeral, once we restart a container the data will be wiped, To make the data persistent we need to attach a volume. Let’s search for any DB images and mount a volume to save the data. Additionally, while starting the DB server we need to pass some variables, let’s use some environment variables as well.
# podman search mysql
# podman search mariadb
Get the image using the pull option
# podman pull docker.io/library/mariadbLet’s do a test without using environmental variables, by running this it should throw an error. At the end of the error, it will print the available variables. Or, we can find the available env variable from logs of the container.
Another way to know the variables is to check from the image repository page.
https://hub.docker.com/_/mariadb
https://catalog.redhat.com/software/containers/search
Let’s run without a variable
# podman run --name db-server docker.io/library/mariadb Check the logs for the container
# podman logs db-serverBefore creating the container from the downloaded image, we need to create the data directory with the required ownership and SELinux context.
# mkdir /dbdata
# chown -R 27:27 /dbdata/
# semanage fcontext -a -t container_file_t '/dbdata(./*)?'
# restorecon -RFv /dbdata/
[root@openshift-lab ~]# semanage fcontext -a -t container_file_t '/dbdata(./*)?'
[root@openshift-lab ~]# restorecon -RFv /dbdata/
Relabeled /dbdata from unconfined_u:object_r:default_t:s0 to system_u:object_r:container_file_t:s0
[root@openshift-lab ~]# Once the volume is ready, create the container.
# podman run --name db-server -p 13456:3306 -v /dbdata:/var/lib/mysql -d -e MYSQL_ROOT_PASSWORD=Redhat@123 docker.io/library/mariadb - -p, –publish strings –> Publish a container’s port
- -d, –detach –> Run container in background and print container ID
- -v, –volume stringArray –> Bind mount a volume into the container
- -e, –env stringArray –> Set environment variables in container
Printing only the latest launched container
[root@openshift-lab ~]# podman ps -n 1
CONTAINER ID  IMAGE                      COMMAND  CREATED        STATUS            PORTS                    NAMES
258ad112f576  docker.io/library/mariadb  mysqld   5 minutes ago  Up 5 minutes ago  0.0.0.0:13456->3306/tcp  db-server
[root@openshift-lab ~]#
Access the container and verify the MariaDB login, Once login into the container we can use the command “env” to print the assigned environment variables.
[root@openshift-lab ~]# podman exec -it db-server /bin/bash
root@258ad112f576:/#
root@258ad112f576:/# mysql -u root -p
Enter password:
Welcome to the MariaDB monitor.  Commands end with ; or \g.
Your MariaDB connection id is 3
Server version: 10.5.9-MariaDB-1:10.5.9+maria~focal mariadb.org binary distribution

Copyright (c) 2000, 2018, Oracle, MariaDB Corporation Ab and others.

Type 'help;' or '\h' for help. Type '\c' to clear the current input statement.

MariaDB [(none)]>
MariaDB [(none)]> show databases;
+--------------------+
| Database           |
+--------------------+
| information_schema |
| mysql              |
| performance_schema |
+--------------------+
3 rows in set (0.000 sec)

MariaDB [(none)]>
If we list the files under /var/lib/mysql we should see the below files.
root@258ad112f576:/# ls -lthr /var/lib/mysql/
total 121M
drwx------. 2 mysql mysql   20 Apr 16 07:09 performance_schema
-rw-rw----. 1 mysql mysql    0 Apr 16 07:09 multi-master.info
drwx------. 2 mysql mysql 4.0K Apr 16 07:09 mysql
-rw-rw----. 1 mysql mysql  976 Apr 16 07:09 ib_buffer_pool
-rw-rw----. 1 mysql mysql  12M Apr 16 07:09 ibdata1
-rw-rw----. 1 mysql mysql   52 Apr 16 07:09 aria_log_control
-rw-rw----. 1 mysql mysql  32K Apr 16 07:09 aria_log.00000001
-rw-rw----. 1 mysql mysql  12M Apr 16 07:09 ibtmp1
-rw-rw----. 1 mysql mysql  96M Apr 16 07:09 ib_logfile0
root@258ad112f576:/# exit
exit
Once we exit from the container, list the files under /dbdata/. We could see the exact SELinux labels on our container volume directory.
[root@openshift-lab ~]# ls -lZ /dbdata/
total 122924
-rw-rw----. 1 systemd-coredump input system_u:object_r:container_file_t:s0     32768 Apr 16 11:09 aria_log.00000001
-rw-rw----. 1 systemd-coredump input system_u:object_r:container_file_t:s0        52 Apr 16 11:09 aria_log_control
-rw-rw----. 1 systemd-coredump input system_u:object_r:container_file_t:s0       976 Apr 16 11:09 ib_buffer_pool
-rw-rw----. 1 systemd-coredump input system_u:object_r:container_file_t:s0  12582912 Apr 16 11:09 ibdata1
-rw-rw----. 1 systemd-coredump input system_u:object_r:container_file_t:s0 100663296 Apr 16 11:09 ib_logfile0
-rw-rw----. 1 systemd-coredump input system_u:object_r:container_file_t:s0  12582912 Apr 16 11:09 ibtmp1
-rw-rw----. 1 systemd-coredump input system_u:object_r:container_file_t:s0         0 Apr 16 11:09 multi-master.info
drwx------. 2 systemd-coredump input system_u:object_r:container_file_t:s0      4096 Apr 16 11:09 mysql
drwx------. 2 systemd-coredump input system_u:object_r:container_file_t:s0        20 Apr 16 11:09 performance_schema
[root@openshift-lab ~]#
Using Podman to Generate YAML
Moving from Podman to Kubernetes made it easier while we using podman
# podman generate kube webserver1 output for your reference
[root@openshift-lab ~]# podman generate kube webserver1
# Generation of Kubernetes YAML is still under development!
#
# Save the output of this file and use kubectl create -f to import
# it into Kubernetes.
#
# Created with podman-2.2.1
apiVersion: v1
kind: Pod
metadata:
  creationTimestamp: "2021-04-16T08:10:40Z"
  labels:
    app: webserver1
  name: webserver1
spec:
  containers:
  - command:
    - nginx
    - -g
    - daemon off;
    env:
    - name: PATH
      value: /usr/local/sbin:/usr/local/bin:/usr/sbin:/usr/bin:/sbin:/bin
    - name: TERM
      value: xterm
    - name: container
      value: podman
    - name: NGINX_VERSION
      value: 1.19.10
    - name: NJS_VERSION
      value: 0.5.3
    - name: PKG_RELEASE
      value: 1~buster
    - name: HOSTNAME
    image: docker.io/library/nginx
    name: webserver1
    resources: {}
    securityContext:
      allowPrivilegeEscalation: true
      capabilities: {}
      privileged: false
      readOnlyRootFilesystem: false
      seLinuxOptions: {}
    workingDir: /
status: {}
---
metadata:
  creationTimestamp: null
spec: {}
status:
  loadBalancer: {}

[root@openshift-lab ~]#
To save the output to a file, use
# podman generate kube webserver1 -f webserver1.yamlIt’s still under development and does not guarantee how it works while we try to import it into the Kubernetes cluster.
[root@openshift-lab ~]# podman generate kube webserver1 -f webserver1.yaml
[root@openshift-lab ~]#
[root@openshift-lab ~]# ls -lthr webserver1.yaml
-rw-r--r--. 1 root root 1.1K Apr 16 12:11 webserver1.yaml
[root@openshift-lab ~]#
That’s it for now.
Conclusion
Using Podman to manage the containers is the same as the docker command. However, to manage we will use podman, and use buildah to develop. Subscribe for more how-to-guide on podman and other container-related technologies. Your feedbacks are most welcome through below comment section.