Introduction
VMFS Partition cleanup, While setting up my home lab I have been gone through multiple installations with vSAN setup. When my testing is done, I need my vSAN once again. while looking for the disks they partitioned and used. So, how can I wipe the existing file system from it? If you are looking to wipe the VMFS partition continue reading.
VMware related guides.
- Migrating multi-writer VMware VM’s from Island cluster to vSAN cluster
- vSAN cluster UUID mismatch | 1 Quick Solution
- Deploy VMware Virtual machines with Ansible for lazy admins
Listing the Physical disks
First we need to make sure that we can going to clean the filesystem from the right disk. For that, list the physical disks.
[root@pve2:~] esxcli storage core device list
eui.00000000010000004ce00018dd8c9084
   Display Name: Local NVMe Disk (eui.00000000010000004ce00018dd8c9084)
   Has Settable Display Name: true
   Size: 122104
   Device Type: Direct-Access
   Multipath Plugin: NMP
   Devfs Path: /vmfs/devices/disks/eui.00000000010000004ce00018dd8c9084
   Vendor: NVMe
   Model: ADATA SX6000LNP
   Revision: V900
   SCSI Level: 7
   Is Pseudo: false
   Status: on
   Is RDM Capable: false
   Is Local: true
   Is Removable: false
   Is SSD: true
   Is VVOL PE: false
   Is Offline: false
   Is Perennially Reserved: false
   Queue Full Sample Size: 0
   Queue Full Threshold: 0
   Thin Provisioning Status: yes
   Attached Filters:
   VAAI Status: unsupported
   Other UIDs: vml.0600000000010000004ce00018dd8c9084
   Is Shared Clusterwide: false
   Is SAS: false
   Is USB: false
   Is Boot Device: false
   Device Max Queue Depth: 1023
   No of outstanding IOs with competing worlds: 32
   Drive Type: physical
   RAID Level: NA
   Number of Physical Drives: 1
   Protection Enabled: false
   PI Activated: false
   PI Type: 0
   PI Protection Mask: NO PROTECTION
   Supported Guard Types: NO GUARD SUPPORT
   DIX Enabled: false
   DIX Guard Type: NO GUARD SUPPORT
   Emulated DIX/DIF Enabled: false

mpx.vmhba32:C0:T0:L0
   Display Name: Local USB Direct-Access (mpx.vmhba32:C0:T0:L0)
   Has Settable Display Name: false
   Size: 29340
   Device Type: Direct-Access
   Multipath Plugin: NMP
   Devfs Path: /vmfs/devices/disks/mpx.vmhba32:C0:T0:L0
   Vendor: SanDisk
   Model: Ultra Fit
   Revision: 0100
   SCSI Level: 2
   Is Pseudo: false
   Status: on
   Is RDM Capable: false
   Is Local: true
   Is Removable: true
   Is SSD: false
   Is VVOL PE: false
   Is Offline: false
   Is Perennially Reserved: false
   Queue Full Sample Size: 0
   Queue Full Threshold: 0
   Thin Provisioning Status: unknown
   Attached Filters:
   VAAI Status: unsupported
   Other UIDs: vml.01000000003035303139396635316339653431373334666562376433663264306265326634316265653366556c74726120
   Is Shared Clusterwide: false
   Is SAS: false
   Is USB: true
   Is Boot Device: true
   Device Max Queue Depth: 1
   No of outstanding IOs with competing worlds: 1
   Drive Type: unknown
   RAID Level: unknown
   Number of Physical Drives: unknown
   Protection Enabled: false
   PI Activated: false
   PI Type: 0
   PI Protection Mask: NO PROTECTION
   Supported Guard Types: NO GUARD SUPPORT
   DIX Enabled: false
   DIX Guard Type: NO GUARD SUPPORT
   Emulated DIX/DIF Enabled: false

t10.ATA_____SanDisk_SSD_G5_BICS4____________________202342450313________
   Display Name: Local ATA Disk (t10.ATA_____SanDisk_SSD_G5_BICS4____________________202342450313________)
   Has Settable Display Name: true
   Size: 476940
   Device Type: Direct-Access
   Multipath Plugin: NMP
   Devfs Path: /vmfs/devices/disks/t10.ATA_____SanDisk_SSD_G5_BICS4____________________202342450313________
   Vendor: ATA
   Model: SanDisk SSD G5 B
   Revision: 00WD
   SCSI Level: 5
   Is Pseudo: false
   Status: on
   Is RDM Capable: false
   Is Local: true
   Is Removable: false
   Is SSD: true
   Is VVOL PE: false
   Is Offline: false
   Is Perennially Reserved: false
   Queue Full Sample Size: 0
   Queue Full Threshold: 0
   Thin Provisioning Status: yes
   Attached Filters:
   VAAI Status: unsupported
   Other UIDs: vml.0100000000323032333432343530333133202020202020202053616e446973
   Is Shared Clusterwide: false
   Is SAS: false
   Is USB: false
   Is Boot Device: false
   Device Max Queue Depth: 31
   No of outstanding IOs with competing worlds: 31
   Drive Type: unknown
   RAID Level: unknown
   Number of Physical Drives: unknown
   Protection Enabled: false
   PI Activated: false
   PI Type: 0
   PI Protection Mask: NO PROTECTION
   Supported Guard Types: NO GUARD SUPPORT
   DIX Enabled: false
   DIX Guard Type: NO GUARD SUPPORT
   Emulated DIX/DIF Enabled: false
[root@pve2:~]
Listing the VMFS Partition
Once you find the right disk, keep note of it and list all the VMFS partitions.
[root@pve2:~] esxcli storage core device partition list
Device                                                                    Partition  Start Sector  End Sector  Type          Size
------------------------------------------------------------------------  ---------  ------------  ----------  ----  ------------
eui.00000000010000004ce00018dd8c9084                                              0             0   250069679     0  128035676160
mpx.vmhba32:C0:T0:L0                                                              0             0    60088319     0   30765219840
mpx.vmhba32:C0:T0:L0                                                              1            64      204863     0     104857600
mpx.vmhba32:C0:T0:L0                                                              5        208896     2306047     6    1073741824
mpx.vmhba32:C0:T0:L0                                                              6       2308096     4405247     6    1073741824
mpx.vmhba32:C0:T0:L0                                                              7       4407296    60088286    f8   28508667392
t10.ATA_____SanDisk_SSD_G5_BICS4____________________202342450313________          0             0   976773167     0  500107862016
t10.ATA_____SanDisk_SSD_G5_BICS4____________________202342450313________          1          2048   976771072    fb  500105740800
[root@pve2:~]
Removing Core & Scratch
Remove the core dump file.
[root@pve2:~] esxcli system coredump file remove --force
[root@pve2:~]
Once file removed, deactivate the dump partiton.
[root@pve2:~] esxcfg-dumppart -d
Dump file deactivated.
[root@pve2:~]
Remove the scratch
[root@pve2:~]
[root@pve2:~] rm -rfv /scratch/
[root@pve2:~]
Clear the currently writing syslog by killing the syslogd service.
[root@pve2:~] ps | grep vmsyslogd
524641  524641  vmsyslogd
524642  524641  vmsyslogd
524643  524641  vmsyslogd
524644  524641  vmsyslogd
525364  524641  vmsyslogd
[root@pve2:~]
[root@pve2:~] kill -9 524641
[root@pve2:~]
Unmount the FileSystem
Unmount the filesystem by running below command.
[root@pve2:~] esxcli storage filesystem unmount -p /vmfs/volumes/tempdata/
[root@pve2:~]
Delete the Partition
Delete the partition using partedUtil, the leading 1 is the number of partition you are about to delete.
[root@pve2:~] partedUtil delete /vmfs/devices/disks/t10.ATA_____SanDisk_SSD_G5_BICS4____________________202342450313________ 1
[root@pve2:~]
Listing Partition after delete
Finally, list and confirm whether still the VMFS partition exists.
[root@pve2:~]
[root@pve2:~] esxcli storage core device partition list
Device                                                                    Partition  Start Sector  End Sector  Type          Size
------------------------------------------------------------------------  ---------  ------------  ----------  ----  ------------
eui.00000000010000004ce00018dd8c9084                                              0             0   250069679     0  128035676160
mpx.vmhba32:C0:T0:L0                                                              0             0    60088319     0   30765219840
mpx.vmhba32:C0:T0:L0                                                              1            64      204863     0     104857600
mpx.vmhba32:C0:T0:L0                                                              5        208896     2306047     6    1073741824
mpx.vmhba32:C0:T0:L0                                                              6       2308096     4405247     6    1073741824
mpx.vmhba32:C0:T0:L0                                                              7       4407296    60088286    f8   28508667392
t10.ATA_____SanDisk_SSD_G5_BICS4____________________202342450313________          0             0   976773167     0  500107862016
[root@pve2:~]
Make it effective
To make it effective we need to take a reboot for ESXi node. After the reboot we could see the free partition.
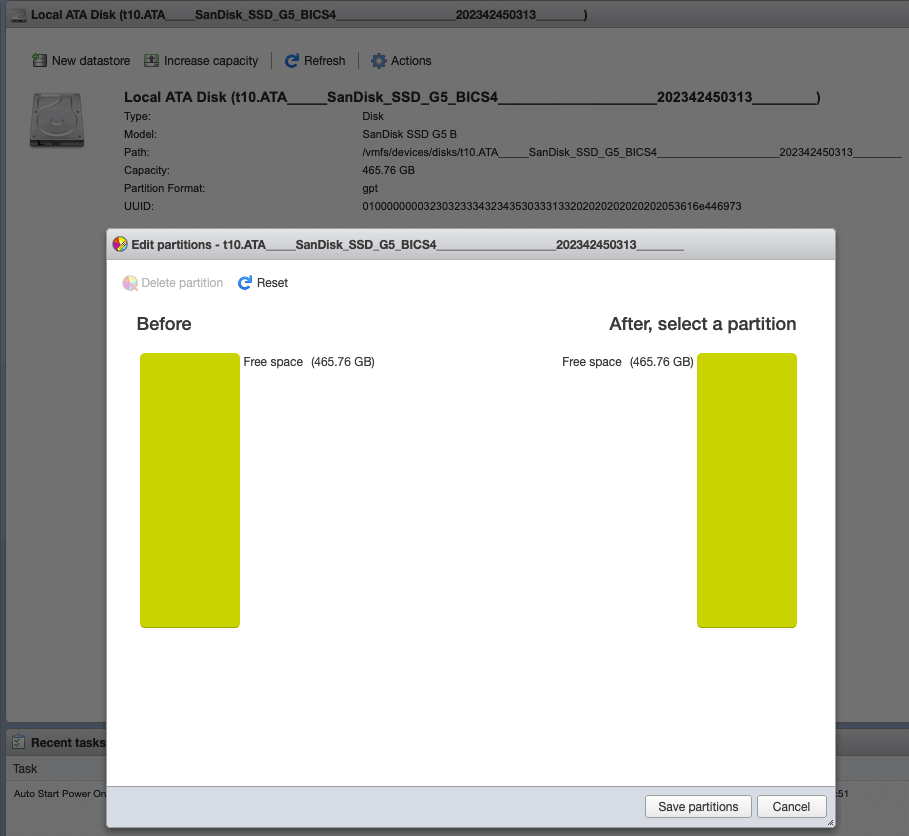
That’s it, we have wiped the VMFS partition from our ESXi.
Conclusion
To wipe out completely a VMFS partition we need to follow few steps by clearing the dumps. Until it’s not cleared we can’t remove the partition straight away. Hope you have found this useful, subscribe to our newsletter for more guides.