Introduction
Integrate RHEV or Ovirt with the Red Hat IDM or FreeIPA for User Authentication, During the RHEV-Manager installation, the default user “admin” will be created.
In a production environment, we need to follow the security standards by avoid using the default user accounts. Similarly in the RHEV environment, we will not use the default admin account. Instead, we will authenticate with an account and set the role similar to the admin account. Moreover, this account will not be created locally in RHEV-Manager, Instead, it will be created on Red Hat IDM or FreeIPA and managed from a centralized location. Then, we will authenticate with the created user on the RHEV platform and associate with the required role.
Related Guides
We have an old guide that helps to integrate with AD
- RHEV Manager version 3.x with the Active directory
- Up and running oVirt 4.3 on CentOS 7
- How to Create VLAN Interface for RHEV Virtualization
- Setup an Identity Management server in Linux using IPA
- Solution for IPA Error 4203: DatabaseError
- Setup a FreeIPA or IDM Replica
- Integrating IDM with AD (Active directory) using indirect cross-forest trust
My Setup Version
The version of the RHEV Manager used in my home lab is the latest one “Red Hat Virtualization Manager Version 4.4.6.8-0.1.el8ev”.
Let’s see how to integrate RHEV with Red Hat IDM for User authentications.
Default Installation
Before starting with Integration we have only the default internal local domain in RHEV Manager.
Getting Information
Before starting with any future steps, we need to gather a few Information for authentication with our IDM/FreeIPA server.
The most privileged account of IDM is admin and we need it for setup purposes.
# ldapsearch -x uid=adminFetch the required information for upcoming steps.
uid=admin,cn=users,cn=compat,dc=linuxsysadmins,dc=localWe have three numbers of IDM servers, IDM master, and two replicas.
idm1.linuxsysadmins.local   # Master
idm2.linuxsysadmins.local   # Replica 1
idm3.linuxsysadmins.local   # Replica 2
Begin with the setup
Run the below Ovirt command to start with the setup.
# ovirt-engine-extension-aaa-ldap-setupIt will prompt to provide with multiple entries
- Select the number “6” to authenticate with Red Hat IDM or FreeIPA server
- Accept the default option “Yes” for DNS
- Since I have 3 numbers of IDM setup I have opted for number 4 “Failover between multiple hosts”.
- Type the FQDN of your available IDM servers.
- Use startTLS for protocol.
- It’s stirclty advice to use CA certificate, However, I’m using Insecure in my home lab setup.
- Enter the Command Name (CN) entried fetched from LDAP, uid=admin,cn=users,cn=compat,dc=linuxsysadmins,dc=local
- Confirm the Distinguished Name (DN)
- Choose “No” for Virtual machine signle signon.
- Set a profile name, I have used “linuxsysadmins.local” as my profile name.
- Type the IDM “admin” account credentials
- Finally, type the “Done“.
At the end of the result, we should see properties files created.
/etc/ovirt-engine/aaa/linuxsysadmins.local.propertiesThe full output is for your reference.
[root@rhevm ~]# ovirt-engine-extension-aaa-ldap-setup
[ INFO  ] Stage: Initializing
[ INFO  ] Stage: Environment setup
          Configuration files: /etc/ovirt-engine-extension-aaa-ldap-setup.conf.d/10-packaging.conf
          Log file: /tmp/ovirt-engine-extension-aaa-ldap-setup-20210708113233-4i7vu2.log
          Version: otopi-1.9.4 (otopi-1.9.4-1.el8ev)
[ INFO  ] Stage: Environment packages setup
[ INFO  ] Stage: Programs detection
[ INFO  ] Stage: Environment customization
          Welcome to LDAP extension configuration program
          Available LDAP implementations:
           1 - 389ds
           2 - 389ds RFC-2307 Schema
           3 - Active Directory
           4 - IBM Security Directory Server
           5 - IBM Security Directory Server RFC-2307 Schema
           6 - IPA
           7 - Novell eDirectory RFC-2307 Schema
           8 - OpenLDAP RFC-2307 Schema
           9 - OpenLDAP Standard Schema
          10 - Oracle Unified Directory RFC-2307 Schema
          11 - RFC-2307 Schema (Generic)
          12 - RHDS
          13 - RHDS RFC-2307 Schema
          14 - iPlanet
          Please select: 6

          NOTE:
          It is highly recommended to use DNS resolution for LDAP server.
          If for some reason you intend to use hosts or plain address disable DNS usage.

          Use DNS (Yes, No) [Yes]:
          Available policy method:
           1 - Single server
           2 - DNS domain LDAP SRV record
           3 - Round-robin between multiple hosts
           4 - Failover between multiple hosts
          Please select: 4
          Please enter space separated list of hosts: idm1.linuxsysadmins.local idm2.linuxsysadmins.local  idm3.linuxsysadmins.local
[ INFO  ] Trying to resolve host 'idm1.linuxsysadmins.local'
[ INFO  ] Trying to resolve host 'idm2.linuxsysadmins.local'
[ INFO  ] Trying to resolve host 'idm3.linuxsysadmins.local'

          NOTE:
          It is highly recommended to use secure protocol to access the LDAP server.
          Protocol startTLS is the standard recommended method to do so.
          Only in cases in which the startTLS is not supported, fallback to non standard ldaps protocol.
          Use plain for test environments only.

          Please select protocol to use (startTLS, ldaps, plain) [startTLS]:
          Please select method to obtain PEM encoded CA certificate (File, URL, Inline, System, Insecure): Insecure
[ INFO  ] Connecting to LDAP using 'ldap://idm1.linuxsysadmins.local:389'
[ INFO  ] Executing startTLS
[ INFO  ] Connection succeeded
          Enter search user DN (for example uid=username,dc=example,dc=com or leave empty for anonymous): uid=admin,cn=users,cn=compat,dc=linuxsysadmins,dc=local
          Enter search user password:
[ ERROR ] Please specify value
          Enter search user password:
[ INFO  ] Attempting to bind using 'uid=admin,cn=users,cn=compat,dc=linuxsysadmins,dc=local'
          Please enter base DN (dc=linuxsysadmins,dc=local) [dc=linuxsysadmins,dc=local]:
          Are you going to use Single Sign-On for Virtual Machines (Yes, No) [Yes]: No
          Please specify profile name that will be visible to users : linuxsysadmins.local

[ INFO  ] Stage: Setup validation

          NOTE:
          It is highly recommended to test drive the configuration before applying it into engine.
          Login sequence is executed automatically, but it is recommended to also execute Search sequence manually after successful Login sequence.

          Please provide credentials to test login flow:
          Enter user name:
          Enter user password:
          [ INFO  ] Login sequence executed successfully
          Please make sure that user details are correct and group membership meets expectations (search for PrincipalRecord and GroupRecord titles).
          Abort if output is incorrect.
          Select test sequence to execute (Done, Abort, Login, Search) [Done]: Done
[ INFO  ] Stage: Transaction setup
[ INFO  ] Stage: Misc configuration (early)
[ INFO  ] Stage: Package installation
[ INFO  ] Stage: Misc configuration
[ INFO  ] Stage: Transaction commit
[ INFO  ] Stage: Closing up
          CONFIGURATION SUMMARY
          Profile name is: linuxsysadmins.local
          The following files were created:
              /etc/ovirt-engine/aaa/linuxsysadmins.local.properties
[ INFO  ] Stage: Clean up
          Log file is available at /tmp/ovirt-engine-extension-aaa-ldap-setup-20210708113233-4i7vu2.log:
[ INFO  ] Stage: Pre-termination
[ INFO  ] Stage: Termination
[root@rhevm ~]#
The content of created properties files will contain the below information.
[root@rhevm ~]# cat /etc/ovirt-engine/aaa/linuxsysadmins.local.properties
include = <ipa.properties>

vars.user = uid=admin,cn=users,cn=compat,dc=linuxsysadmins,dc=local
vars.password = Redhat@123

pool.default.auth.simple.bindDN = ${global:vars.user}
pool.default.auth.simple.password = ${global:vars.password}
pool.default.serverset.type = failover
pool.default.serverset.failover.00.server = idm1.linuxsysadmins.local
pool.default.serverset.failover.01.server = idm2.linuxsysadmins.local
pool.default.serverset.failover.02.server = idm3.linuxsysadmins.local
pool.default.ssl.startTLS = true
pool.default.ssl.insecure = true
[root@rhevm ~]#
Finally, restart the service.
# systemctl restart ovirt-engineThe command line part is done.
Configuring from the Web Interface
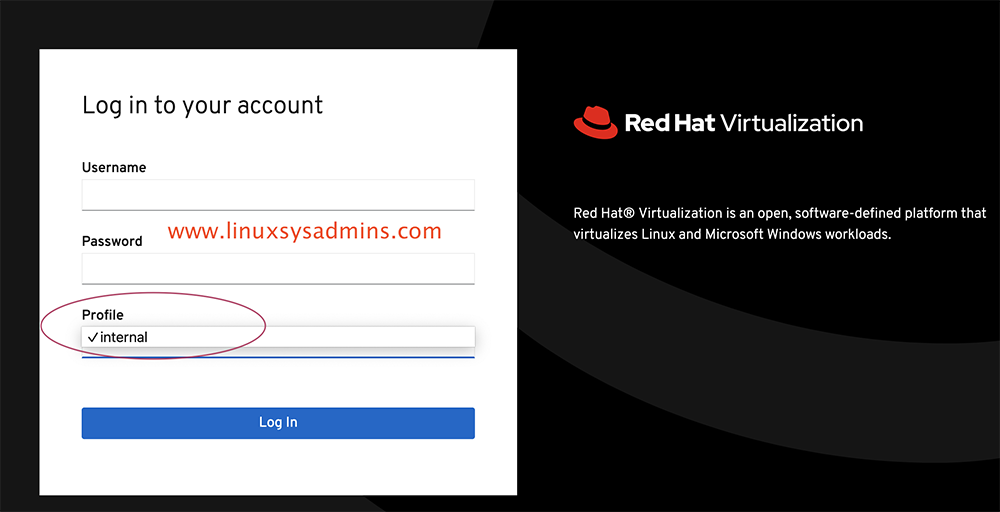
Login to the web Interface using default credentials admin and your password.
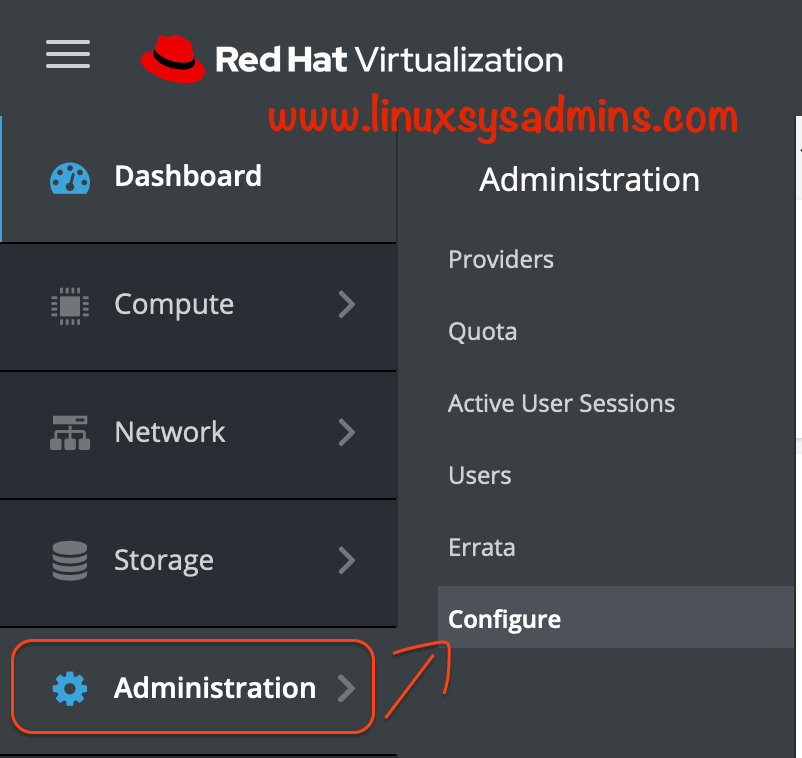
https://rhevm.linuxsysadmins.local/ovirt-engine/Navigate to the “Administration” menu from the left side pane and select “configure“.
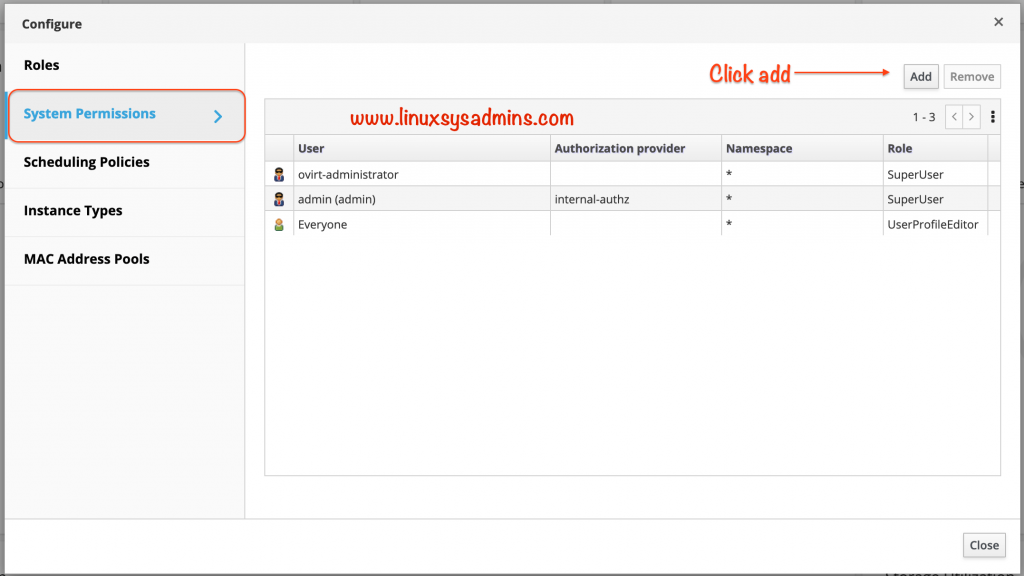
We should get a window similar to below to add the user.
Adding IDM User and Role
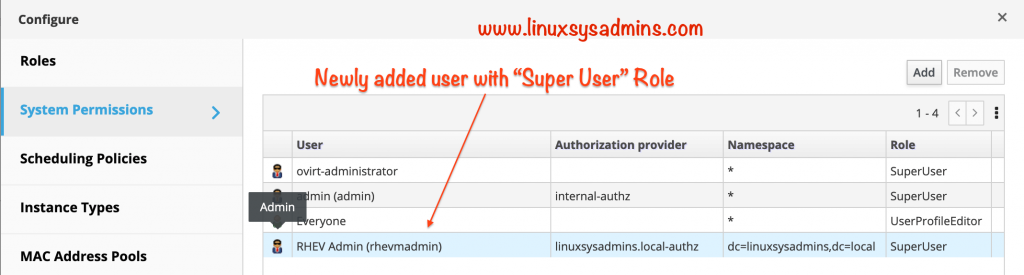
Click on System Permissions from the left side pane.
By default, we will have three numbers of users that come with the default installation. Before adding a new user from IDM we should get the below three users.
Click the Add at the right top corner to add the new user.
We will get another pop-up window as shown below.
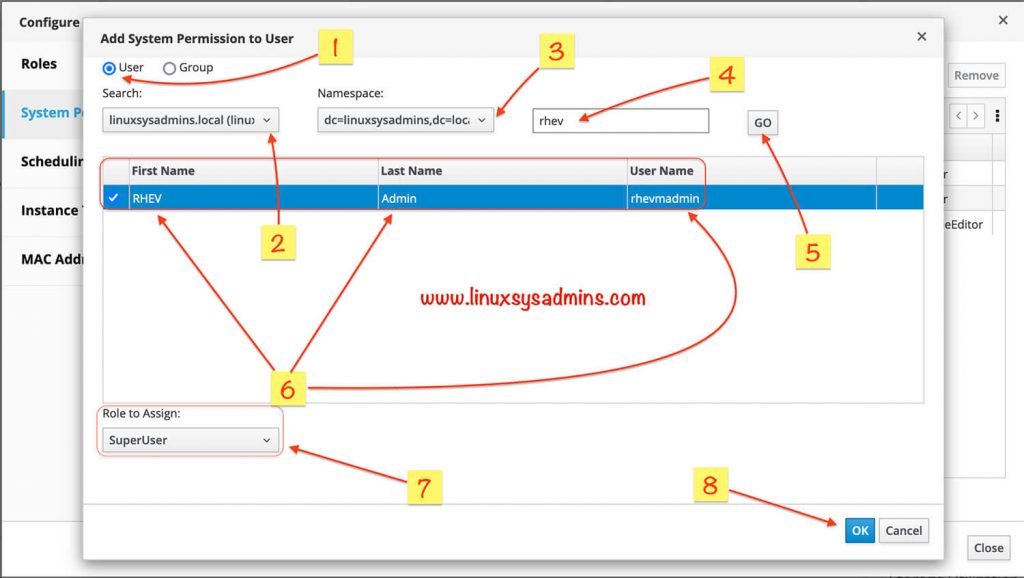
- Select the User radio button.
- select your domain profile name, In my case linuxsysadmins.local.
- Select the namespace.
- Type the username or it’s keyword
- Click “Go” to search the user.
- Once the user found it will be listed with First Name, Last Name and User Name. Select it by clicking on the check box.
- Select the role which you planned to assign for the specific user.
- Finally, click Ok to save the changes.
Now we could see an additional one more user with admin privilege.
Logout from the default admin user session.
Test the New User
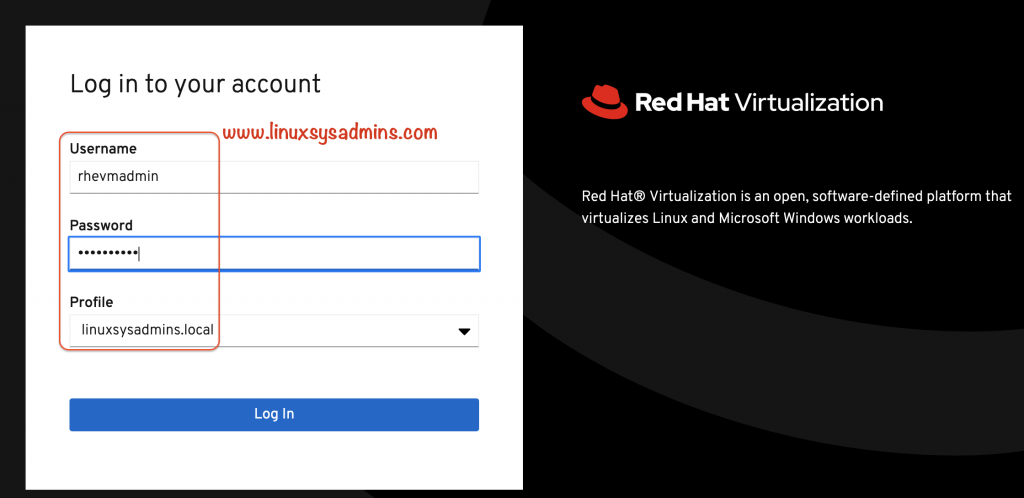
Now we could see the newly added profile to log in and use the IDM users.
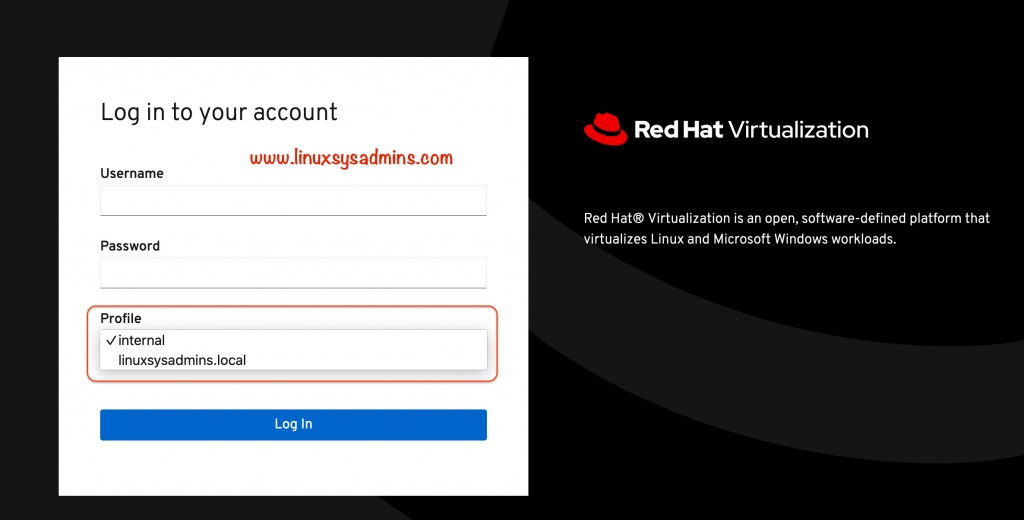
Try to log in with the user created in the IDM server.
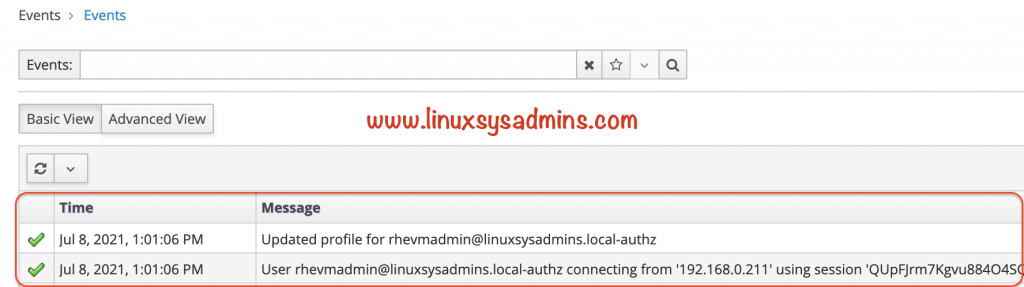
We could see the successful login events from the RHEV-Manager event section.
Additionally, we could see the active user session by navigating to
Administration --> User Sessions
That’s it, we have successfully integrated an IDM user with the RHEV Virtualization Environment.
Conclusion:
Integrating IDM or FreeIPA with the RHEV and Ovirt for User authentication is required in all types of environments. This helps to manage and track the user activity in the RHEVM and Ovirt Virtualization platform. Subscribe to the newsletter and stay tuned for more RHEV and OVirt related how-to-guides.